


關於Nginx
款高性能、輕量級Web服務軟件
-
穩定性高
-
系統資源消耗低
-
對HTTP併發連接的處理能力高
- 單臺物理服務器可支持30000 ~ 50000個併發請求
Nginx編譯安裝
1.宿主機共享所需的工具包
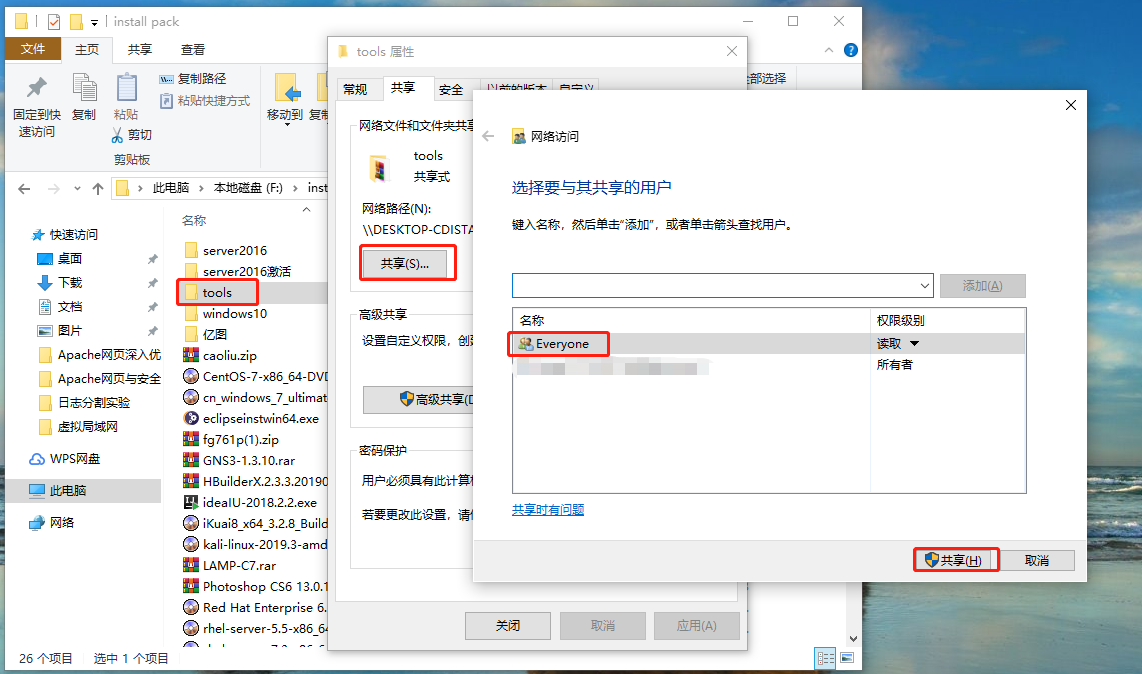
2.虛擬機掛載共享目錄
[root@localhost ~]# smbclient -L //192.168.100.50/
Enter SAMBA\root's password:
OS=[Windows 10 Enterprise LTSC 2019 17763] Server=[Windows 10 Enterprise LTSC 2019 6.3]

    Sharename       Type      Comment
    ---------       ----      -------
    IPC$            IPC       遠程 IPC
    share           Disk
    tools           Disk
    Users           Disk
Connection to 192.168.100.50 failed (Error NT_STATUS_RESOURCE_NAME_NOT_FOUND)
NetBIOS over TCP disabled -- no workgroup available
[root@localhost ~]# mkdir /mnt/tools
[root@localhost ~]# mount.cifs //192.168.100.50/tools /mnt/tools/
Password for root@//192.168.100.50/tools:
[root@localhost ~]# cd /mnt/tools/
[root@localhost tools]# ls
awstats-7.6.tar.gz                extundelete-0.2.4.tar.bz2  forbid.png                 jdk-8u191-windows-x64.zip  LAMP-C7  picture.jpg
cronolog-1.6.2-14.el7.x86_64.rpm  fiddler.exe                intellijideahahau2018.rar  john-1.8.0.tar.gz          LNMP
[root@localhost tools]#
3.解壓Nginx源碼包
[root@localhost tools]# cd LNMP/
[root@localhost LNMP]# ls
Discuz_X3.4_SC_UTF8.zip  mysql-boost-5.7.20.tar.gz  nginx-1.12.2.tar.gz  php-7.1.20.tar.gz
[root@localhost LNMP]# tar zxvf nginx-1.12.2.tar.gz -C /opt/
.......//省略解壓過程
4.安裝編譯Nginx所需環境包
[root@localhost LNMP]# yum -y install gcc gcc-c++ pcre-devel zlib-devel
........//省略安裝過程
[root@localhost LNMP]#
5.新建一個程序用戶nginx
[root@localhost LNMP]# useradd -M -s /sbin/nologin nginx   //-M,不創建家目錄
[root@localhost LNMP]# id nginx     //查看nginx用戶
uid=1001(nginx) gid=1001(nginx) 組=1001(nginx)
[root@localhost LNMP]#
6.配置Nginx服務
[root@localhost LNMP]# cd /opt/nginx-1.12.2/
[root@localhost nginx-1.12.2]# ls
auto  CHANGES  CHANGES.ru  conf  configure  contrib  html  LICENSE  man  README  src
[root@localhost nginx-1.12.2]# ./configure \
> --prefix=/usr/local/nginx \           //安裝路徑
> --user=nginx \             //屬主
> --group=nginx \          //屬組
> --with-http_stub_status_module    //開啓統計模塊
........//省略配置過程
7.編譯安裝Nginx服務
[root@localhost nginx-1.12.2]# make && make install
.........//省略編譯過程
[root@localhost nginx-1.12.2]#
8.優化nginx命令執行路徑
[root@localhost nginx-1.12.2]# cd /usr/local/nginx/
[root@localhost nginx]# ls
conf  html  logs  sbin
[root@localhost nginx]# cd sbin/
[root@localhost sbin]# ls
nginx
[root@localhost sbin]# ln -s /usr/local/nginx/sbin/nginx /usr/local/sbin/
[root@localhost sbin]#
9.開啓nginx服務
[root@localhost sbin]# nginx -t   //檢查測試配置文件
nginx: the configuration file /usr/local/nginx/conf/nginx.conf syntax is ok
nginx: configuration file /usr/local/nginx/conf/nginx.conf test is successful
[root@localhost sbin]# nginx    //開啓服務
[root@localhost sbin]# netstat -ntap | grep 80  //查看80端口
tcp        0      0 0.0.0.0:80              0.0.0.0:*               LISTEN      52709/nginx: master
[root@localhost sbin]#
10.關閉防火牆和增強性安全功能
[root@localhost sbin]# systemctl stop firewalld.service   //關閉防火牆
[root@localhost sbin]# setenforce 0   //關閉增強性安全功能
[root@localhost sbin]#
11.安裝elinks工具,測試nginx服務
[root@localhost sbin]# yum install elinks -y   //安裝工具
.........//省略安裝過程
[root@localhost sbin]#
[root@localhost sbin]# elinks http://localhost    //測試能否訪問nginx服務
12.用瀏覽器測試能否訪問nginx服務(訪問成功)

Nginx服務優化
1.nginx服務基礎命令
[root@localhost sbin]# killall -s QUIT nginx     //停止服務
[root@localhost sbin]# killall -3 nginx        //停止服務
[root@localhost sbin]# killall -s HUP nginx     //重載服務
[root@localhost sbin]# killall -1 nginx     //重載服務
[root@localhost sbin]# nginx    //啓動服務
2.製作管理服務的腳本
[root@localhost sbin]# vim /etc/init.d/nginx

#!/bin/bash
# chkconfig: - 99 20
# description: Nginx Service Control Script
PROG="/usr/local/nginx/sbin/nginx"
PIDF="/usr/local/nginx/logs/nginx.pid"
case "$1" in
  start)
    $PROG
    ;;
  stop)
    kill -s QUIT $(cat $PIDF)
    ;;
  restart)
    $0 stop
    $0 start
    ;;
  reload)
    kill -s HUP $(cat $PIDF)
    ;;
  *)
        echo "Usage: $0 {start|stop|restart|reload}"
        exit 1
esac
exit 0
[root@localhost sbin]# chmod +x /etc/init.d/nginx    //添加執行權限
[root@localhost sbin]# chkconfig --add nginx   //添加讓系統可以識別
[root@localhost sbin]#
3.測試服務管理腳本
[root@localhost sbin]# service nginx stop    //停止服務
[root@localhost sbin]# netstat -ntap | grep 80   //查看80端口,無
[root@localhost sbin]# service nginx start    //開啓服務
[root@localhost sbin]# netstat -ntap | grep 80   //查看80端口,有
tcp        0      0 0.0.0.0:80              0.0.0.0:*               LISTEN      53614/nginx: master
[root@localhost sbin]#
4.修改配置文件,開啓統計功能
[root@localhost sbin]# vim /usr/local/nginx/conf/nginx.conf

        location / {
            root   html;
            index  index.html index.htm;
        }
        location /status {
            stub_status on;
            access_log off;
        }

[root@localhost sbin]# service nginx stop
[root@localhost sbin]# service nginx start
[root@localhost sbin]#
5.測試統計功能

Nginx服務訪問控制
1.修改配置文件,開啓密碼訪問功能
[root@localhost sbin]# vim /usr/local/nginx/conf/nginx.conf
        location / {
            auth_basic "secret";
            auth_basic_user_file /usr/local/nginx/passwd.db;
            root   html;
            index  index.html index.htm;
        }
        location /status {
            stub_status on;
            access_log off;
        }
[root@localhost sbin]#
2.安裝密碼訪問工具
[root@localhost sbin]# yum install httpd-tools -y
........//省略安裝過程
[root@localhost sbin]#
3.創建訪問登錄的用戶和密碼
[root@localhost sbin]# htpasswd -c /usr/local/nginx/passwd.db test
New password:
Re-type new password:
Adding password for user test
[root@localhost sbin]# cat /usr/local/nginx/passwd.db
test:$apr1$od5a34WH$MduYUJbQ2W0oihB0Bs/bx.
[root@localhost sbin]#
[root@localhost sbin]# service nginx stop
[root@localhost sbin]# service nginx start
[root@localhost sbin]#
4.測試訪問控制(成功)

