


SpringBoot 項目通常將一些重要的參數配置在application.yml或者application.properites中,譬如外部服務連接、數據庫地址及賬號信息、某些業務變量。隨着業務的開展,實現一個完整的業務流程通常需要開發並管理多個微服務,一旦這些參數調整,需要修改多個微服務的配置並重啓,這將給運維及生產帶來額外的工作和影響。爲了解決這個問題,我們可以將這些配置抽取到一個公共的地方,可參照另一篇文章“Spring Cloud 微服務公共配置處理請添加鏈接描述”,將微服務的公共配置抽取出來。完成抽取只是第一步,一旦數據庫的賬號或者外部服務連接修改,服務還是需要逐個重啓,如何解決這個問題呢?
Spring Cloud的message和integration機制,允許我們通過cloud bus,將變更通知到每一個服務,實現動態刷新,其架構設計如下(摘自網絡)

實現這個過程,需要引入spring cloud的相關組件:註冊服務、消息服務、集成服務、配置服務等,以及一個可用的消息隊列。下面我將以Springboot2.1.8,cloud版本Greenwich.SR3爲例,介紹如何實現。
服務清單
- EurekaServer - 註冊服務,實際項目可選其他,此處僅作示例。
- ConfigServer - 配置服務
- ConfigClient1 - 微服務應用1,通過config server獲取配置
- ConfigClient2 - 微服務應用2,通過config server獲取配置
- RabbitMQ - 消息服務,用來接收和轉發 bus消息
- Git服務 - 配置文件的存儲和修改,實際項目中可選其他替代方案,此處僅作示例。
1. EurekaServer
Eureka服務比較簡單,配置和啓動效果如下。
server:
  port: 7777
eureka:
  instance:
    hostname: localhost
  client:
    register-with-eureka: false
    fetch-registry: false
    service-url:
      default-zone: http://${eureka.instance.hostname}:${server.port}/eureka/
2. ConfigServer
Configserver需要引入bus-amqp,pom配置如下:
-
boot相關
<dependency> <groupId>org.springframework.boot</groupId> <artifactId>spring-boot-autoconfigure</artifactId> </dependency> <dependency> <groupId>org.springframework.boot</groupId> <artifactId>spring-boot-starter-web</artifactId> </dependency> <dependency> <groupId>org.springframework.boot</groupId> <artifactId>spring-boot-starter-amqp</artifactId> </dependency> - cloud相關
<dependency>
        <groupId>org.springframework.cloud</groupId>
        <artifactId>spring-cloud-starter</artifactId>
    </dependency>
    <dependency>
        <groupId>org.springframework.cloud</groupId>
        <artifactId>spring-cloud-config-server</artifactId>
    </dependency>
    <dependency>
        <groupId>org.springframework.cloud</groupId>
        <artifactId>spring-cloud-starter-config</artifactId>
    </dependency>
    <dependency>
        <groupId>org.springframework.cloud</groupId>
        <artifactId>spring-cloud-context</artifactId>
    </dependency>
    <dependency>
        <groupId>org.springframework.cloud</groupId>
        <artifactId>spring-cloud-commons</artifactId>
    </dependency>
    <dependency>
        <groupId>org.springframework.cloud</groupId>
        <artifactId>spring-cloud-bus</artifactId>
    </dependency>
    <dependency>
        <groupId>org.springframework.cloud</groupId>
        <artifactId>spring-cloud-starter-bus-amqp</artifactId>
    </dependency>
    <dependency>
        <groupId>org.springframework.cloud</groupId>
        <artifactId>spring-cloud-config-monitor</artifactId>
    </dependency>
    <dependency>
        <groupId>org.springframework.cloud</groupId>
        <artifactId>spring-cloud-netflix-eureka-client</artifactId>
    </dependency>
    <dependency>
        <groupId>org.springframework.cloud</groupId>
        <artifactId>spring-cloud-starter-netflix-eureka-client</artifactId>
    </dependency>
    <dependency>
        <groupId>org.springframework.cloud</groupId>
        <artifactId>spring-cloud-stream</artifactId>
    </dependency>
application的配置如下,
-
spring config相關:
![SpringBoot項目中的配置文件如何動態刷新]()
- management相關:
![SpringBoot項目中的配置文件如何動態刷新]()


3. ConfigClient01 和ConfigClient02
- bootstrap.yml配置
![SpringBoot項目中的配置文件如何動態刷新]()

management的配置是爲了支持bus-fresh,rabbitmq需要同時配置在bootstrap和application中。
- application配置
![SpringBoot項目中的配置文件如何動態刷新]()

主要包括eureka配置,rabbitmq配置及用來測試ext.key。configclient02的配置和01幾乎一致,僅端口和應用名稱不同。
所以服務啓動後,可以看到eureka的管理界面如下: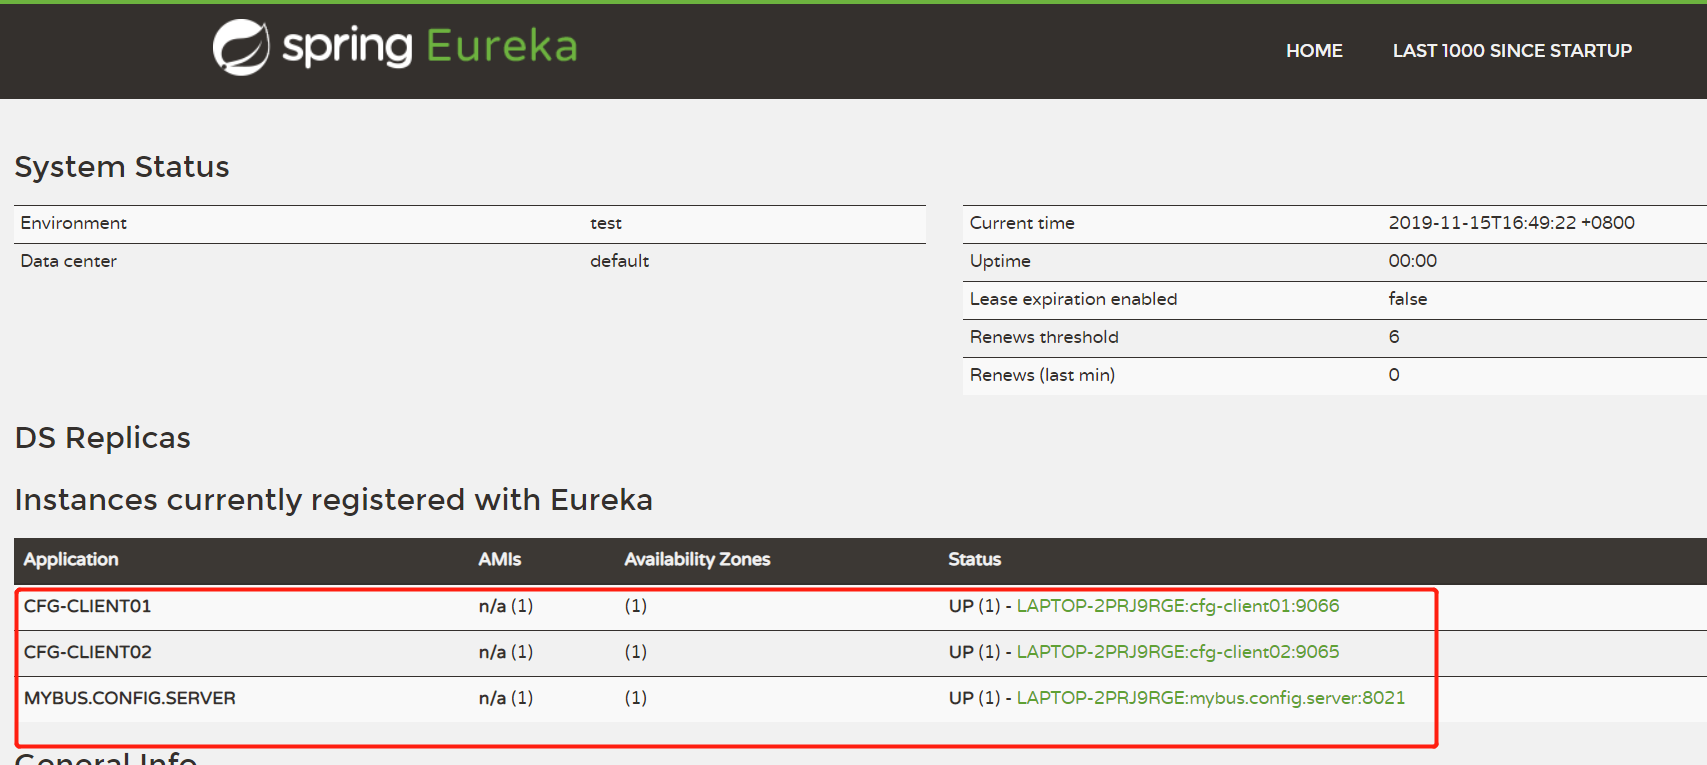
4. git倉庫中配置服務application文件的替代版

內容分別如下:
ext.key=hello client 111
ext.key=hello client 222
這個時候就可以測試了。測試方式可以通過瀏覽器訪問configserver,直接請求配置文件,也可以通過程序測試,先說通過瀏覽器訪問。
springboot項目啓動時,如果引入了config-client和context包,則會自動根據bootstrap指定的地址獲取配置,請求方式如下:
http://${spring.cloud.config.uri}/${spring.cloud.config.name}/<spring.cloud.config.profile>/<lspring.cloud.config.label>, 參照bootstrap.yml的定義。
這個項目直接請求:http://localhost:8021/cfg_client01/dev/aliyun_dev, 返回如下:
這種請求方式,也是springboot項目啓動時初始化的請求方式。
下面以更實際的方式測試,在controller中引用一個變量,ext.key, 查看屬性的變化。
@RestController
@RequestMapping("/test")
@RefreshScope
public class IndexController {

    @Value("${ext.key}")
    private String key;

    @GetMapping("/key")
    public String printKey() {
        return key;
    }
}
controller很簡單,唯一需要注意的是,一定要加上@RefreshScope,因爲spring在刷新時,會基於這個註解,確定要不要刷新bean或者方法內的引用屬性。
第一次直接請求:

現在修改git上的配置文件,將ext.key改成111000和222000。

這個時候就可以調用spring的bus-refresh了。調用refresh的時候,可以直接調用server的,也可以調用某個具體的client,我希望一次刷新,所有的變更都生效,所以直接調用configserver的bus-refresh。當然,也有人將git的commit配置成hookurl,但這種方式在生產環境會有些風險,我們的做法是,配置文件修改並確認提交後,手動執行一次bus-refrehs。

刷新完成後,分別在請求extkey,查看返回: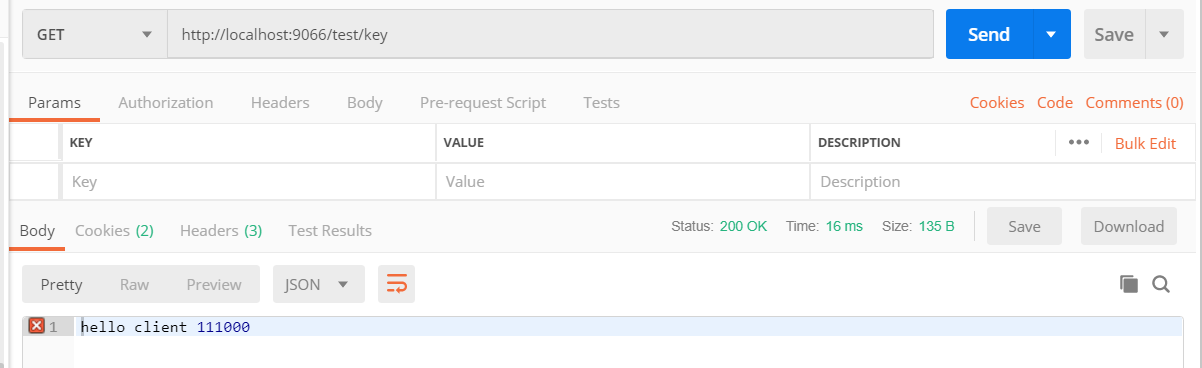

可以看到兩個應用服務的屬性都已經刷新。實現刷新的關鍵有以下幾個:
- 消息隊列的在bootstrap和applicaiton中同時配置
- management.endpoints.web.exposure.include屬性需要配成"*"或者 bus-refresh,因爲這個地址默認不支持,直接調用會出現404.
- 驗證服務,網上很多介紹都需要關閉,我測試過程中,沒有關閉,但是可以直接訪問。實踐者可以根據自己的服務配置調整。
基於此,我們就實踐了配置文件中屬性的動態刷新,實現一次刷新,所有服務生效。這種@Value引用的屬性可以這麼刷新,那麼數據庫連接參數呢?下一篇文章,我將介紹如何通過刷新機制,實現在不重啓服務的前提下,動態修改數據庫的連接參數或者密碼。