


通過博文Nginx初步優化就已經瞭解了Nginx的基礎概念,已經可以對Nginx進行初步的優化了,包括:Nginx平滑升級
、更改Nginx版本信息、Nginx虛擬主機配置、nginx配置文件中location選項的作用等等。本篇博文主要針對Nginx進行進一步的優化。
博文大綱:
一、Nginx配置反向代理
二、Nginx的proxy緩存使用
三、優化Nginx服務的壓縮功能
一、Nginx配置反向代理
配置Nginx作爲反向代理和負載均衡,同時利用其緩存功能,將靜態頁面在Nginx中緩存,以達到降低後端服務器連接數的目的並檢查後端web服務器的檢查狀態。
如圖: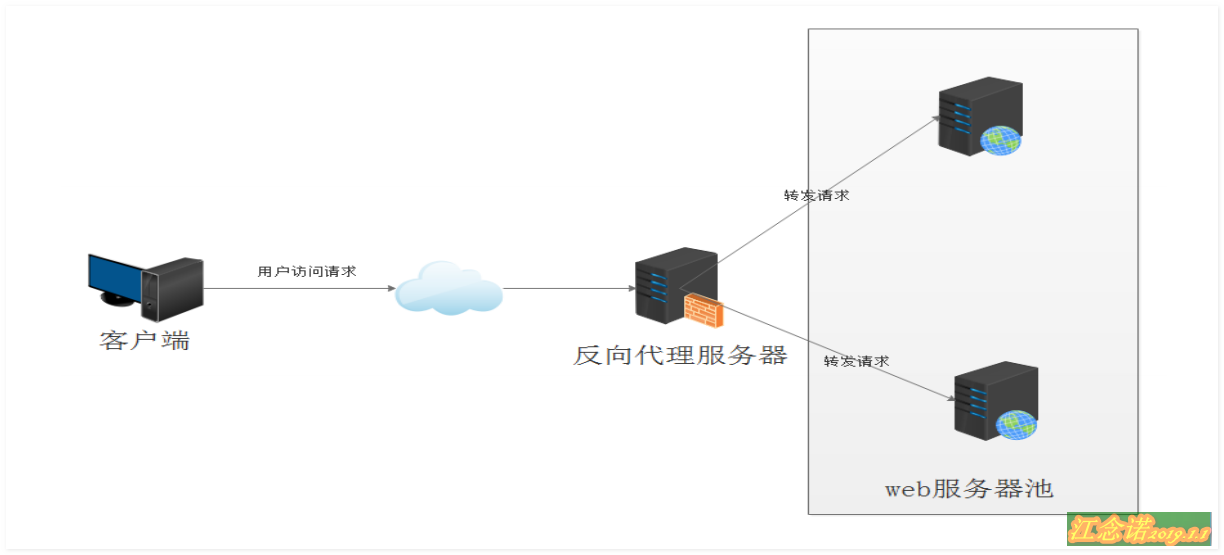
環境需求:
一臺Nginx服務器(Centos系統)IP地址:192.168.1.1;
兩臺httpd服務器(Centos系統)IP地址:192.168.1.2 192.168.1.3;
下載Nginx軟件包
安裝Nginx:
[root@localhost ~]#  yum -y install gcc gcc-c++ make libtool zlib zlib-devel pcre pcre-devel openssl openssl-devel
//如果安裝系統時,是最小化安裝,則需要安裝以上依賴包
[root@localhost ~]# yum -y install pcre-devel zlib-devel  openssl-devel
//如果系統不是最小安裝,則安裝以上幾個依賴包即可
[root@localhost ~]#  unzip nginx-sticky-module.zip -d /usr/src/
//使用 nginx-sticky-module 擴展模塊實現 Cookie 會話黏貼(保持會話)
[root@localhost ~]# tar zxf ngx_brotli.tar.gz -C /usr/src/
[root@localhost ~]# tar zxf ngx_cache_purge-2.3.tar.gz -C /usr/src/
//使用 ngx_cache_purge 實現更強大的緩存清除功能
//安裝Nginx源碼依賴包
[root@localhost ~]# tar zxf nginx-1.14.0.tar.gz -C /usr/src/
[root@localhost ~]# cd /usr/src/nginx-1.14.0/
[root@localhost nginx-1.14.0]# ./configure --prefix=/usr/local/nginx --user=nginx \
  --group=nginx --with-http_stub_status_module --with-http_realip_module \
  --with-http_ssl_module --with-http_gzip_static_module \
  --http-client-body-temp-path=/var/tmp/nginx/client \
  --http-proxy-temp-path=/var/tmp/nginx/proxy \
  --http-fastcgi-temp-path=/var/tmp/nginx/fcgi --with-pcre \
 --add-module=/usr/src/ngx_cache_purge-2.3/ --with-http_flv_module \
 --add-module=/usr/src/nginx-sticky-module/  && make && make install
配置選項含義:
- --prefix=/usr/local/nginx:指定Nginx存放路徑;
- --with-http_stub_status_module:通過網頁方式監控nginx狀態;
- --with-http_realip_module:顯示客戶端真是IP;
- --with-http_ssl_module:開啓Nginx的加密傳輸功能;
- --with-http_gzip_static_module:開啓Nginx擴展壓縮模塊;
- --http-client-body-temp-path=/var/tmp/nginx/client:客戶端訪問數據臨時存放路徑;
- --http-proxy-temp-path=/var/tmp/nginx/proxy:同上;
- --http-fastcgi-temp-path=/var/tmp/nginx/fcgi:同上;
- --with-pcre:支持正則匹配表達式;
- --add-module=/usr/src/ngx_cache_purge-2.3: 添加第三方模塊,並指定第三方模塊路徑,支持緩存;
- --with-http_flv_module:支持flv視頻流;
- --add-module=/usr/src/nginx-sticky-module: 添加第三方模塊,並指定第三方模塊路徑,添加第三方模塊格式:--add-module=源碼解壓後的路徑;
[root@localhost ~]# ln -s /usr/local/nginx/sbin/nginx /usr/local/sbin/
//創建符號鏈接
[root@localhost ~]# vim /usr/local/nginx/conf/nginx.conf
//編寫Nginx主配置文件
 …………            //省略部分內容
http {
    include       mime.types;
    default_type  application/octet-stream;
    upstream lzj {          //定義服務器羣組,名稱爲lzj
        sticky;           //session會話保持
        server 192.168.1.2:80 weight=1 max_fails=2 fail_timeout=10s;
        server 192.168.1.3:80 weight=1 max_fails=2 fail_timeout=10s;
    }
    //定義了後臺兩臺服務器,權重分別爲1,最大失敗次數爲2,最大超時時間爲10S
        location / {
                proxy_pass http://lzj;
        }
        //將原本的location規則註釋,並重新定義轉發到定義的lzj
[root@localhost ~]# nginx -t               //檢測配置文件
nginx: the configuration file /usr/local/nginx/conf/nginx.conf syntax is ok
nginx: [emerg] getpwnam("nginx") failed
nginx: configuration file /usr/local/nginx/conf/nginx.conf test failed
[root@localhost ~]# useradd -s /sbin/nologin -M nginx
//創建Nginx用戶,並不允許登錄操作系統
[root@localhost ~]# nginx -t                   //檢測配置文件
nginx: the configuration file /usr/local/nginx/conf/nginx.conf syntax is ok
nginx: [emerg] mkdir() "/var/tmp/nginx/client" failed (2: No such file or directory)
nginx: configuration file /usr/local/nginx/conf/nginx.conf test failed
[root@localhost ~]# mkdir -p /var/tmp/nginx/client
//創建目錄,用於存放客戶端訪問數據臨時存放路徑
[root@localhost ~]# nginx -t
nginx: the configuration file /usr/local/nginx/conf/nginx.conf syntax is ok
nginx: configuration file /usr/local/nginx/conf/nginx.conf test is successful
//表示配置文件沒有問題
[root@localhost ~]# nginx                 //啓動Nginx
[root@localhost ~]# nginx -V              //可以查看編譯時,使用的配置參數
nginx version: nginx/1.14.0
built by gcc 4.8.5 20150623 (Red Hat 4.8.5-39) (GCC)
built with OpenSSL 1.0.2k-fips  26 Jan 2017
TLS SNI support enabled
configure arguments: --prefix=/usr/local/nginx --user=nginx --group=nginx --with-http_stub_status_module --with-http_realip_module --with-http_ssl_module --with-http_gzip_static_module --http-client-body-temp-path=/var/tmp/nginx/client --http-proxy-temp-path=/var/tmp/nginx/proxy --http-fastcgi-temp-path=/var/tmp/nginx/fcgi --with-pcre --add-module=/usr/src/ngx_cache_purge-2.3/ --with-http_flv_module --add-module=/usr/src/nginx-sticky-module/
測試機操作如下:
第一臺:
[root@localhost ~]# yum -y install httpd
[root@localhost ~]# echo "192.168.1.2" > /var/www/html/index.html
[root@localhost ~]# systemctl start httpd
第二臺:
[root@localhost ~]# yum -y install httpd
[root@localhost ~]# echo "192.168.1.3" > /var/www/html/index.html
[root@localhost ~]# systemctl start httpd
Nginx測試效果:
[root@localhost ~]# curl 127.0.0.1
192.168.1.2
[root@localhost ~]# curl 127.0.0.1
192.168.1.3注意:如果需要在已經安裝好的Nginx服務器上添加第三方模塊,依然需要重新編譯,但爲了不覆蓋原本的配置信息,請不要執行make install,而是直接複製可執行文件即可!
添加Nginx爲系統服務腳本:
[root@localhost ~]# vim /etc/init.d/nginx
#!/bin/bash
# chkconfig: 2345 99 20
# description: Nginx Service Control Script
PROG="/usr/local/nginx1.10/sbin/nginx"
PIDF="/usr/local/nginx1.10/logs/nginx.pid"
case "$1" in
        start)
           netstat -anplt |grep ":80" &> /dev/null && pgrep "nginx" &> /dev/null
           if [ $? -eq 0 ]
           then
              echo "Nginx service already running."
           else
              $PROG -t &> /dev/null
              if [ $? -eq 0 ] ; then
                $PROG
                echo "Nginx service start success."
              else
                $PROG -t
              fi
           fi
        ;;
        stop)
           netstat -anplt |grep ":80" &> /dev/null && pgrep "nginx" &> /dev/null
           if [ $? -eq 0 ]
           then
                kill -s QUIT $(cat $PIDF)
                echo "Nginx service stop success."
            else
                echo "Nginx service already stop"
            fi
        ;;
        restart)
                $0 stop
                $0 start
        ;;
        status)
           netstat -anplt |grep ":80" &> /dev/null && pgrep "nginx" &> /dev/null
           if [ $? -eq 0 ]
           then
                echo "Nginx service is running."
           else
                echo "Nginx is stop."
           fi
        ;;
        reload)
           netstat -anplt |grep ":80" &> /dev/null && pgrep "nginx" &> /dev/null
           if [ $? -eq 0 ]
           then
                $PROG -t &> /dev/null
              if [ $? -eq 0 ] ; then
                kill -s HUP $(cat $PIDF)
                echo "reload Nginx config success."
              else
                $PROG -t
              fi
           else
                echo "Nginx service is not run."
           fi
        ;;
        *)
                echo "Usage: $0 {start|stop|restart|reload}"
                exit 1
        esac
[root@localhost ~]#  chmod +x /etc/init.d/nginx
[root@localhost ~]#  chkconfig --add nginx
[root@localhost ~]# systemctl restart nginx
二、Nginx的proxy緩存使用
緩存也就是將一些靜態文件從後端服務器緩存到nginx指定的緩存目錄下,既可以減輕後端服務器負擔,也可以加快訪問速度,但這樣緩存及時清理就成了一個頭疼的問題。所以需要第三方模塊ngx_cache_purge來在過期時間未到之前,手動清理緩存。
proxy模塊常用的指令是proxy_pass和proxy_cache
nginx的web緩存功能只要就是由proxy_cache、fastcgi_cache指令集和相關指令集完成:
- proxy_cache:負責反向代理緩存後端服務器的靜態內容;
- fastcgi_cache:主要用來處理fastcgi動態進程緩存;
爲了使nginx能夠擁有緩存功能,需要修改其配置文件,如下:
[root@localhost ~]# vim /usr/local/nginx/conf/nginx.conf
…………    //省略部分內容
log_format  main  '$remote_addr - $remote_user [$time_local] "$request" '
                      '$status $body_bytes_sent "$http_referer" '
                      '"$http_user_agent" "$http_x_forwarded_for"'
                      '"$upstream_cache_status"';            //記錄緩衝命中率,注意這是一個整段,所以只在末尾有一個分號
//以上內容原本已經存在,只需添加最後一行即可!
    access_log  logs/access.log  main;
     proxy_buffering on;        //代理時,開啓緩衝後端服務器的響應
    proxy_temp_path /usr/local/nginx/proxy_temp;        //定義緩存臨時目錄
    proxy_cache_path /usr/local/nginx/proxy_cache levels=1:2 keys_zone=my-cache:100m inactive=600m max_size=2g;
//定義緩存目錄,具體信息已在配置文件外部進行說明
…………    //省略部分內容
        location ~/purge(/.*) {                 //定義緩存清除策略
                allow 127.0.0.1;
                allow 192.168.1.0/24;
                deny all;
                proxy_cache_purge my-cache $host$1$is_args$args;
        }

        location / {
                proxy_pass http://lzj;            //請求轉向lzj定義的服務器列表
                proxy_redirect off;            指定是否修改被代理服務器返回的響應頭中的 location 頭域跟 refresh 頭域數值
#例如:
# 設置後端服務器“Location”響應頭和“Refresh”響應頭的替換文本。 假設後端服務器返回的
# 響應頭是 “Location: http://localhost:8000/two/some/uri/”,那麼指令proxy_redirect
# http://localhost:8000/two/ http://frontend/one/;將把字符串改寫爲 “Location:
# http://frontend/one/some/uri/”。
                proxy_set_header Host $host;    //允許重新定義或者添加發往後端服務器的請求頭
#Host 的含義是表明請求的主機名,nginx 反向代理服務器會向後端真實服務器發送請求,
#並且請求頭中的host字段重寫爲proxy_pass指令設置的服務器。因爲nginx作爲反向代理使
#用,而如果後端真實的服務器設置有類似防盜鏈或者根據 http 請求頭中的 host 字段來進行
#路由或判斷功能的話,如果反向代理層的nginx不重寫請求頭中的host字段,將會導致請求失敗。
                proxy_set_header X-Real-IP $remote_addr;
                                //web 服務器端獲得用戶的真實 ip 但是,實際上要獲得用戶的真實 ip,也可以通過下面的X-Forward-For

                proxy_set_header X-Forwarded-For $proxy_add_x_forwarded_for;
                                #後端的 Web服務器可以通過 X-Forwarded-For 獲取用戶真實 IP,X_Forward_For 字段
#表示該條 http 請求是有誰發起的?如果反向代理服務器不重寫該請求頭的話,那麼後端
#真實服務器在處理時會認爲所有的請求都來自反向代理服務器,如果後端有防護策略
#的話,那麼機器就被封掉了。因此,在配置用作反向代理的 nginx 中一般會增加兩條配置,以便修改 http 的請求頭部
                proxy_next_upstream error timeout invalid_header http_500 http_502 http_503 http_504;
                                #增加故障轉移,如果後端的服務器返回 502、504、執行超時等錯誤,
#自動將請求轉發到upstream 負載均衡池中的另一臺服務器,實現故障轉移。
                proxy_cache my-cache;
                add_header Nginx-Cache $upstream_cache_status;
                proxy_cache_valid 200 304 301 302 8h;
                proxy_cache_valid 404 1m;
                proxy_cache_valid any 1d;
                proxy_cache_key $host$uri$is_args$args;
                expires 30d;
        }
[root@localhost ~]# nginx -t
nginx: the configuration file /usr/local/nginx/conf/nginx.conf syntax is ok
nginx: configuration file /usr/local/nginx/conf/nginx.conf test is successful
//檢測配置文件沒有問題
[root@localhost ~]# nginx -s reload            //重新加載nginx配置文件
配置選項詳解:
- levels=1:2 keys_zone=my-cache:100m 表示採用 2 級目錄結構,第一層目錄只有一個字符,是由 levels=1:2 設置,總共二層目錄,子目錄名字由二個字符組成。Web 緩存區名稱爲 my-cache,內存緩存空間大小爲 100MB,這個緩衝 zone 可以被多次使用;
- inactive=600 max_size=2g 表示 600 分鐘沒有被訪問的內容自動清除,硬盤最大緩存空間爲2GB,超過這個大學將清除最近最少使用的數據;
- proxy_cache : 引用前面定義的緩存區 my-cache;
- proxy_cache_key :定義如何生成緩存的鍵,設置 web 緩存的 key 值,nginx 根據 key 值 md5哈希存儲緩存;
- proxy_cache_valid : 爲不同的響應狀態碼設置不同的緩存時間,比如 200、302 等正常結果可以緩存的時間長點,而 404、500 等緩存時間設置短一些,這個時間到了文件就會過期,
而不論是否剛被訪問過;- add_header 指令來設置 response header, 語法: add_header name value;
- $upstream_cache_status 這個變量來顯示緩存的狀態,我們可以在配置中添加一個 http 頭來顯示這一狀態;
$upstream_cache_status 包含以下幾種狀態:
- MISS:未命中,請求被傳送到後端(常見);
- HIT:緩存命中(常見);
- EXPIRED:緩存已經過期請求被傳送到後端;
- UPDATING:正在更新緩存,將使用舊的應答;
- STALE:後端將得到過期的應答;
- expires : 在響應頭裏設置 Expires:或 Cache-Control:max-age,返回給客戶端的瀏覽器緩存失效時間;
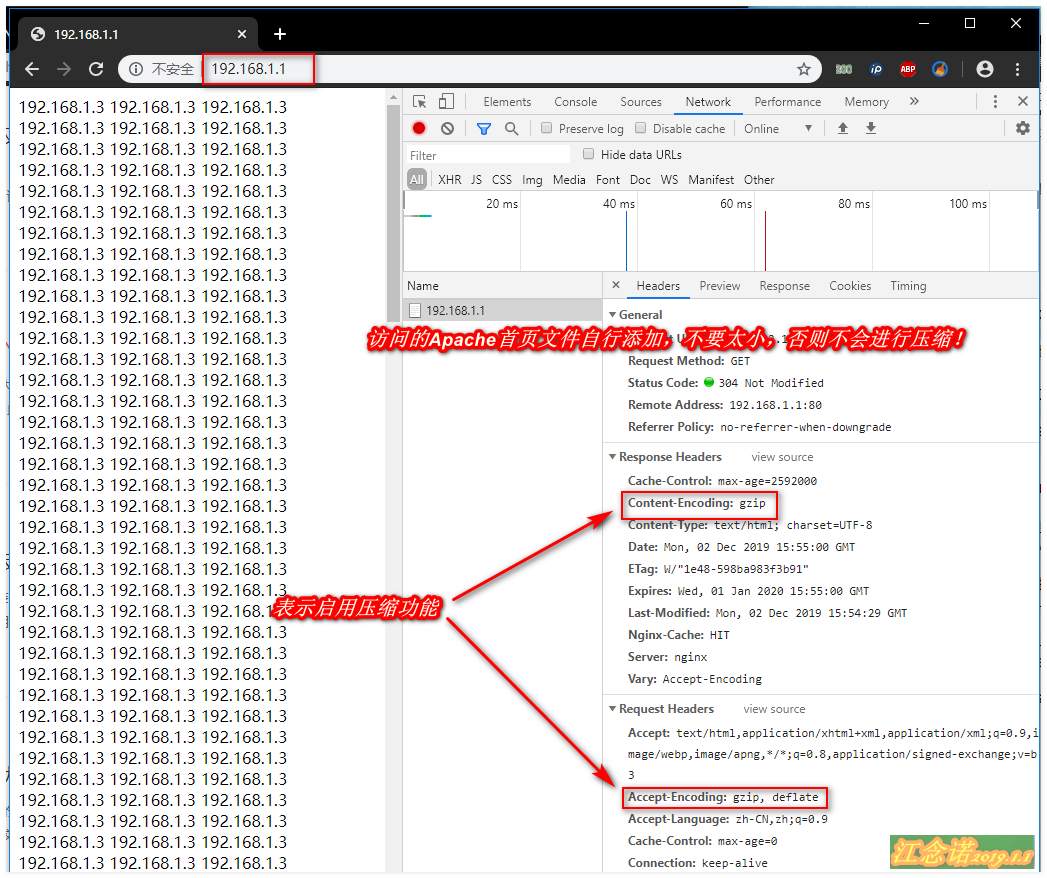
客戶端瀏覽器訪問: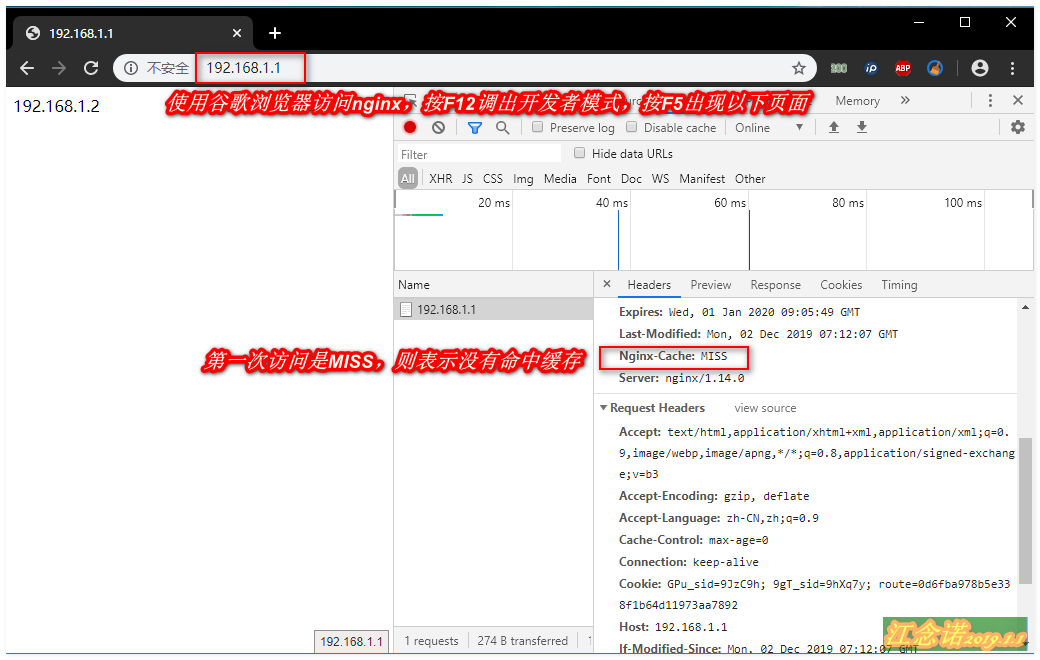
使用F5刷新頁面之後,出現如下頁面: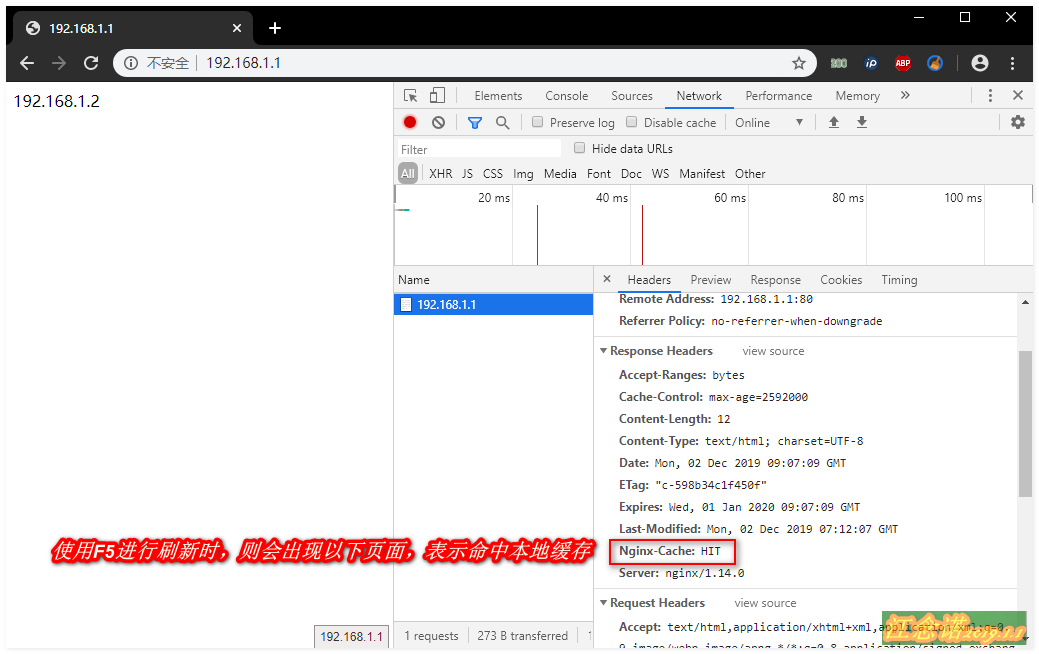
清除緩存訪問以下路徑,如圖: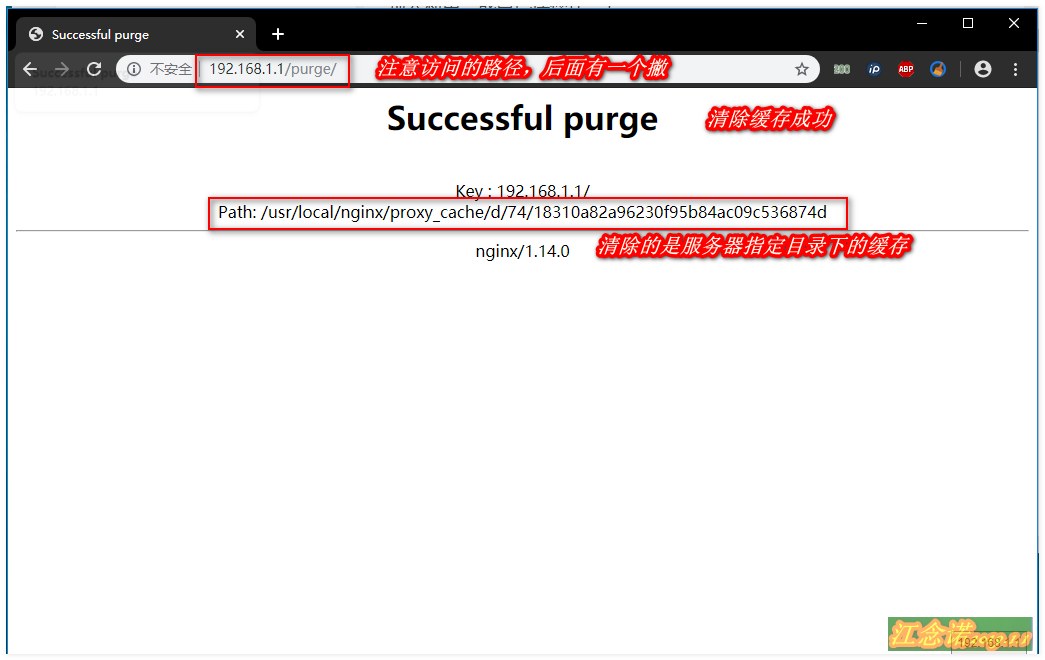
如果訪問時訪問的URL是:http:192.168.1.1/index.html,那麼清除緩存則需要http:192.168.1.1/purge/index.html。
這些從nginx的訪問日誌中,也可以看出,如圖:
注意:測試時,注意清除客戶端瀏覽器的緩存!
三、優化Nginx服務的壓縮功能
優化Nginx服務的壓縮功能就需要進行以下操作:
[root@localhost ~]# vim /usr/local/nginx/conf/nginx.conf
………………           //省略部分內容
http {
    include       mime.types;
    default_type  application/octet-stream;

     upstream lzj {
            sticky;
            server 192.168.1.2:80 weight=1 max_fails=2 fail_timeout=10s;
            server 192.168.1.3:80 weight=1 max_fails=2 fail_timeout=10s;
         }
    log_format  main  '$remote_addr - $remote_user [$time_local] "$request" '
                      '$status $body_bytes_sent "$http_referer" '
                      '"$http_user_agent" "$http_x_forwarded_for"'
                      '"$upstream_cache_status"';

    access_log  logs/access.log  main;
    brotli on;
    brotli_types text/plain text/css text/xml application/xml application/json;
    brotli_static off;            //是否允許查找預處理好的、以 .br結尾的壓縮文件,可選值爲on、off、always。
    brotli_comp_level 11;    //壓縮的級別,範圍是“1~14”,值越大,壓縮比越高
    brotli_buffers 16 8k;      //讀取緩衝區數量和大小
    brotli_window 512k;      //滑動窗口大小
    brotli_min_length 20;    //指定壓縮數據的最小字節
    server_tokens off;         //隱藏版本信息
    sendfile on;                   //開啓高效文件傳輸
    keepalive_timeout 65;      //長連接超時時間,單位是秒
    gzip on;                      //開啓 gzip 壓縮
    gzip_comp_level 6;     //壓縮的級別,範圍是“1~6”,值越大,壓縮比越高
    gzip_http_version 1.1;     //http版本爲1.1
    gzip_proxied any;            // Nginx 作爲反向代理的時候啓用,根據某些請求和應答來決定是否在對代理請求的應答啓用 gzip 壓縮,是否壓縮取決於請求頭中的“Via”字段,指令中可以同時指定多個不同的參數,
常用的參數如下:
off – 關閉所有的代理結果數據的壓縮;
expired – 啓用壓縮,如果 header 頭中包含 “Expires” 頭信息;
no-cache – 啓用壓縮,如果 header 頭中包含 “Cache-# Control:no-cache” 頭信息;
private – 啓用壓縮,如果 header 頭中包含 “Cache-Control:private” 頭信息;
no_last_modified – 啓用壓縮,如果 header 頭中不包含 “Last-Modified” 頭信息;
no_etag – 啓用壓縮 ,如果 header 頭中不包含 “ETag” 頭信息;
auth – 啓用壓縮 , 如果 header 頭中包含 “Authorization” 頭信息;
any – 無條件啓用壓縮;

    gzip_min_length 1k;
    gzip_buffers 16 8k;
    gzip_types text/plain text/css text/xml application/xml application/json;
    gzip_vary on;
    client_max_body_size 10m;
    client_body_buffer_size 128k;                //緩衝區代理緩衝用戶端請求的最大字節數
    proxy_connect_timeout 75;            //nginx 跟後端服務器連接超時時間(代理連接超時)
    proxy_read_timeout 75;            //定義從後端服務器讀取響應的超時
    proxy_buffer_size 4k;               //設置緩衝區的大小爲 size
    proxy_buffers 4 32k;                 //每塊緩衝區的大小
    proxy_busy_buffers_size 64k;   //高負荷下緩衝大小
    proxy_temp_file_write_size 64k;        //每次寫臨時文件的大小
    proxy_buffering on;
    proxy_temp_path /usr/local/nginx/proxy_temp;
    proxy_cache_path /usr/local/nginx/proxy_cache levels=1:2 keys_zone=my-cache:100m inactive=600m max_size=2g;
    #sendfile        on;
    #tcp_nopush     on;

    #keepalive_timeout  0;
    #keepalive_timeout  65;

    #gzip  on;
    server {
        listen       80;
        server_name  localhost;
        charset utf-8;
………………           //省略部分內容,在location規則最後添加
        location /nginx_status {
                stub_status on;
                access_log off;
                allow 192.168.1.0/24;
                deny all;
        }
[root@localhost ~]# nginx -t
nginx: [emerg] unknown directive "brotli" in /usr/local/nginx/conf/nginx.conf:32
nginx: configuration file /usr/local/nginx/conf/nginx.conf test failed
//檢查配置文件發現brotli這個工具在編譯時忘記安裝了(故意的)
接下進行安裝原本的模塊:
[root@localhost ~]# cd /usr/src/nginx-1.14.0/          //進入源碼包路徑
[root@localhost nginx-1.14.0]# nginx -V         //-V查詢編譯安裝時,使用的那些參數
nginx version: nginx/1.14.0
built by gcc 4.8.5 20150623 (Red Hat 4.8.5-39) (GCC)
built with OpenSSL 1.0.2k-fips  26 Jan 2017
TLS SNI support enabled
configure arguments: --prefix=/usr/local/nginx --user=nginx --group=nginx --with-http_stub_status_module --with-http_realip_module --with-http_ssl_module --with-http_gzip_static_module --http-client-body-temp-path=/var/tmp/nginx/client --http-proxy-temp-path=/var/tmp/nginx/proxy --http-fastcgi-temp-path=/var/tmp/nginx/fcgi --with-pcre --add-module=/usr/src/ngx_cache_purge-2.3/ --with-http_flv_module --add-module=/usr/src/nginx-sticky-module/
[root@localhost nginx-1.14.0]# ./configure --prefix=/usr/local/nginx --user=nginx --group=nginx --with-http_stub_status_module --with-http_realip_module --with-http_ssl_module --with-http_gzip_static_module --http-client-body-temp-path=/var/tmp/nginx/client --http-proxy-temp-path=/var/tmp/nginx/proxy --http-fastcgi-temp-path=/var/tmp/nginx/fcgi --with-pcre --add-module=/usr/src/ngx_cache_purge-2.3/ --with-http_flv_module --add-module=/usr/src/nginx-sticky-module/ --add-module=/usr/src/ngx_brotli && make && make install
//將上述查到的已加載的模塊複製以下,重新編譯以下,同時,加上需要添加的模塊
//比如我在上面添加了第三方模塊“--add-module=/usr/src/ngx_brotli”
[root@localhost ~]# mv /usr/local/nginx/sbin/nginx /usr/local/nginx/sbin/nginx.bak
//將原本的命令進行備份
[root@localhost ~]# cp /usr/src/nginx-1.14.0/objs/nginx /usr/local/nginx/sbin/
//複製新生成的nginx命令到指定的目錄中
[root@localhost ~]#  ln -sf /usr/local/nginx/sbin/nginx /usr/local/sbin/
//對新命令做一個強制軟連接
[root@localhost ~]# nginx -s reload              //重新加載nginx配置文件
[root@localhost ~]# nginx -t
nginx: the configuration file /usr/local/nginx/conf/nginx.conf syntax is ok
nginx: configuration file /usr/local/nginx/conf/nginx.conf test is successful
//檢查配置文件
[root@localhost ~]# nginx -s stop
[root@localhost ~]# nginx
//重新啓動nginx服務,注意清除瀏覽器本地的緩存信息
客戶端驗證訪問: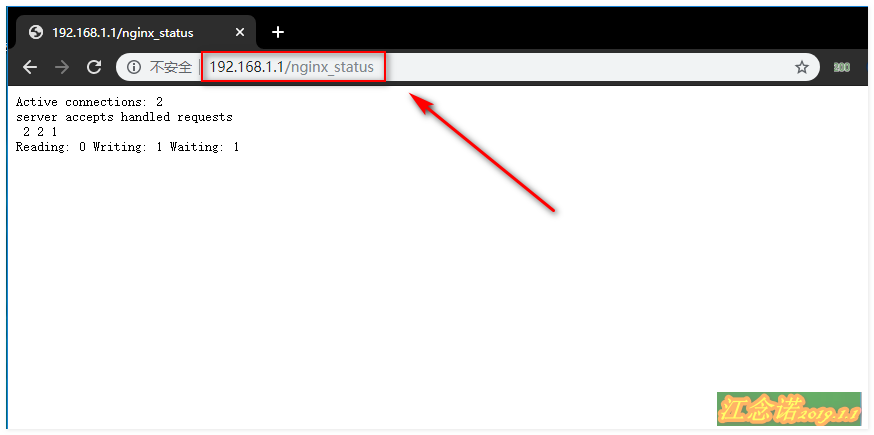

鑑於複製的問題,最後附上本篇博文有關沒有註釋的完整的Nginx配置文件:
#user  nobody;
worker_processes  1;

#error_log  logs/error.log;
#error_log  logs/error.log  notice;
#error_log  logs/error.log  info;

#pid        logs/nginx.pid;

events {
    worker_connections  1024;
}

http {
    include       mime.types;
    default_type  application/octet-stream;

     upstream lzj {
            sticky;
            server 192.168.1.2:80 weight=1 max_fails=2 fail_timeout=10s;
            server 192.168.1.3:80 weight=1 max_fails=2 fail_timeout=10s;
         }
    log_format  main  '$remote_addr - $remote_user [$time_local] "$request" '
                      '$status $body_bytes_sent "$http_referer" '
                      '"$http_user_agent" "$http_x_forwarded_for"'
                      '"$upstream_cache_status"';

    access_log  logs/access.log  main;
    brotli on;
    brotli_types text/plain text/css text/xml application/xml application/json;
    brotli_static off;
    brotli_comp_level 11;
    brotli_buffers 16 8k;
    brotli_window 512k;
    brotli_min_length 20;
    server_tokens off;
    sendfile on;
    keepalive_timeout 65;
    gzip on;
    gzip_comp_level 6;
    gzip_http_version 1.1;
    gzip_proxied any;
    gzip_min_length 1k;
    gzip_buffers 16 8k;
    gzip_types text/plain text/css text/xml application/xml application/json;
    gzip_vary on;
    client_max_body_size 10m;
    client_body_buffer_size 128k;
    proxy_connect_timeout 75;
    proxy_send_timeout 75;
    proxy_read_timeout 75;
    proxy_buffer_size 4k;
    proxy_buffers 4 32k;
    proxy_busy_buffers_size 64k;
    proxy_temp_file_write_size 64k;
    proxy_buffering on;
    proxy_temp_path /usr/local/nginx/proxy_temp;
    proxy_cache_path /usr/local/nginx/proxy_cache levels=1:2 keys_zone=my-cache:100m inactive=600m max_size=2g;
    #sendfile        on;
    #tcp_nopush     on;

    #keepalive_timeout  0;
    #keepalive_timeout  65;

    #gzip  on;

    server {
        listen       80;
        server_name  localhost;
        charset utf-8;
        #charset koi8-r;
        #access_log  logs/host.access.log  main;
        location ~/purge(/.*) {
                allow 127.0.0.1;
                allow 192.168.1.0/24;
                deny all;
                proxy_cache_purge my-cache $host$1$is_args$args;
        }

        location / {
                proxy_pass http://lzj;
                proxy_redirect off;
                proxy_set_header Host $host;
                proxy_set_header X-Real-IP $remote_addr;
                proxy_set_header X-Forwarded-For $proxy_add_x_forwarded_for;
                proxy_next_upstream error timeout invalid_header http_500 http_502 http_503 http_504;
                proxy_cache my-cache;
                add_header Nginx-Cache $upstream_cache_status;
                proxy_cache_valid 200 304 301 302 8h;
                proxy_cache_valid 404 1m;
                proxy_cache_valid any 1d;
                proxy_cache_key $host$uri$is_args$args;
                expires 30d;
        }
        location /nginx_status {
                stub_status on;
                access_log off;
                allow 192.168.1.0/24;
                deny all;
        }
//以下的內容沒有進行修改所以就不復制了
———————— 本文至此結束,感謝閱讀 ————————