


一、LVS+Keepalived高可用羣集
Keepalived的設計目標是構建高可用的LVS負載均衡羣集,可以調用ipvsadm工具來創建虛擬服務器、管理服務器池,而不僅僅用作雙機熱備。使用Keepalived構建LVS羣集更加簡便易用,主要優勢體現在:對LVS負載調度器實現熱備切換,提高可用性;對服務器池中的節點進行健康檢查,自動移除失效節點,恢復後再重新加入。
在基於LVS+Keepalived實現的LVS羣集結構中,至少包括兩臺熱備的負載調度器,三臺以上的節點服務器。此博客將以DR模式的LVS羣集爲基礎,增加一臺從負載調度器,使用Keepalived來實現主、從調度器的熱備,從而構建兼有負載均衡、高可用兩種能力的LVS網站羣集平臺。
因爲該服務涉及到了LVS技術,相關LVS概述及配置博文可以參考以下鏈接:
Centos 7之LVS負載均衡羣集概述
1、案例環境如下:
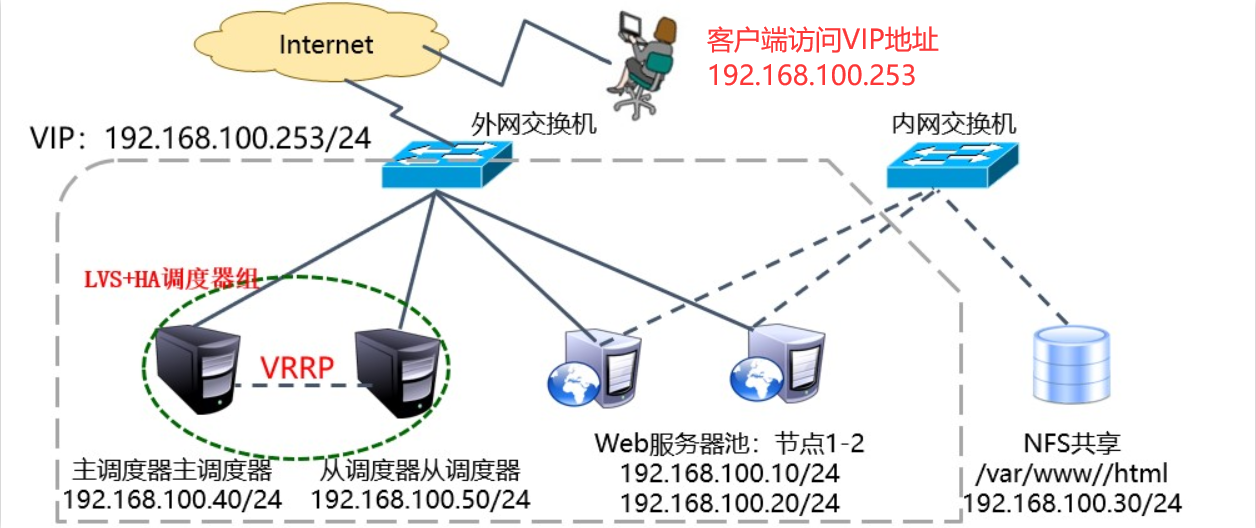
使用Keepalived構建LVS羣集時,也需要用到ipvsadm管理工具,但大部分工作會由Keepalived自動完成,不需要手動執行ipvsadm(除了查看和監控羣集以外)。
2、環境分析
1)、2個調度器和2個web節點使用同一個網段地址,可以直接和外網通信。爲了共享存儲的安全性,一般將web節點和存儲服務器規劃到內網環境,所以web節點必須有兩個及以上網卡的接口。
2)、我這裏資源有限,也爲了配置方便,所以調度器和web節點分別只有兩個,在web訪問請求量不大的情況下,足夠了,但是若訪問請求比較大,那麼最少要分別配置三個調度器和web節點,如果只有兩個web節點的話,訪問量又比較大,那麼一旦有一個宕機了,那剩下一個獨苗必定會因爲扛不住激增的訪問請求,而被打死。
3)、準備系統映像,以便安裝相關服務。
4)、自行配置防火牆策略和除了VIP之外的IP地址(我這裏直接關閉了防火牆)。
5)、keepalived會自動調用IP_vs模塊,所以無需手動加載。
3、最終效果
1)、客戶端多次訪問羣集的VIP,得到的是同一個網頁。
2)、主調度器宕機後,羣集的VIP地址將會自動漂移到從(備份)調度器,此時,所有的調度任務由從調度器進行分配。當主調度器恢復運行後,羣集的VIP地址會自動轉移回主調度器,主調度器繼續工作,從調度器轉回備份狀態。
3)、web節點宕機後,會被keepalived健康檢查功能檢測到,從而自動在web節點池中去除宕機的節點,待web節點恢復運行後,會被自動添加到web節點池中。
二、開始配置LVS+Keepalived高可用羣集
1、部署第一臺Web服務器
[root@centos01 ~]# yum -y install httpd <!--安裝httpd服務-->
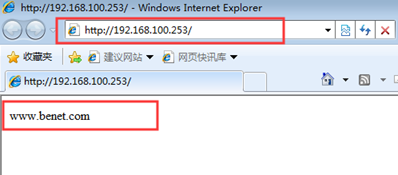
[root@centos01 ~]# echo "www.benet.com" >
/var/www/html/index.html <!--創建網站主頁,寫入測試數據-->
[root@centos01 ~]# systemctl start httpd <!--啓動httpd服務-->
[root@centos01 ~]# systemctl enable httpd<!--設置開機自動啓動-->
[root@centos01 ~]# cp /etc/sysconfig/network-scripts/ifcfg-lo
/etc/sysconfig/network-scripts/ifcfg-lo:0
<!--複製lo:0網卡配置文件-->
[root@centos01 ~]# vim /etc/sysconfig/network-scripts/ifcfg-lo:0
<!--編輯lo:0網卡配置文件-->
DEVICE=lo:0 <!--修改網卡名字-->
IPADDR=192.168.100.253 <!--配置VIP地址-->
NETMASK=255.255.255.255 <!--配置子網掩碼-->
ONBOOT=yes
<!--保留上面四行配置項即可,多餘的行刪除-->
[root@centos01 ~]# systemctl restart network <!--重啓網卡服務-->
[root@centos01 ~]# ifconfig <!--查看配置是否生效-->
lo: flags=73<UP,LOOPBACK,RUNNING> mtu 65536
inet 127.0.0.1 netmask 255.0.0.0
inet6 ::1 prefixlen 128 scopeid 0x10<host>
loop txqueuelen 1 (Local Loopback)
RX packets 488 bytes 39520 (38.5 KiB)
RX errors 0 dropped 0 overruns 0 frame 0
TX packets 488 bytes 39520 (38.5 KiB)
TX errors 0 dropped 0 overruns 0 carrier 0 collisions 0
lo:0: flags=73<UP,LOOPBACK,RUNNING> mtu 65536
inet 192.168.100.253 netmask 255.255.255.255
loop txqueuelen 1 (Local Loopback)
[root@centos01 ~]# vim /etc/sysctl.conf <!--修改web服務器ARP響應-->
net.ipv4.conf.all.arp_ignore = 1
net.ipv4.conf.all.arp_announce = 2
net.ipv4.conf.default.arp_ignore = 1
net.ipv4.conf.default.arp_announce = 2
net.ipv4.conf.lo.arp_ignore = 1
net.ipv4.conf.lo.arp_announce = 2
[root@centos01 ~]# sysctl -p <!--刷新配置-->
net.ipv4.conf.all.arp_ignore = 1
net.ipv4.conf.all.arp_announce = 2
net.ipv4.conf.default.arp_ignore = 1
net.ipv4.conf.default.arp_announce = 2
net.ipv4.conf.lo.arp_ignore = 1
net.ipv4.conf.lo.arp_announce = 22、部署第二臺Web服務器
[root@centos02 ~]# yum -y install httpd  <!--安裝httpd服務-->
[root@centos02 ~]# echo "www.accp.com" >
/var/www/html/index.html   <!--創建網站主頁,寫入測試數據-->
[root@centos02 ~]# systemctl start httpd  <!--啓動httpd服務-->
[root@centos02 ~]# systemctl enable httpd   <!--設置開機自動啓動-->
[root@centos02 ~]# scp [email protected]:/etc/sysconfig/network-scripts/ifcfg-lo:0
/etc/sysconfig/network-scripts/
<!--拷貝 第一臺網站服務器的lo:0網卡配置文件到第二臺網站服務器-->
The authenticity of host '192.168.100.10 (192.168.100.10)' can't be established.
ECDSA key fingerprint is SHA256:PUueT9fU9QbsyNB5NC5hbSXzaWxxQavBxXmfoknXl4I.
ECDSA key fingerprint is MD5:6d:f7:95:0e:51:1a:d8:9e:7b:b6:3f:58:51:51:4b:3b.
Are you sure you want to continue connecting (yes/no)? yes  <!--輸入yes-->
Warning: Permanently added '192.168.100.10' (ECDSA) to the list of known hosts.
[email protected]'s password:   <!--輸入密碼-->
ifcfg-lo:0                                                          100%   70    53.3KB/s   00:00
[root@centos02 ~]# scp [email protected]:/etc/sysctl.conf /etc/sysctl.conf
            <!--拷貝ARP響應到第二臺網站服務器-->
[email protected]'s password:    <!--輸入密碼-->
sysctl.conf                                                         100%  660   304.3KB/s   00:00
[root@centos02 ~]# systemctl restart network  <!--重啓網卡服務-->
[root@centos02 ~]# ifconfig    <!--查看是否配置生效-->
lo: flags=73<UP,LOOPBACK,RUNNING>  mtu 65536
        inet 127.0.0.1  netmask 255.0.0.0
        inet6 ::1  prefixlen 128  scopeid 0x10<host>
        loop  txqueuelen 1  (Local Loopback)
        RX packets 496  bytes 40064 (39.1 KiB)
        RX errors 0  dropped 0  overruns 0  frame 0
        TX packets 496  bytes 40064 (39.1 KiB)
        TX errors 0  dropped 0 overruns 0  carrier 0  collisions 0

lo:0: flags=73<UP,LOOPBACK,RUNNING>  mtu 65536
        inet 192.168.100.253  netmask 255.255.255.255
        loop  txqueuelen 1  (Local Loopback)
[root@centos02 ~]# sysctl -p  <!--刷新配置-->
net.ipv4.conf.all.arp_ignore = 1
net.ipv4.conf.all.arp_announce = 2
net.ipv4.conf.default.arp_ignore = 1
net.ipv4.conf.default.arp_announce = 2
net.ipv4.conf.lo.arp_ignore = 1
net.ipv4.conf.lo.arp_announce = 2
3、部署主調度器
[root@centos04 ~]# yum -y install keepalived ipvsadm <!--安裝所需工具-->
[root@centos04 ~]# vim /etc/sysctl.conf <!--調整內核參數,寫入下面三行-->
            .....................
net.ipv4.conf.all.send_redirects = 0
net.ipv4.conf.default.send_redirects = 0
net.ipv4.conf.ens33.send_redirects = 0
[root@centos04 ~]# sysctl -p      <!--刷新一下-->
net.ipv4.conf.all.send_redirects = 0
net.ipv4.conf.default.send_redirects = 0
net.ipv4.conf.ens33.send_redirects = 0
[root@centos04 ~]# cd /etc/keepalived/
[root@centos04 keepalived]# cp keepalived.conf keepalived.conf.bak          <!--備份配置文件-->
[root@centos04 keepalived]# vim keepalived.conf <!--編輯keepalived配置文件-->

! Configuration File for keepalived

global_defs {
   router_id LVS_DEVEL1<!--本服務器的名稱改一下,在羣集中所有調度器名稱裏必須唯一-->
}

vrrp_instance VI_1 {         <!--定義VRRP熱備實例-->
    state MASTER             <!--設置爲主調度器-->
    interface ens32            <!--承載VIP地址的物理網卡接口根據實際情況改一下-->
    virtual_router_id 51<!--虛擬路由器的ID號,每個熱備組保持一致-->
    priority 100            <!--優先級,數值越大優先級越高-->
    advert_int 1           <!--通告間隔秒數(心跳頻率)-->
    authentication {       <!--認證信息,每個熱備組保持一致-->
        auth_type PASS   <!--認證類型-->
        auth_pass 1111       <!--密碼字串-->
    }
    virtual_ipaddress {
        192.168.100.253     <!--指定漂移IP地址(VIP),可以有多個-->
    }
}

virtual_server 192.168.100.253 80 { <!--改爲VIP地址及所需端口-->
    delay_loop 6            <!--健康檢查的間隔時間(秒)-->
    lb_algo rr   <!--根據需要改一下負載調度算法,rr表示輪詢-->
    lb_kind DR   <!--設置工作模式爲DR(直接路由)模式-->
    persistence_timeout 50   <!--連接保持時間-->
    protocol TCP          <!--應用服務採用的是TCP協議-->

real_server 192.168.100.10 80 {       <!--一個web節點的配置,real_server 192.168.100.10 80 {  ..... }是複製下面的。複製過來後,更改一下節點IP地址即可-->
        weight 1                 <!--節點的權重-->
        TCP_CHECK {       <!--健康檢查方式-->
            connect_port 80   <!--檢查的目標端口-->
            connect_timeout 3     <!--連接超時(秒)-->
            nb_get_retry 3       <!--重試次數-->
            delay_before_retry 3   <!--重試間隔(秒)-->
        }
    }

    real_server 192.168.100.20 80 {        <!--一個web節點的配置,改動完成後,有幾個節點就複製幾份real_serve 192.168.100.20 80  {  ..... }到該行的上方,最好別往下面粘貼,以防大括號丟失-->
        weight 1            <!--節點的權重-->
        TCP_CHECK {    <!--健康檢查方式-->
            connect_port 80     <!--檢查的目標端口-->
            connect_timeout 3   <!--連接超時(秒)-->
            nb_get_retry 3          <!--重試次數-->
            delay_before_retry 3   <!--重試間隔(秒)-->
        }
    }
}

 <!--以下還有很多配置項,我這裏有98行,全部刪除即可,若不刪除時重啓服務可能報錯-->
[root@centos04 ~]# systemctl restart keepalived <!--重啓服務-->
[root@centos04 ~]# systemctl enable keepalived <!--設置開機自啓動-->
4、配置從調度器
[root@centos05 ~]# yum -y install ipvsadm keepalived
                  <!--安裝ipvsadm和keepalived軟件包-->
[root@centos05 ~]# scp [email protected]:/etc/sysctl.conf /etc/
<!--將主調度器的/proc參數文件複製過來-->
[email protected] s password:            <!--輸入主調度器的用戶密碼-->
sysctl.conf                                 100%  566   205.8KB/s   00:00
[root@centos05 ~]# sysctl -p               <!--刷新-->
net.ipv4.conf.all.send_redirects = 0
net.ipv4.conf.default.send_redirects = 0
net.ipv4.conf.ens33.send_redirects = 0
[root@centos05 ~]# scp [email protected]:/etc/keepalived/keepalived.conf
/etc/keepalived/
             <!--拷貝主節點的keepalived主配置文件到從節點服務器上-->
[email protected]'s password:       <!--輸入密碼-->
keepalived.conf                                                                                     100%  803     2.1MB/s   00:00
[root@centos05 ~]# vim /etc/keepalived/keepalived.conf <!--修改keepalived主配置文件-->
<!--若兩臺服務器都是ens32網卡的話,那麼所需該的只有以下三項(其他項保持默認)-->
   router_id LVS_HA_Backup    <!--將route_id改爲不一樣的,route_id必須是唯一的-->
    state BACKUP         <!--狀態改爲BACKUP,注意大小寫-->
    interface ens32
    priority 99      <!--優先級要比主調度器小,並且不可與其他備份調度器優先級衝突-->
[root@centos05 ~]# systemctl start keepalived     <!--啓動keepalived服務-->
[root@centos05 ~]# chkconfig --level 35 keepalived on   <!--設置開機自動啓動-->
至此,主、從調度器也配置完成了,若需要部署多個從調度器,按照以上這個從(備份)調度器配置即可。
5、配置客戶端訪問
客戶端測試訪問VIP地址:192.168.100.253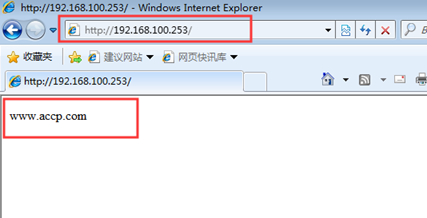
爲了測試,所以纔在每個web節點準備不同的網頁文件,以便測試是否有負載均衡的效果,現在效果已經有了,所以要搭建共享存儲服務器,所有的web節點都從共享存儲服務器讀取網頁文件向client提供,以便向client提供相同的網頁文件。
接下來開始配置共享存儲服務器
6、配置NFS服務器
[root@centos03 ~]# yum -y install rpcbind nfs-utils   <!--安裝所需軟件包-->
[root@centos03 ~]# mkdir /web   <!--創建共享網站根目錄-->
[root@centos03 ~]# echo "www.nfs.com" > /web/index.html
              <!--創建網站主頁,寫入測試數據-->
[root@centos03 ~]# vim /etc/exports      <!--修改nfs主配置文件共享/web目錄-->
/web    192.168.100.10(ro) 192.168.100.20(rw)
[root@centos03 ~]# systemctl start rpcbind      <!---啓動相關服務->
[root@centos03 ~]# systemctl start nfs      <!--啓動相關服務-->
[root@centos03 ~]# systemctl enable rpcbind     <!--設置開機自動啓動-->
[root@centos03 ~]# systemctl enable nfs   <!--設置開機自動啓動-->
[root@centos03 ~]# showmount -e 192.168.100.30   <!--查看共享目錄-->
Export list for 192.168.100.30:
/web 192.168.100.20,192.168.100.10
7、Web站點掛載共享存儲目錄
1)Web節點1服務器掛載共享目錄
[root@centos01 ~]# mount 192.168.100.30:/web /var/www/html/
          <!--掛載共享目錄到網站服務器的根目錄-->
[root@centos01 ~]# cat /var/www/html/index.html  <!--查看是否掛載成功-->
www.nfs.com
[root@centos01 ~]# vim /etc/fstab        <!--設置自動掛載-->
192.168.100.30:/web     /var/www/html/                            nfs     defaults        0 0
[root@centos01 ~]# systemctl restart httpd     <!--重新啓動httpd服務-->
2)Web節點2服務器掛載共享目錄
[root@centos02 ~]# mount 192.168.100.30:/web /var/www/html/
          <!--掛載共享目錄到網站服務器的根目錄-->
[root@centos02 ~]# cat /var/www/html/index.html        <!--查看是否掛載成功-->
www.nfs.com
[root@centos02 ~]# vim /etc/fstab   <!--設置自動掛載-->
192.168.100.30:/web     /var/www/html/                            nfs     defaults        0 0
[root@centos02 ~]# systemctl restart httpd       <!--重新啓動httpd服務-->
8、客戶端再次訪問測試
這次,客戶端無論怎麼刷新,看到的頁面永遠都是www.nfs.com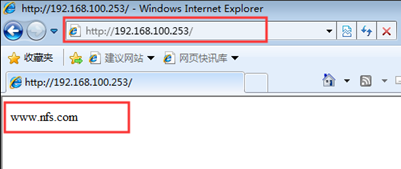
9、案例相關的查詢命令
1)VIP在哪個調度器上,查詢該調度器承載VIP地址的物理接口,即可看到VIP地址(VIP地址在備份調度器上查不到的):
[root@centos04 ~]# ip a show dev ens32
     <!--查詢承載VIP地址的物理網卡ens32或者使用ip a命令也可以查看VIP地址-->
ens32: <BROADCAST,MULTICAST,UP,LOWER_UP> ate UP groupn 1000
    link/ether 00:0c:29:77:2c:03 brd ff:ff:ff:ff:ff:ff
    inet 192.168.100.40/24 brd 192.168.100.255 scope global noprefixroute ens32
       valid_lft forever preferred_lft forever
    inet 192.168.100.253/32 scope global ens32    <!--VIP地址-->
       valid_lft forever preferred_lft forever
    inet6 fe80::95f8:eeb7:2ed2:d13c/64 scope link noprefixroute
       valid_lft forever preferred_lft forever
2)查詢有哪些web節點
[root@centos04 ~]# ipvsadm -ln     <!--查詢web節點池及VIP-->
IP Virtual Server version 1.2.1 (size=4096)
Prot LocalAddress:Port Scheduler Flags
  -> RemoteAddress:Port           Forward Weight ActiveConn InActConn
TCP  192.168.100.253:80 rr persistent 50
  -> 192.168.100.10:80            Route   1      0          0
  -> 192.168.100.20:80            Route   1      0          0
3)模擬第二臺Web節點和主調度器故障,並在備份調度器上再次查詢VIP以及web節點
[root@centos05 ~]# ip a show dev ens32   <!--可以看到VIP地址已經轉移到了備份調度器上-->
ens32: <BROADCAST,MULTICAST,UP,LOWER_UP> ate UP groupn 1000
    link/ether 00:0c:29:77:2c:03 brd ff:ff:ff:ff:ff:ff
    inet 192.168.100.40/24 brd 192.168.100.255 scope global noprefixroute ens32
       valid_lft forever preferred_lft forever
    inet 192.168.100.253/32 scope global ens32    <!--VIP地址-->
       valid_lft forever preferred_lft forever
    inet6 fe80::95f8:eeb7:2ed2:d13c/64 scope link noprefixroute
       valid_lft forever preferred_lft forever
[root@centos05 ~]# ipvsadm -ln <!--Web2節點宕機後,就查不到了。-->
IP Virtual Server version 1.2.1 (size=4096)
Prot LocalAddress:Port Scheduler Flags
  -> RemoteAddress:Port           Forward Weight ActiveConn InActConn
TCP  192.168.100.253:80 rr
  -> 192.168.100.10:80            Route   1      0          0
4)查看調度器故障切換時的日誌消息
[root@centos05 ~]# tail -30 /var/log/messages—————— 本文至此結束,感謝閱讀 ——————