


轉載地址:https://testerhome.com/topics/2632
uiautomatorviewer二次開發之自動生成控件定位符
前言
我們在使用Appium進行移動自動化測試腳本編寫的時候,經常出現控件無法定位,如ListView下面的item,控件基本屬性一樣的、某些控件沒有id、name等,這個時候,如果單純靠id、name、text可能無法完全唯一定位一個控件,這個時候就需要編寫xpath了,可是xpath語法、寫法對於沒有接觸過的測試人員來說,又是個門檻,接下來,我們就來討論如何通過二次開發uiautomatorviewer自動生成xpath供用戶直接copy使用。
原理
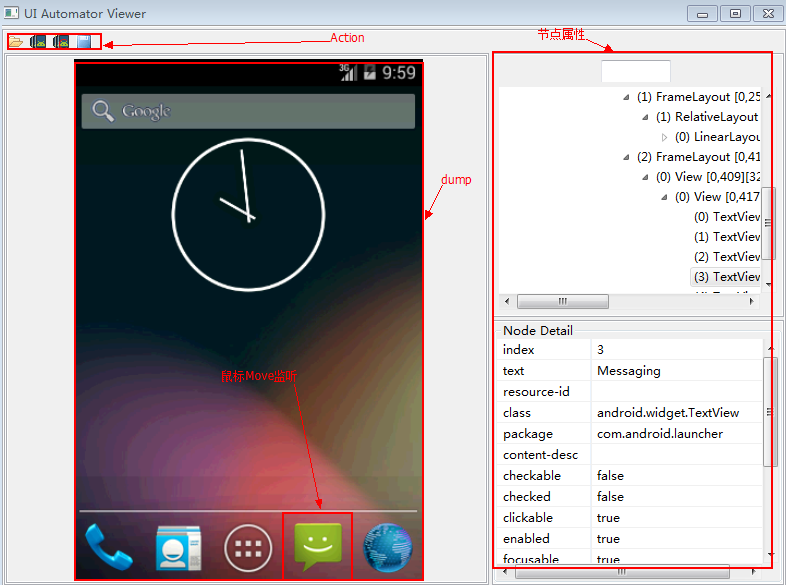
uiautomatorviewer是android SDK包中原生的開源工具,給用戶提供一種查看當前終端佈局、控件屬性的一個輔佐工具,
該工具的GUI是使用RCP組件進行開發的,然後通過uiautomator dump把當前終端佈局文件dump到本地,uiautomatorviewer
通過xml佈局文件,構造一棵tree,放到Canvas SWT組件中,和當前png截圖疊加在一起,同時監聽鼠標move等事件,自動
獲取該tree的node節點,並且把該node節點的所有屬性獲取顯示出來。
代碼結構

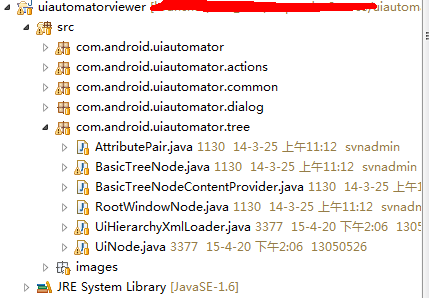
com.android.uiautomator:存放uiautomatorviewer工具的GUI界面代碼,其中主入口UiAutomatorViewer.java文件裏面有main函數入口,工具的窗口就在此創建。com.android.uiautomator.actions:存放所有anction操作,如:Device screenshot 、open等。com.android.uiautomator.tree:存放tree封裝,dump出來的xml解析成一棵完整的tree,這個包是核心包。
二次開發
首先,dump出來的xml文件被uiautomationviewer解析成自定義的tree,每個節點代表一個控件,所以,如何添加Xpath屬性呢?只需要在node節點中添加一個字段即可,其實很簡單。通過閱讀代碼,在com.android.uiautomator.tree包下,有個node節點封裝類,UiNode.java,看下以下代碼片源:
public class UiNode extends BasicTreeNode {
    private static final Pattern BOUNDS_PATTERN = Pattern
            .compile("\\[-?(\\d+),-?(\\d+)\\]\\[-?(\\d+),-?(\\d+)\\]");

    private final Map<String, String> mAttributes = new LinkedHashMap();
    private String mDisplayName = "ShouldNotSeeMe";
    private Object[] mCachedAttributesArray;

    public void addAtrribute(String key, String value) {
        this.mAttributes.put(key, value);
        updateDisplayName();
        if ("bounds".equals(key))
            updateBounds(value);
    }

    public Map<String, String> getAttributes() {
        return Collections.unmodifiableMap(this.mAttributes);
    }

    private void updateDisplayName() {
        String className = (String) this.mAttributes.get("class");
        if (className == null)
            return;
        String text = (String) this.mAttributes.get("text");
        if (text == null)
            return;
        String contentDescription = (String) this.mAttributes
                .get("content-desc");
        if (contentDescription == null)
            return;
        String index = (String) this.mAttributes.get("index");
        if (index == null)
            return;
        String bounds = (String) this.mAttributes.get("bounds");
        if (bounds == null) {
            return;
        }

        className = className.replace("android.widget.", "");
        className = className.replace("android.view.", "");
        StringBuilder builder = new StringBuilder();
        builder.append('(');
        builder.append(index);
        builder.append(") ");
        builder.append(className);
        if (!text.isEmpty()) {
            builder.append(':');
            builder.append(text);
        }
        if (!contentDescription.isEmpty()) {
            builder.append(" {");
            builder.append(contentDescription);
            builder.append('}');
        }
        builder.append(' ');
        builder.append(bounds);
        this.mDisplayName = builder.toString();
private final Map<String, String> mAttributes = new LinkedHashMap();UiNode 節點下定義一個mAttributes LinkedHashMap,用於存儲節點所有key-value屬性,如:className、text 、index等等,所以,只需要在這個UiNode 類下添加一個獲取xpath方法,如下:
    public String getXpath()
    {
        String className=getNodeClassAttribute();
        String xpath="//"+className;
        String text = getAttribute("text");
        if(text !=null&& !text.equals(""))
        {
            xpath += "[@text='"+text+"']";
            return xpath;
        }else
        {
            return getAttribute("content-desc") !=""?
                    xpath+"[@content-desc='"+getAttribute("content-desc")+"']"
                    :xpath+"[@index='"+getAttribute("index")+"']";
        }


    }
根據約定的優先級,進行篩選(text>content-desc>index),方法定義完畢後,如何觸發getXpath()代碼呢?
同樣,在此包下UiHierarchyXmlLoader.java中,該類是用於處理把dump xml轉換爲BasicTreeNode對象,UiHierarchyXmlLoader 引用org.xml.sax.helpers處理基本xml文件(Default base class for SAX2 event handlers.),實現了ContentHandler接口下的startElement、endElement接口,
public void endElement(String uri, String localName, String qName)
throws SAXException {
if (this.mParentNode != null) {
this.mWorkingNode = this.mParentNode;
this.mParentNode = this.mParentNode.getParent();
`mTmpNode.addAtrribute("xpath",mTmpNode.getXpath());`
}
}
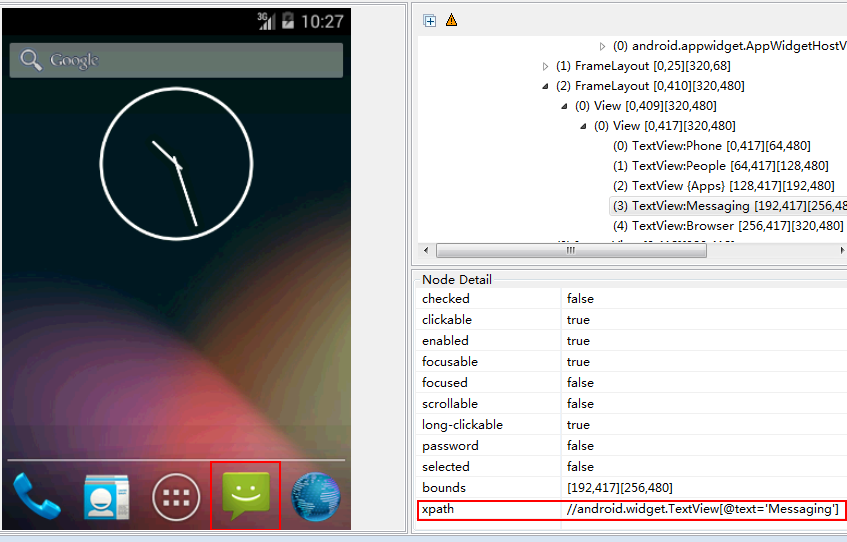
};到這裏,xpath就會自動出現在uiautomatorviewer界面上了,效果如下:
補充
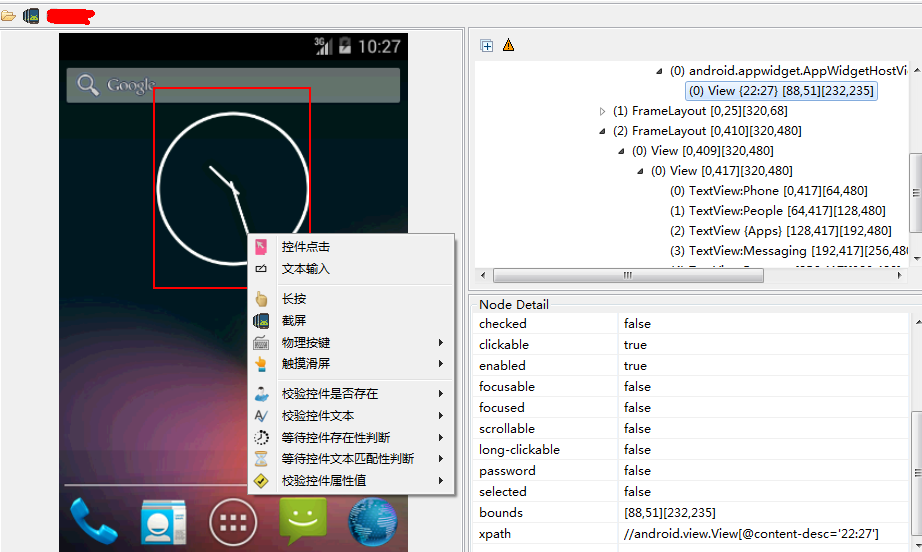
其實uiautomatorviewer二次開發還不止這些,我們可以在uiautomatorviewer中加入錄製自動生成java、python等appium腳本,還可以每次用戶點擊uiautomatorviewer界面,同步刷新(目前需要用戶手動點擊device screenshot 這個action)等等,如下:

第一次發分享貼,寫的不好,希望大家多多鼓勵,後續會繼續分享