


接上一篇《KubeSphere實戰排除》近期在使用kubesphere中也記錄了一些使用問題,希望可以對其他人有幫助
八 kubesphere應用上傳問題
8.1 文件上傳413
將應用部署進入kubesphere中,應用中有設置上傳文件功能,測試上次異常無法正常上傳,文件上傳,ingress413報錯,kubesphere使用的是ingress-nginx控制器,可以在其中註解添加k-v來支持,
解決方案:應用路由自定義max body size
8.2 大文件上傳後端504
大文件上傳後端響應504解決方案:
proxy read timeoutnginx.ingress.kubernetes.io/proxy-read-timeout九 跨域問題
kubesphere使用ingress-nginx支持跨域,可以參考以下鏈接在註解中添加
https://kubernetes.github.io/ingress-nginx/user-guide/nginx-configuration/annotations/#enable-cors
測試環境可以使用可以使用hosts,將域名解析到本地,前端利用nginx來做靜態文件服務,反向代理後端api,可以參考示例:
server {
  listen 80;
  server_name localhost;
  # 強制https跳轉
  # rewrite ^(.*)$ https://$host$1 permanent;
  location / {
    index      index.html;
    root       /smart-frontend;
    try_files $uri $uri/ /index.html;
    client_body_buffer_size 200m;
    charset utf-8;
  }
  location /api {
      proxy_pass http://smart-backend:8080/api;
      proxy_read_timeout 1200;
      client_max_body_size 1024m;
  }
      gzip  on; #開啓gzip
      gzip_vary on;
      gzip_min_length 1k; #不壓縮臨界值,大於1k的才壓縮,一般不用改
      gzip_buffers 4 16k;
      gzip_comp_level 6; #壓縮級別,數字越大壓縮的越好
      gzip_types  text/plain application/javascript application/x-javascript text/css application/xml text/javascript application/x-httpd-php image/jpeg image/gif image/png image/x-icon;
}
十 添加節點
後期逐漸業務上來,集羣節點資源不足,新增node節點,將node節點的數據盤添加到ceph節點
10.1 ceph集羣添加節點
-
系統配置
- 免費密鑰配置
- hosts配置
- docker安裝並遷移至數據盤
- cgroup啓用
- ceph數據節點添加
ceph集羣配置添加node03集羣的數據盤節點(如果數據存儲類足夠,可以不用添加數據節點)
[root@node03 docker]# mkfs.xfs /dev/vdd
[root@node03 docker]# mkdir -p /var/local/osd3
[root@node03 docker]# mount /dev/vdd /var/local/osd3/

添加vdd到/etc/fstab中
[root@node03 docker]# yum -y install yum-plugin-priorities epel-release

[root@node03 yum.repos.d]# chmod 777 -R /var/local/osd3/
[root@node03 yum.repos.d]# chmod 777 -R /var/local/osd3/*  master節點利用ceph-deploy部署node03節點[root@master ceph]# ceph-deploy install node03
[root@master ceph]# ceph-deploy  gatherkeys master
[root@master ceph]# ceph-deploy osd prepare node03:/var/local/osd3- 激活osd
[root@master ceph]# ceph-deploy osd activate node03:/var/local/osd3- 查看狀態
[root@master ceph]# ceph-deploy osd list master node01 node02 node03- 拷貝密鑰
[root@master ceph]# ceph-deploy admin master node01 node02 node03- 在node03節點設置權限
[root@node03 yum.repos.d]# chmod +r /etc/ceph/ceph.client.admin.keyring- 在master設置MDS
[root@master ceph]# ceph-deploy mds create node01 node02 node03- 查看狀態
[root@master ceph]# ceph health
[root@master ceph]# ceph - 由於是新增node節點,數據需要平衡回填,此刻查看集羣狀態[root@master conf]# ceph -s
    cluster 5b9eb8d2-1c12-4f6d-ae9c-85078795794b
     health HEALTH_ERR
            44 pgs backfill_wait
            1 pgs backfilling
            1 pgs inconsistent
            45 pgs stuck unclean
            recovery 1/55692 objects degraded (0.002%)
            recovery 9756/55692 objects misplaced (17.518%)
            2 scrub errors
     monmap e1: 1 mons at {master=172.16.60.2:6789/0}
            election epoch 35, quorum 0 master
     osdmap e2234: 4 osds: 4 up, 4 in; 45 remapped pgs
            flags sortbitwise,require_jewel_osds
      pgmap v5721471: 192 pgs, 2 pools, 104 GB data, 27846 objects
            230 GB used, 1768 GB / 1999 GB avail
            1/55692 objects degraded (0.002%)
            9756/55692 objects misplaced (17.518%)
                 146 active+clean
                  44 active+remapped+wait_backfill
                   1 active+remapped+backfilling
                   1 active+clean+inconsistent
recovery io 50492 kB/s, 13 objects/s
client io 20315 B/s wr, 0 op/s rd, 5 op/s wr - 最終的問題,目前由於新增了node節點,新增ceph數據節點需要數據同步
[root@master conf]# ceph -s
    cluster 5b9eb8d2-1c12-4f6d-ae9c-85078795794b
     health HEALTH_ERR
            1 pgs inconsistent
            2 scrub errors
     monmap e1: 1 mons at {master=172.16.60.2:6789/0}
            election epoch 35, quorum 0 master
     osdmap e2324: 4 osds: 4 up, 4 in
            flags sortbitwise,require_jewel_osds
      pgmap v5723479: 192 pgs, 2 pools, 104 GB data, 27848 objects
            229 GB used, 1769 GB / 1999 GB avail
                 191 active+clean
                   1 active+clean+inconsistent
  client io 78305 B/s wr, 0 op/s rd, 18 op/s wr修復[root@master conf]# ceph -s
    cluster 5b9eb8d2-1c12-4f6d-ae9c-85078795794b
     health HEALTH_OK
     monmap e1: 1 mons at {master=172.16.60.2:6789/0}
            election epoch 35, quorum 0 master
     osdmap e2324: 4 osds: 4 up, 4 in
            flags sortbitwise,require_jewel_osds
      pgmap v5724320: 192 pgs, 2 pools, 104 GB data, 27848 objects
            229 GB used, 1769 GB / 1999 GB avail
                 192 active+clean
  client io 227 kB/s wr, 0 op/s rd, 7 op/s wr
# 同步完成
[root@master conf]# ceph health
HEALTH_OK
10.2 node節點添加
kubesphere爲方便新增節點,提供了方便的腳步一鍵新增,可參考:https://kubesphere.com.cn/docs/v2.1/zh-CN/installation/add-nodes/
修改host.ini
[all]
master ansible_connection=local  ip=172.16.60.2
node01  ansible_host=172.16.60.3  ip=172.16.60.3
node02  ansible_host=172.16.60.4  ip=172.16.60.4
node03  ansible_host=172.16.60.5  ip=172.16.60.5
[kube-master]
master
[kube-node]
master
node01
node02
node03
在 "/script" 目錄執行 add-nodes.sh腳本。待擴容腳本執行成功後,即可看到包含新節點的集羣節點信息,可通過 KubeSphere 控制檯的菜單選擇 基礎設施 然後進入 主機管理 頁面查看,或者通過 Kubectl 工具執行 kubectl get node命令,查看擴容後的集羣節點詳細信息。
[root@master scripts]# ./add-nodes.sh查看驗證
[root@master conf]# kubectl get nodes -owide
NAME     STATUS   ROLES         AGE    VERSION   INTERNAL-IP   EXTERNAL-IP   OS-IMAGE                KERNEL-VERSION          CONTAINER-RUNTIME
master   Ready    master        136d   v1.15.5   172.16.60.2   <none>        CentOS Linux 7 (Core)   3.10.0-693.el7.x86_64   docker://18.6.2
node01   Ready    node,worker   136d   v1.15.5   172.16.60.3   <none>        CentOS Linux 7 (Core)   3.10.0-693.el7.x86_64   docker://18.6.2
node02   Ready    node,worker   136d   v1.15.5   172.16.60.4   <none>        CentOS Linux 7 (Core)   3.10.0-693.el7.x86_64   docker://18.6.2
node03   Ready    worker        10m    v1.15.5   172.16.60.5   <none>        CentOS Linux 7 (Core)   3.10.0-693.el7.x86_64   docker://19.3.5
[root@master conf]# kubectl label node  node-role.kubernetes.io/node=
common.yaml            hosts.ini              plugin-qingcloud.yaml
[root@master conf]# kubectl label node node03  node-role.kubernetes.io/node=
node/node03 labeled
[root@master conf]# kubectl get nodes -owide
NAME     STATUS   ROLES         AGE    VERSION   INTERNAL-IP   EXTERNAL-IP   OS-IMAGE                KERNEL-VERSION          CONTAINER-RUNTIME
master   Ready    master        136d   v1.15.5   172.16.60.2   <none>        CentOS Linux 7 (Core)   3.10.0-693.el7.x86_64   docker://18.6.2
node01   Ready    node,worker   136d   v1.15.5   172.16.60.3   <none>        CentOS Linux 7 (Core)   3.10.0-693.el7.x86_64   docker://18.6.2
node02   Ready    node,worker   136d   v1.15.5   172.16.60.4   <none>        CentOS Linux 7 (Core)   3.10.0-693.el7.x86_64   docker://18.6.2
node03   Ready    node,worker   11m    v1.15.5   172.16.60.5   <none>        CentOS Linux 7 (Core)   3.10.0-693.el7.x86_64   docker://19.3.5
[root@master conf]# 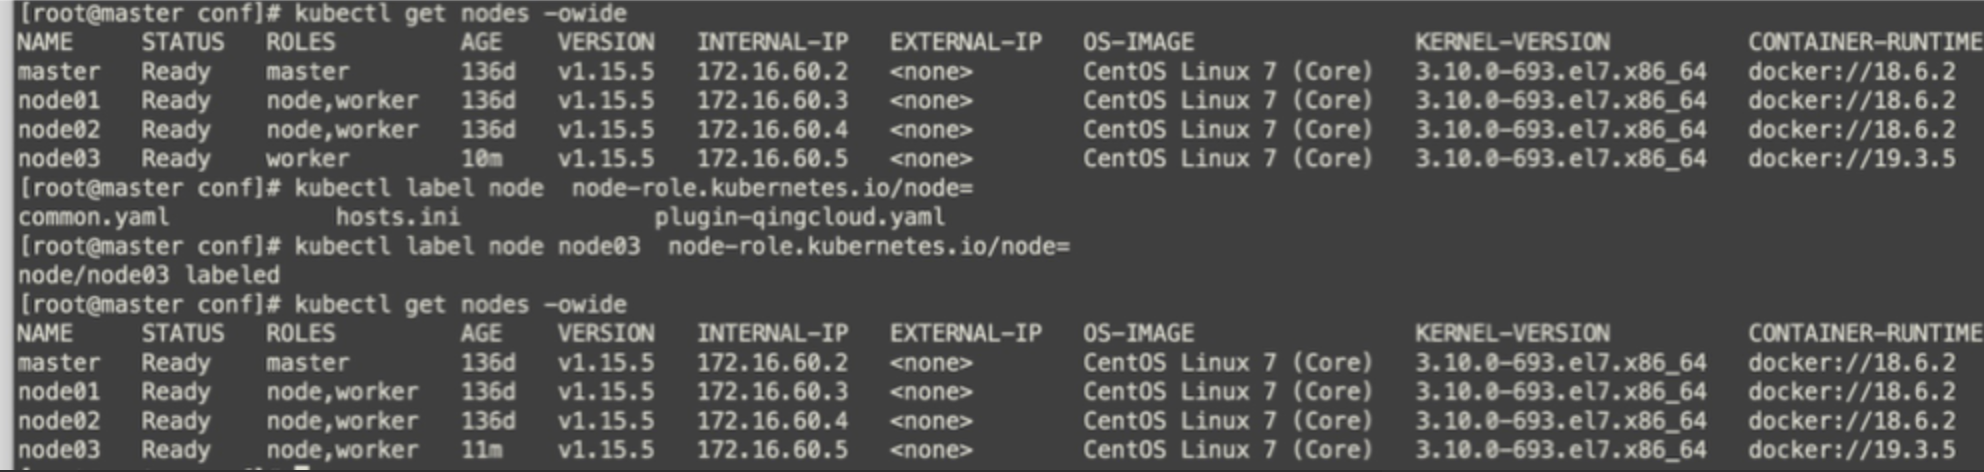
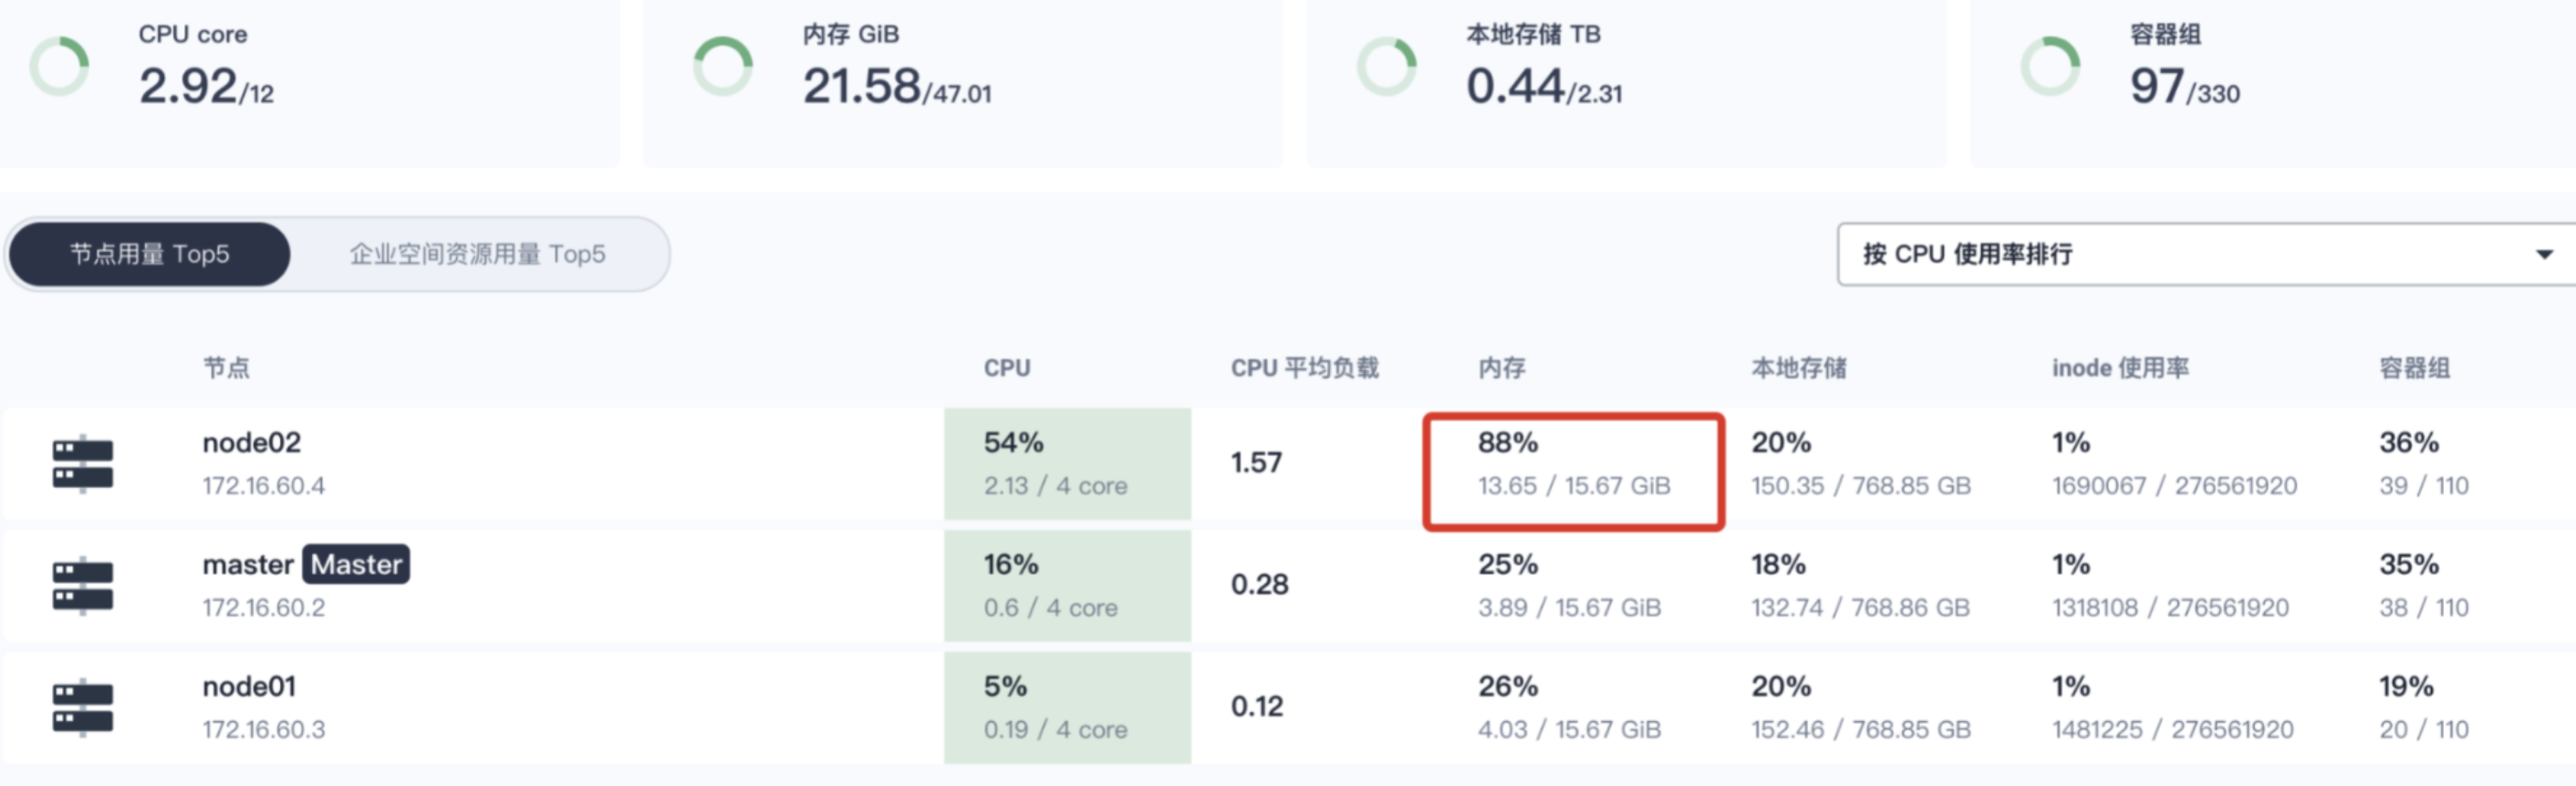
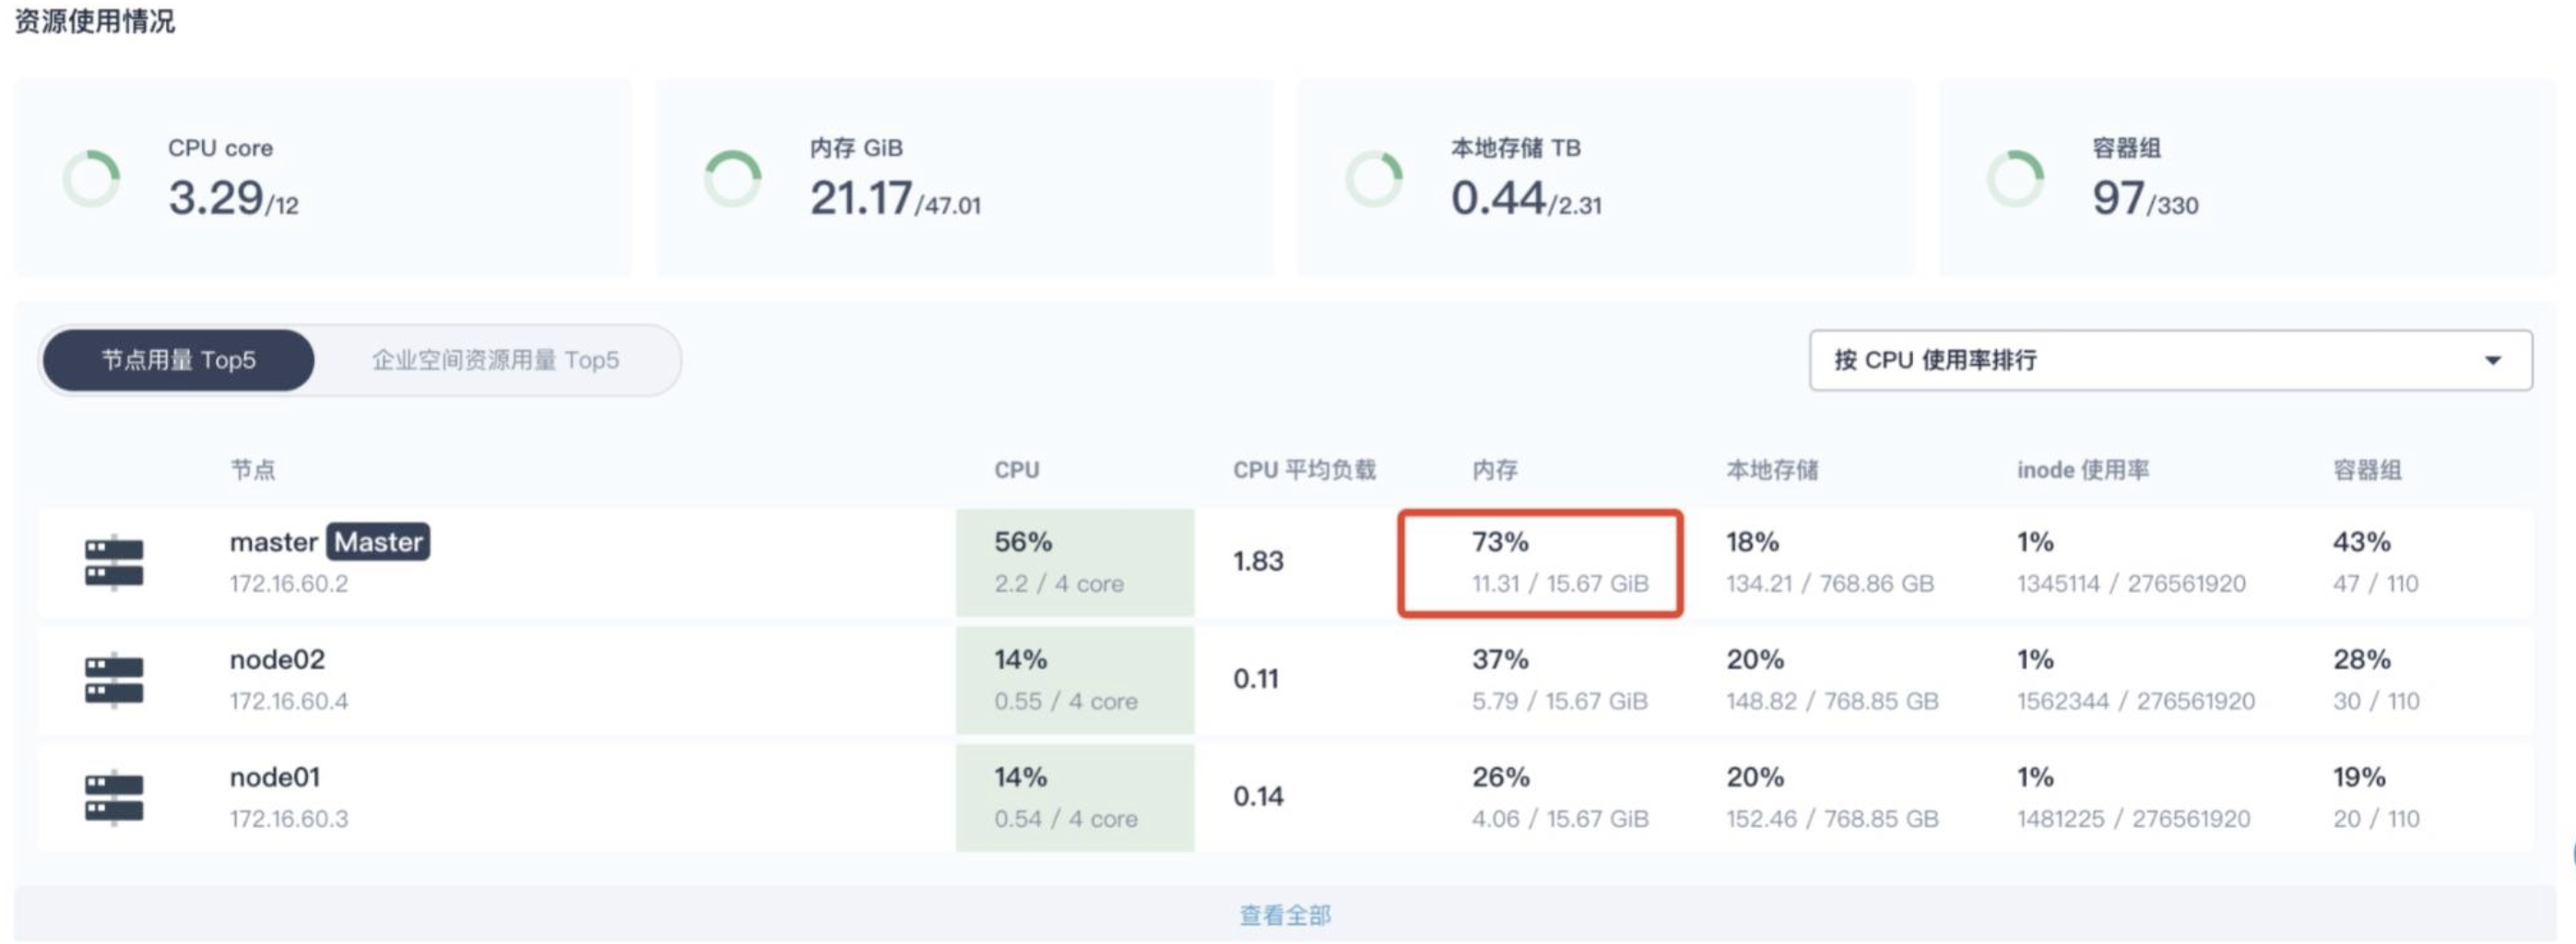
十一 K8s集羣資源不均
可以發現k8s資源使用不均衡,之前的部署應用爲制定nodeSelect,導致一些系統服務運行在node節點,查看node2內存佔用很大,導致集羣異常告警或重啓
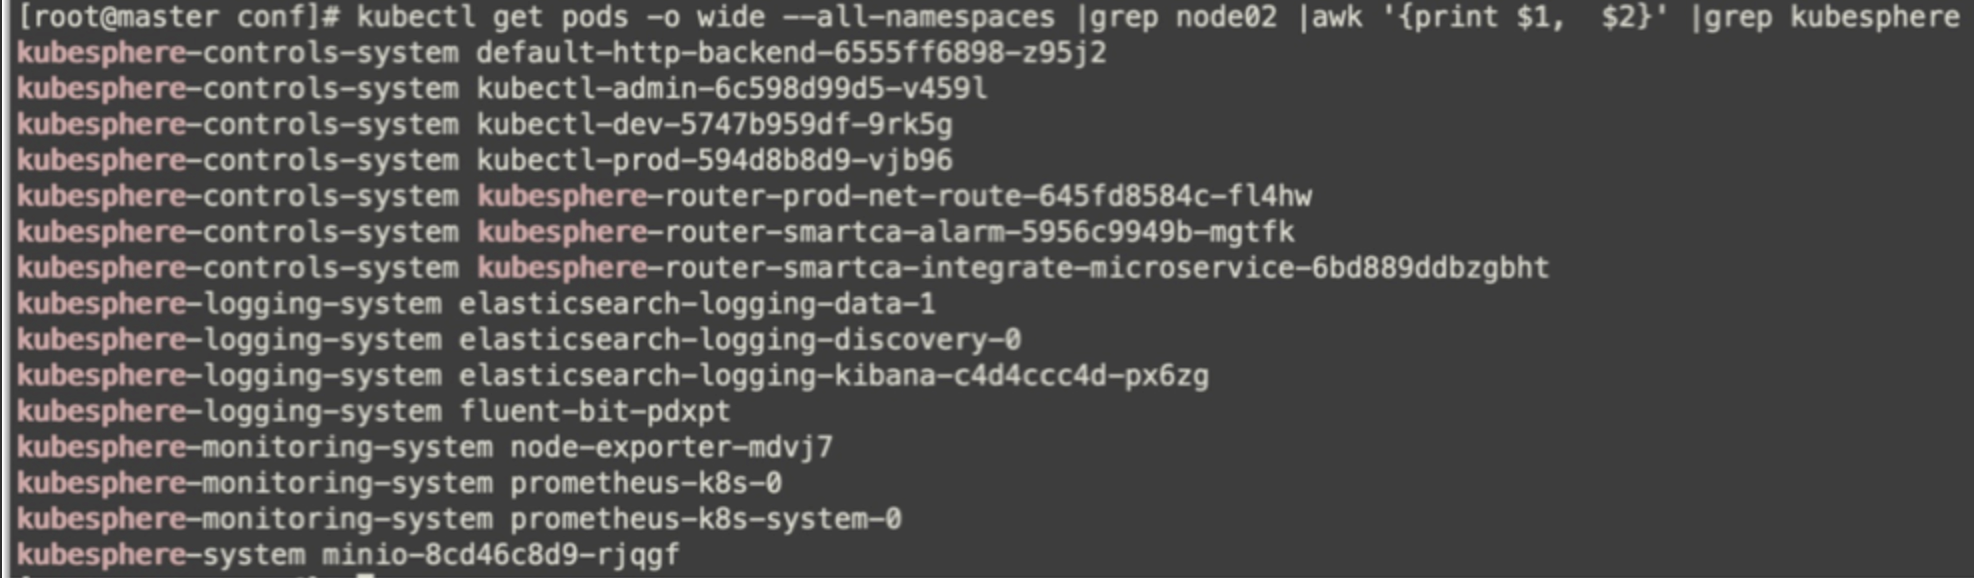
可以通過查看
kubectl get pods -o wide --all-namespaces |grep node02 |awk '{print $1, $2}'將一些系統應用通過nodeselect來調度到master節點,以減輕node2節點的內存壓力。
`kubectl get nodes --show-labels`在node2上查看系統組建添加nodeselector來重新調度
      nodeSelector:
        node-role.kubernetes.io/master: master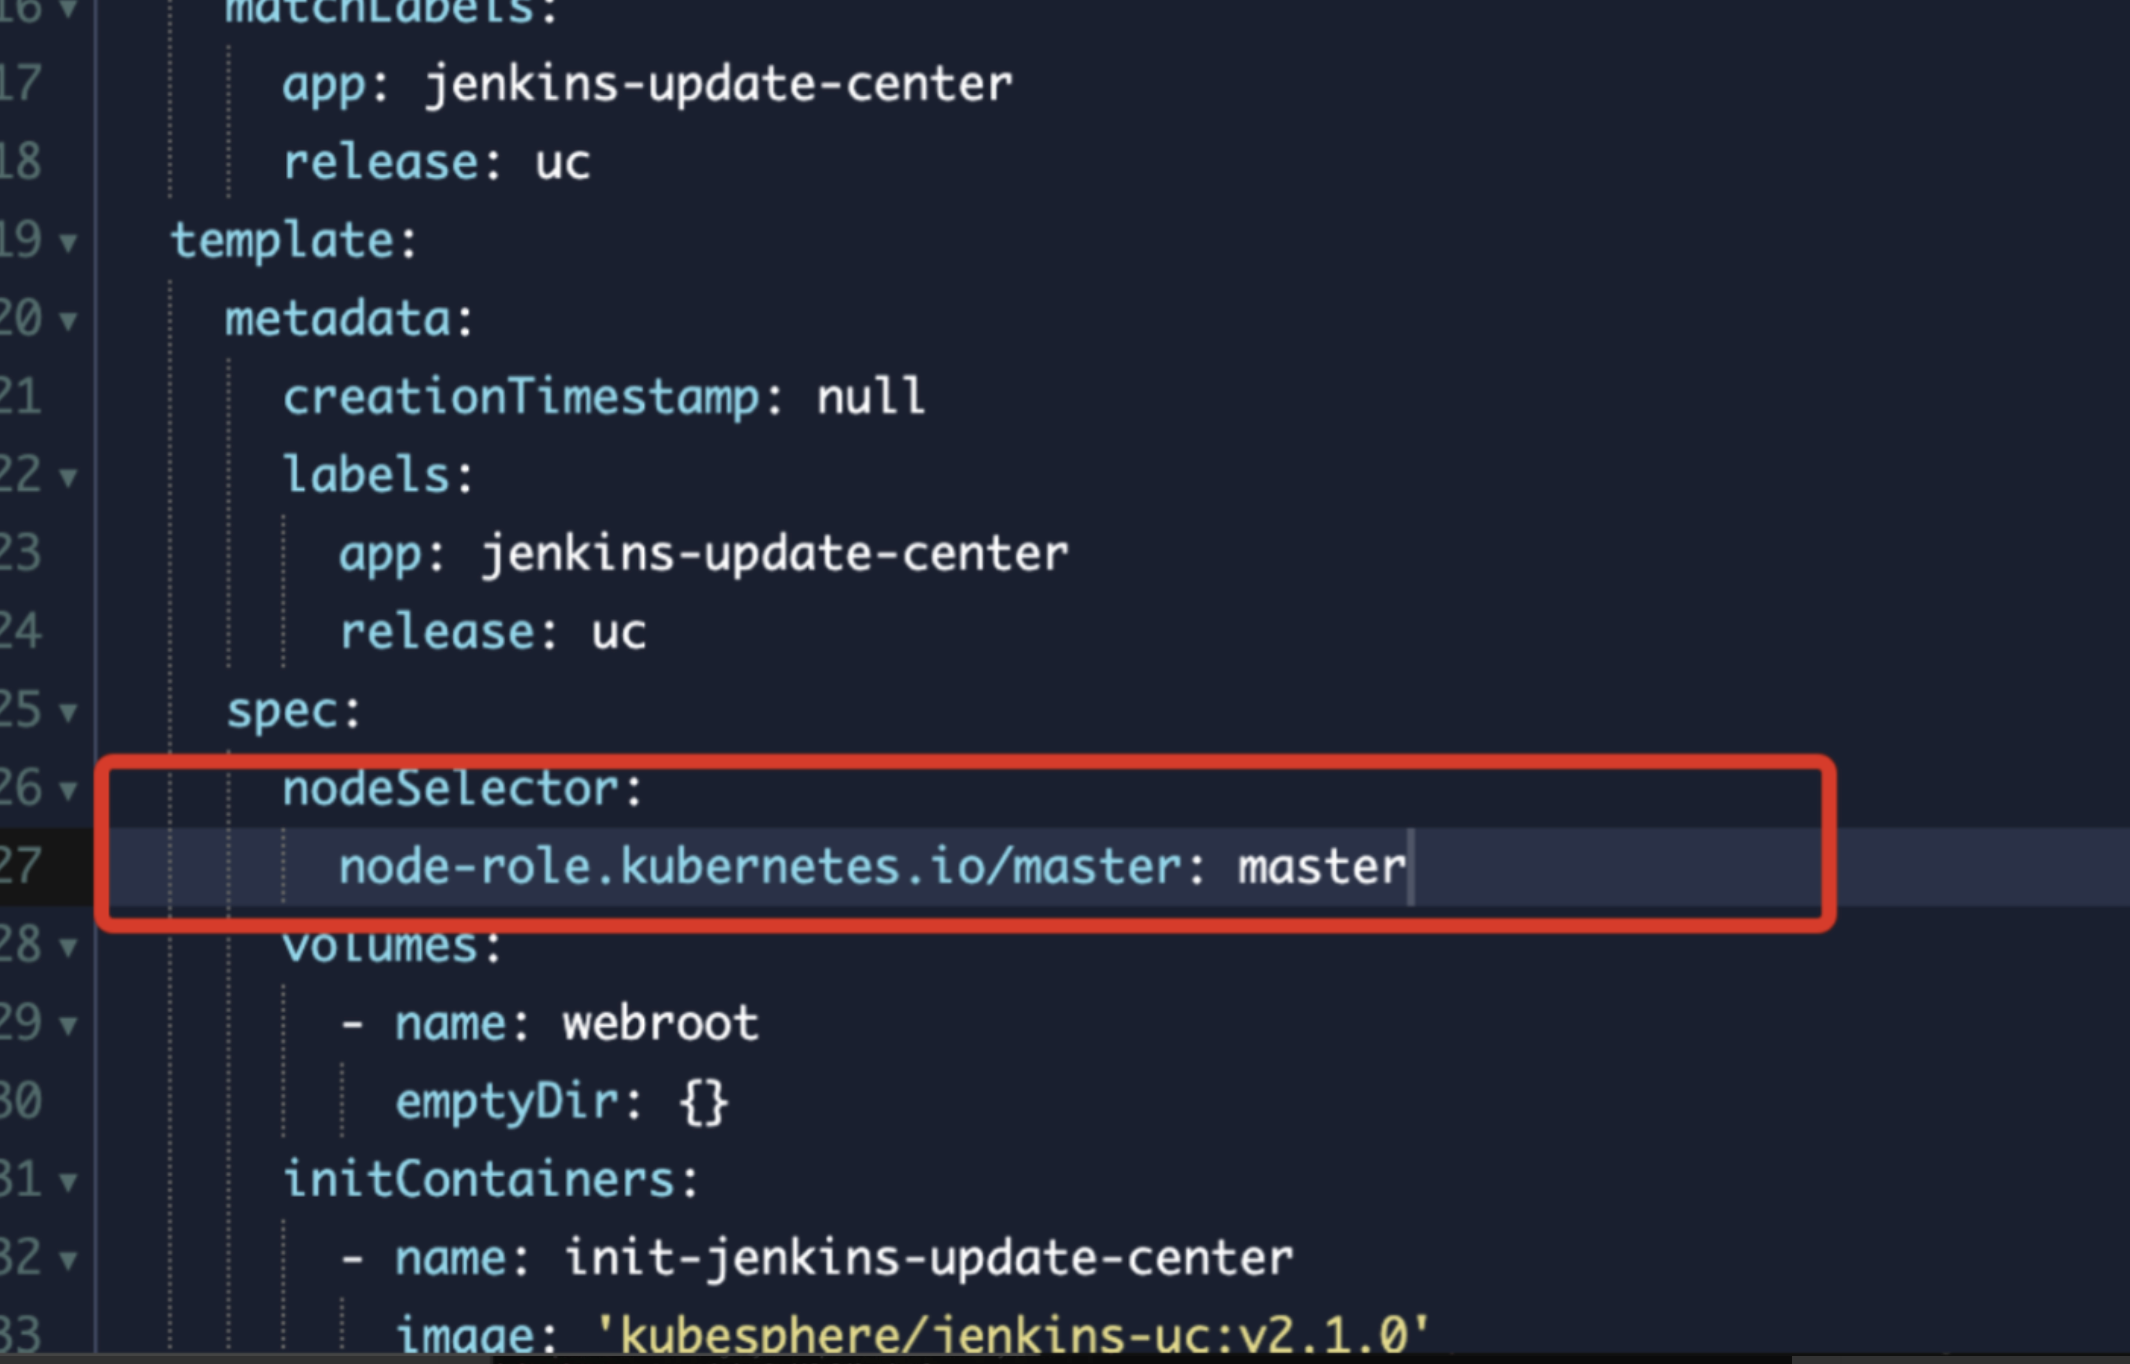
查看現存在node2上面的kubesphere系統deployment
通過調度完成,查看node2的內存負載已經下來了
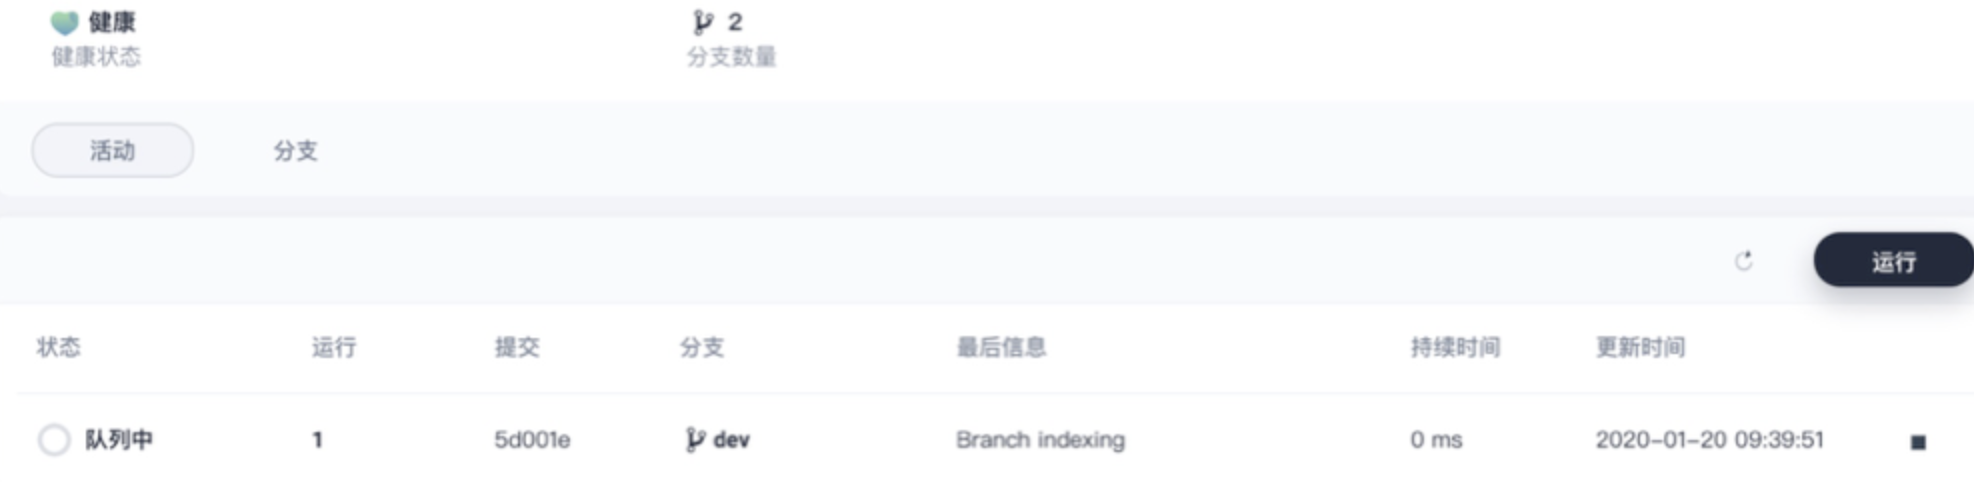
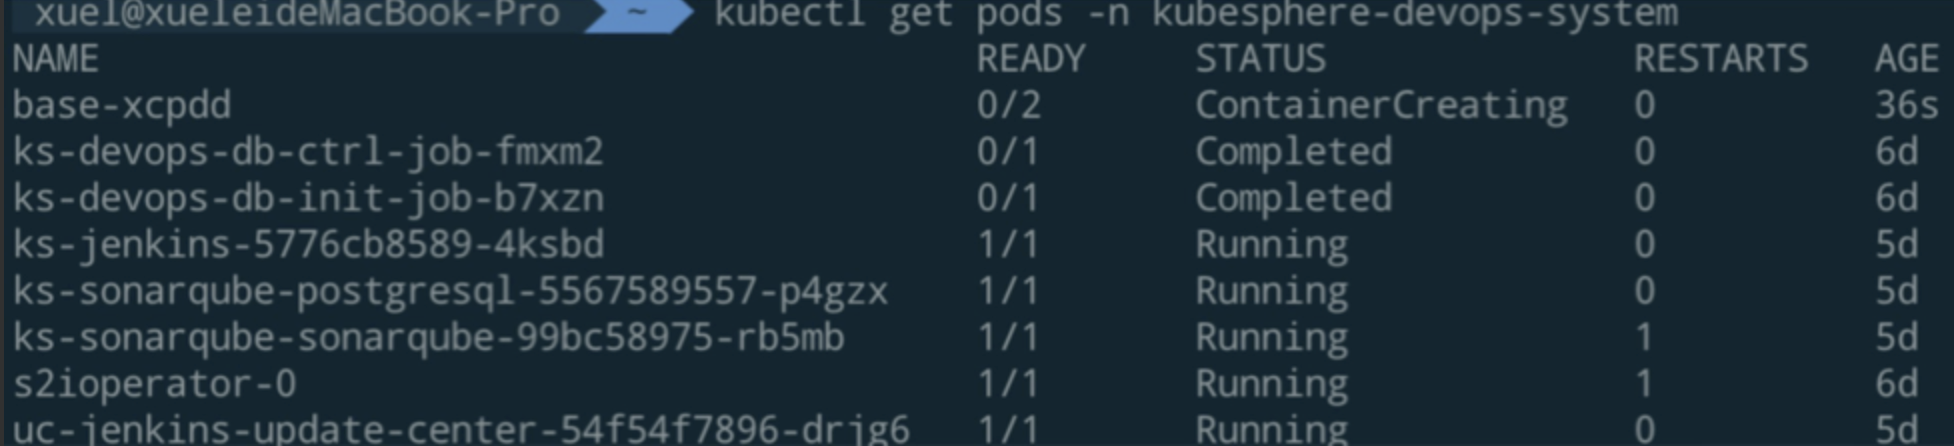
十二 kubesphere devops工程
新增了node03節點,devops工程一週爲隊列中爲此時運行該job的實例未完成初始化,登錄集羣查看,node03上的base pod在pull agent鏡像,爲了快速,直接在node節點,save base鏡像然後在node03上load
[root@master ~]# kubectl describe pods -n kubesphere-devops-system $(kubectl get pods -n kubesphere-devops-system |grep -E "^base" |awk '{print $1}')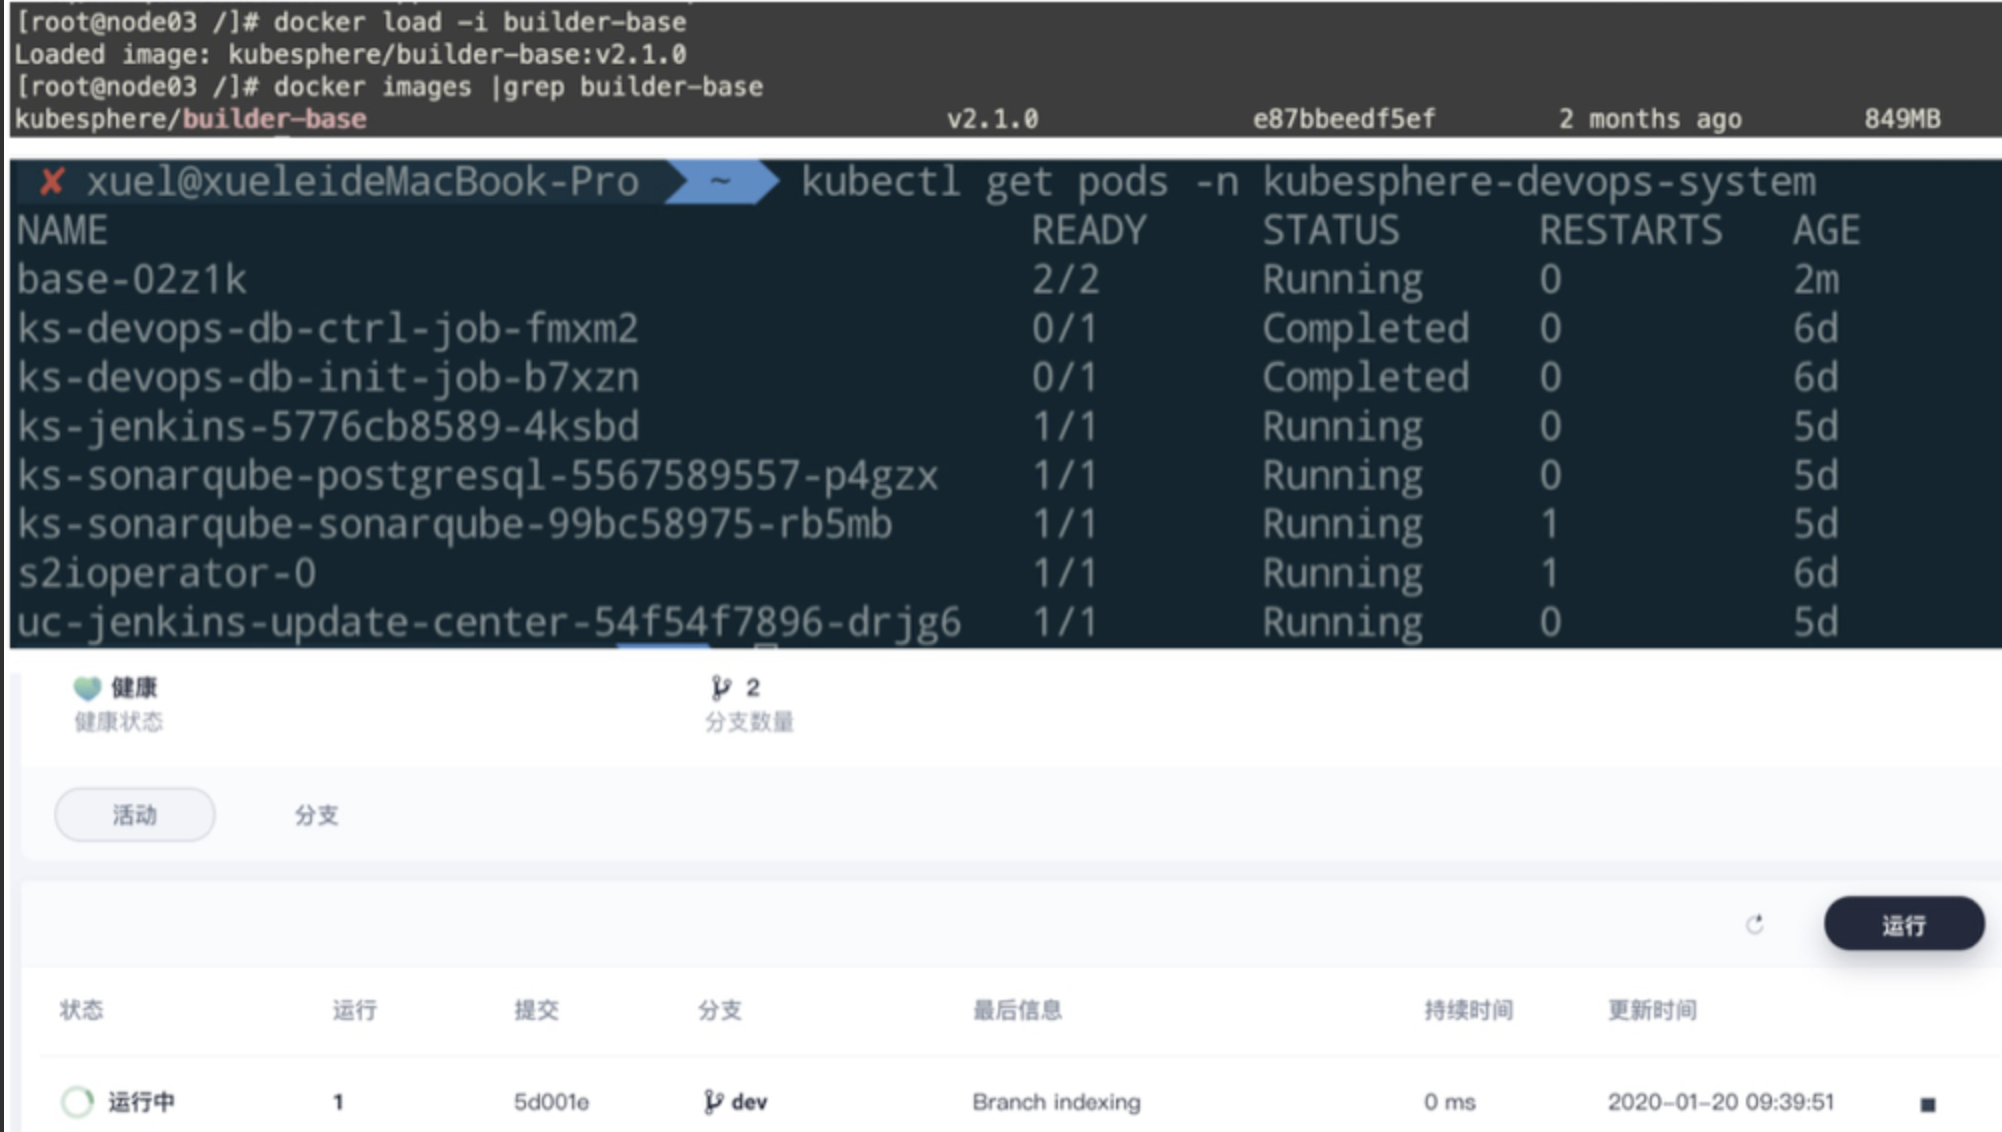
十三 kubesphere 應用安裝
目前自己的kubesphere集羣爲2.1,在具體的在項目中添加了repo後,後臺回自己去同步鏡像數據還是需要爲手動在那個地方觸發下,我添加了幾個helm 的repo,好像裏面的chart沒有在web界面顯示,在添加了repo的項目下,我新建應用,然後選擇來自kubesphere的應用商店,其中只有幾個charts,發現不了添加的helm 源的chartscharts,在服務器內部是可以使用命令search到。諮詢社區暫時爲收到回覆,記得v2.0版本後臺有個任務會去同步charts,目前2.1版本,先使用helm命令在集羣內進行手動helm安裝
[root@master common-service]# helm install -n consul --namespace common-service -f consul/values-production.yaml consul/
NAME:   consul
LAST DEPLOYED: Tue Jan 14 17:56:27 2020
NAMESPACE: common-service
STATUS: DEPLOYED

RESOURCES:
==> v1/Pod(related)
NAME      READY  STATUS   RESTARTS  AGE
consul-0  0/2    Pending  0         0s

==> v1/Service
NAME       TYPE       CLUSTER-IP   EXTERNAL-IP  PORT(S)                                                AGE
consul     ClusterIP  None         <none>       8400/TCP,8301/TCP,8301/UDP,8300/TCP,8600/TCP,8600/UDP  1s
consul-ui  ClusterIP  10.233.59.7  <none>       80/TCP                                                 1s
==> v1/StatefulSet
NAME    READY  AGE
consul  0/3    0s

==> v1beta1/PodDisruptionBudget
NAME        MIN AVAILABLE  MAX UNAVAILABLE  ALLOWED DISRUPTIONS  AGE
consul-pdb  1              N/A              0                    1s

NOTES:
  ** Please be patient while the chart is being deployed **

  Consul can be accessed within the cluster on port 8300 at consul.common-service.svc.cluster.local

In order to access to the Consul Web UI:

    kubectl port-forward --namespace common-service svc/consul-ui 80:80
    echo "Consul URL: http://127.0.0.1:80"

Please take into account that you need to wait until a cluster leader is elected before using the Consul Web UI.

In order to check the status of the cluster you can run the following command:

    kubectl exec -it consul-0 -- consul members

Furthermore, to know which Consul node is the cluster leader run this other command:

    kubectl exec -it consul-0 -- consul operator raf

具體問題可以參考帖子:https://kubesphere.com.cn/forum/d/669-kubesphere
自己整理了k8s學習筆記,有興起的可以一快學習交流:https://github.com/redhatxl/awesome-kubernetes-notes
支持國產容器管理平臺KubeSphere,爲社區儘自己的一份綿薄之力。