


本文首發於 vivo互聯網技術 微信公衆號
鏈接: https://mp.weixin.qq.com/s/Xz2bGaLxVL4xw1M2hb2nJQ
作者:Morrain
很多同學在學習 Promise 時,知其然卻不知其所以然,對其中的用法理解不了。本系列文章由淺入深逐步實現 Promise,並結合流程圖、實例以及動畫進行演示,達到深刻理解 Promise 用法的目的。
本系列文章有如下幾個章節組成:
-
圖解 Promise 實現原理(二)—— Promise 鏈式調用
-
圖解 Promise 實現原理(三)—— Promise 原型方法實現
- 圖解 Promise 實現原理(四)—— Promise 靜態方法實現
一、前言
上一節中,實現了 Promise 的基礎版本:
//極簡的實現+鏈式調用+延遲機制+狀態
class Promise {
    callbacks = [];
    state = 'pending';//增加狀態
    value = null;//保存結果
    constructor(fn) {
        fn(this._resolve.bind(this));
    }
    then(onFulfilled) {
        if (this.state === 'pending') {//在resolve之前,跟之前邏輯一樣,添加到callbacks中
            this.callbacks.push(onFulfilled);
        } else {//在resolve之後,直接執行回調,返回結果了
            onFulfilled(this.value);
        }
        return this;
    }
    _resolve(value) {
        this.state = 'fulfilled';//改變狀態
        this.value = value;//保存結果
        this.callbacks.forEach(fn => fn(value));
    }
}
但鏈式調用,只是在 then 方法中 return 了 this,使得 Promise 實例可以多次調用 then 方法,但因爲是同一個實例,調用再多次 then 也只能返回相同的一個結果,通常我們希望的鏈式調用是這樣的:
//使用Promise
function getUserId(url) {
    return new Promise(function (resolve) {
        //異步請求
        http.get(url, function (id) {
            resolve(id)
        })
    })
}
getUserId('some_url').then(function (id) {
    //do something
    return getNameById(id);
}).then(function (name) {
    //do something
    return getCourseByName(name);
}).then(function (course) {
    //do something
    return getCourseDetailByCourse(course);
}).then(function (courseDetail) {
    //do something
});
每個 then 註冊的 onFulfilled 都返回了不同的結果,層層遞進,很明顯在 then 方法中 return this 不能達到這個效果。引入真正的鏈式調用,then 返回的一定是一個新的Promise實例。
真正的鏈式 Promise 是指在當前 Promise 達到 fulfilled 狀態後,即開始進行下一個 Promise(後鄰 Promise)。那麼我們如何銜接當前 Promise 和後鄰 Promise 呢?(這是理解 Promise 的難點,我們會通過動畫演示這個過程)。
二、鏈式調用的實現
先看下實現源碼:
//完整的實現
class Promise {
    callbacks = [];
    state = 'pending';//增加狀態
    value = null;//保存結果
    constructor(fn) {
        fn(this._resolve.bind(this));
    }
    then(onFulfilled) {
        return new Promise(resolve => {
            this._handle({
                onFulfilled: onFulfilled || null,
                resolve: resolve
            });
        });
    }
    _handle(callback) {
        if (this.state === 'pending') {
            this.callbacks.push(callback);
            return;
        }
        //如果then中沒有傳遞任何東西
        if (!callback.onFulfilled) {
            callback.resolve(this.value);
            return;
        }
        var ret = callback.onFulfilled(this.value);
        callback.resolve(ret);
    }
    _resolve(value) {
        this.state = 'fulfilled';//改變狀態
        this.value = value;//保存結果
        this.callbacks.forEach(callback => this._handle(callback));
    }
}
由上面的實現,我們可以看到:
-
then 方法中,創建並返回了新的 Promise 實例,這是串行Promise的基礎,是實現真正鏈式調用的根本。
-
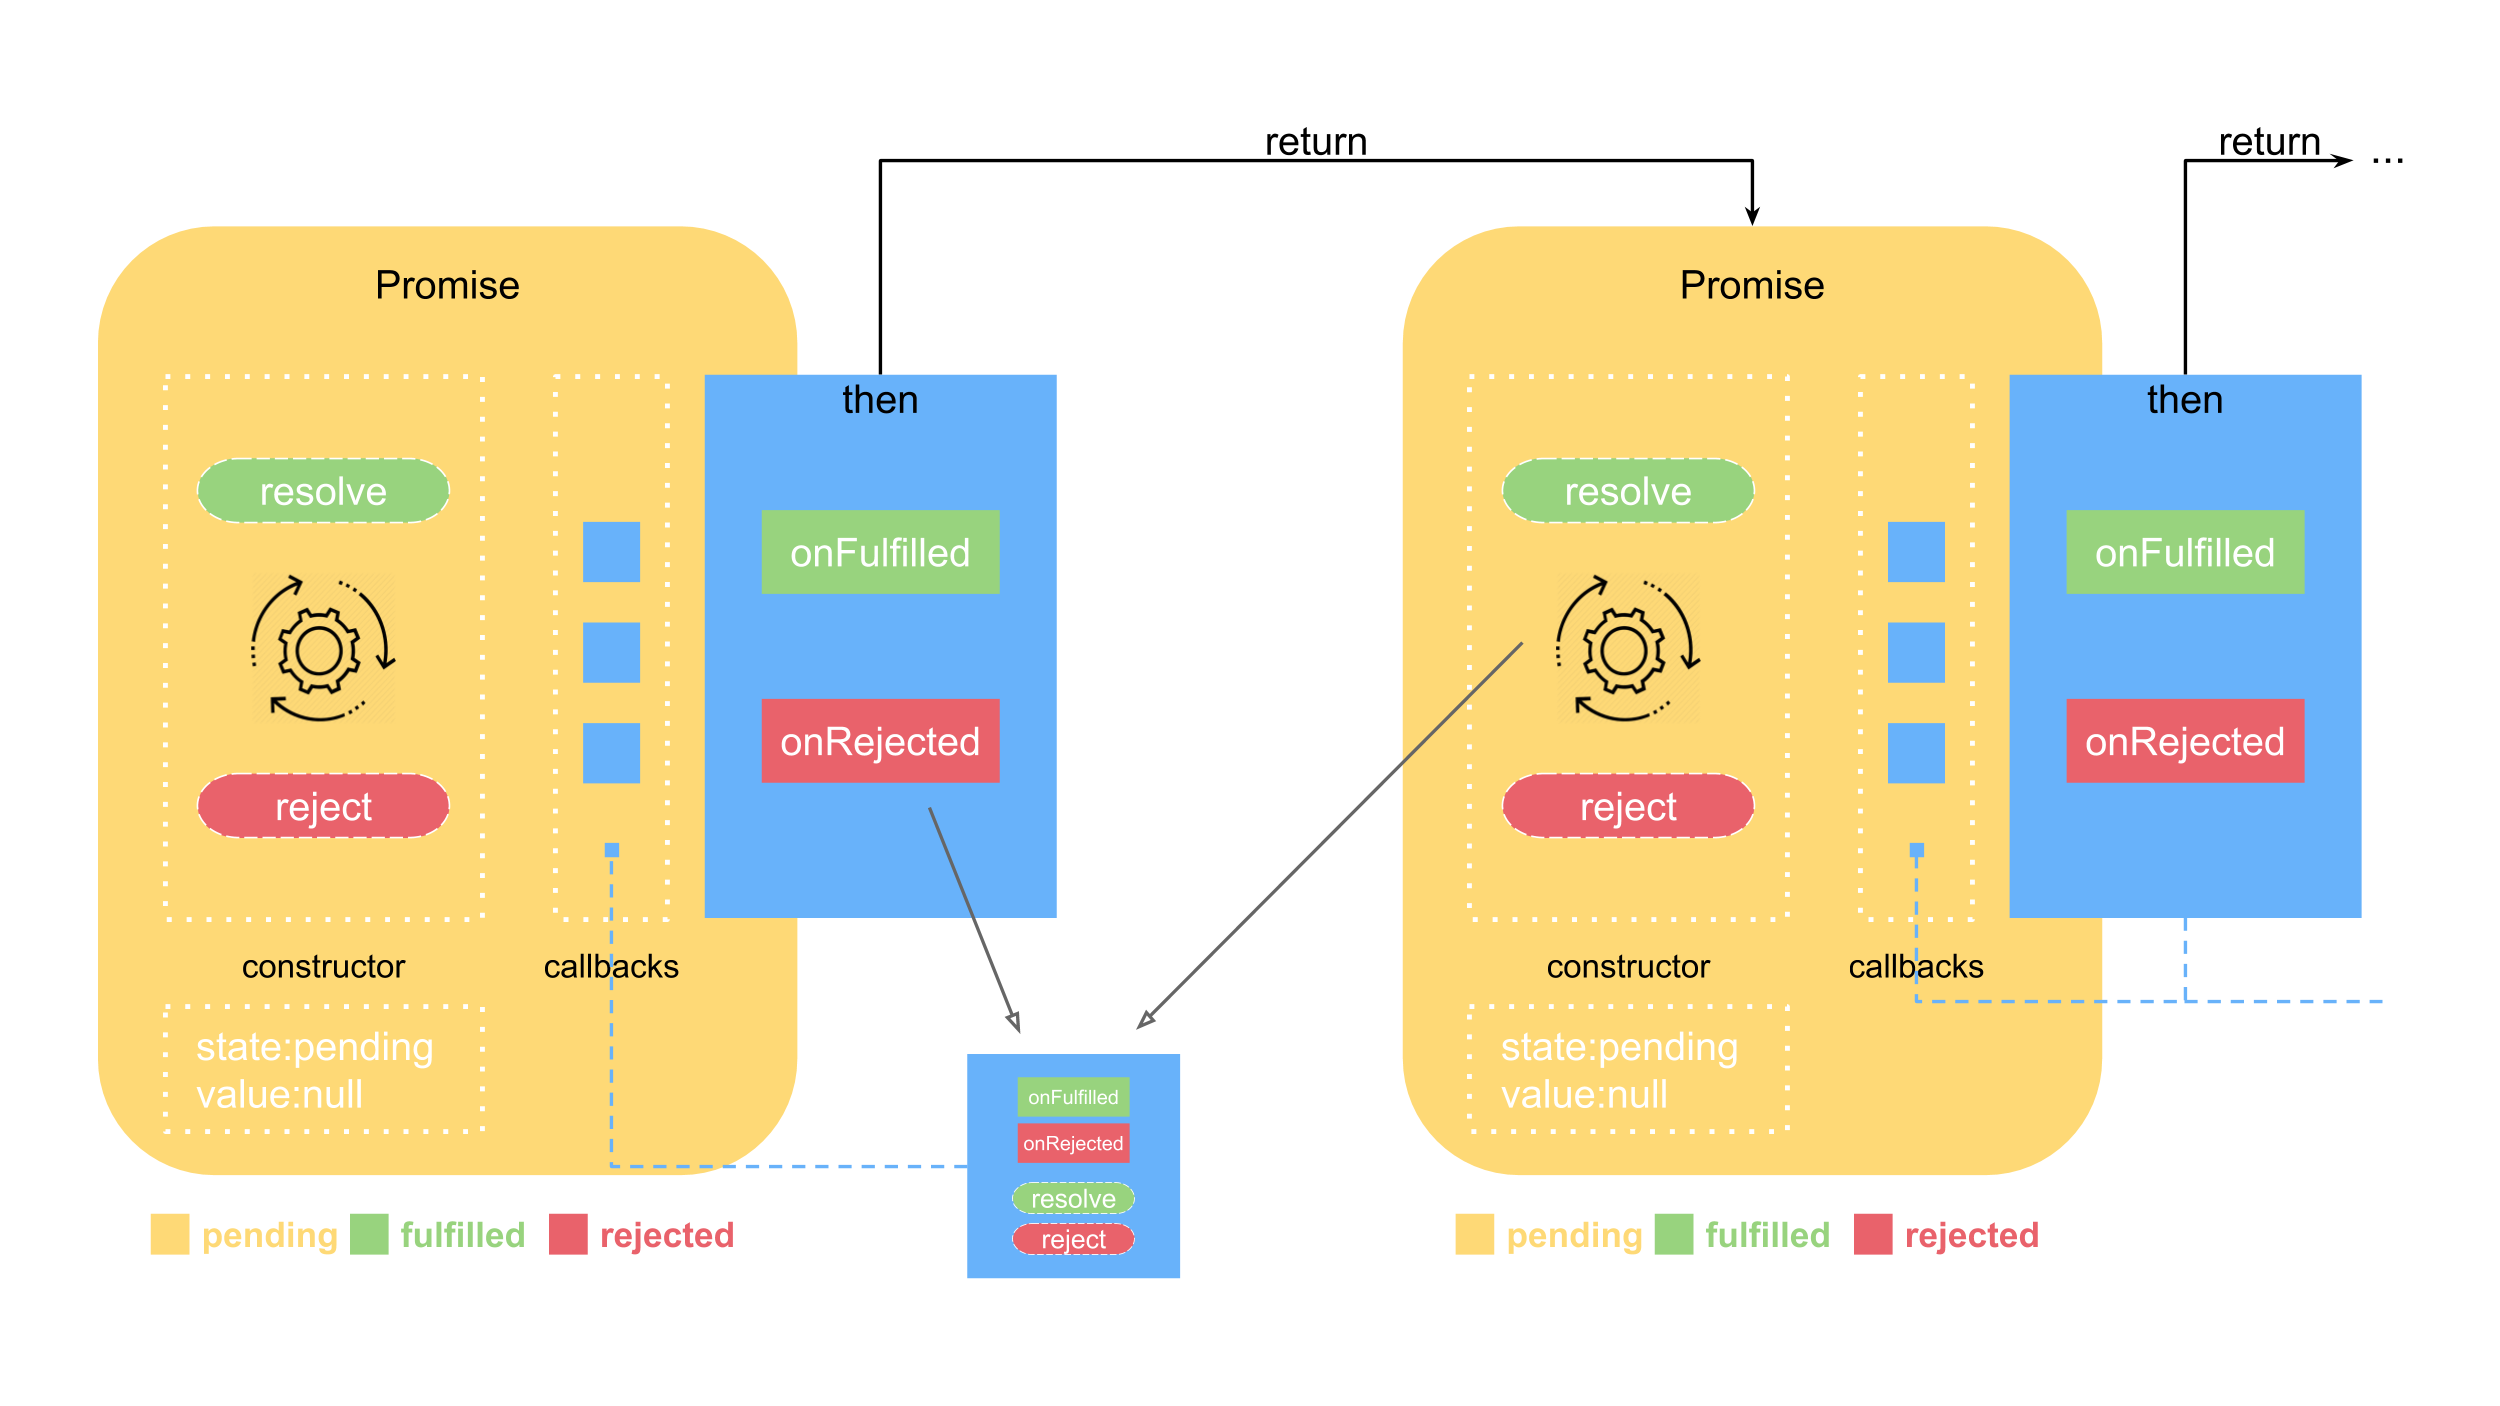
then 方法傳入的形參 onFulfilled 以及創建新 Promise 實例時傳入的 resolve 放在一起,被push到當前 Promise 的 callbacks 隊列中,這是銜接當前 Promise 和後鄰 Promise 的關鍵所在。
- 根據規範,onFulfilled 是可以爲空的,爲空時不調用 onFulfilled。
看下動畫演示:
(Promise 鏈式調用演示動畫)
當第一個 Promise 成功時,resolve 方法將其狀態置爲 fulfilled ,並保存 resolve 帶過來的value。然後取出 callbacks 中的對象,執行當前 Promise的 onFulfilled,返回值通過調用第二個 Promise 的 resolve 方法,傳遞給第二個 Promise。動畫演示如下:
(Promise 鏈式調用 fulfilled)
爲了真實的看到鏈式調用的過程,我寫一個mockAjax函數,用來模擬異步請求:
/**
 * 模擬異步請求
 * @param {*} url  請求的URL
 * @param {*} s  指定該請求的耗時,即多久之後請求會返回。單位秒
 * @param {*} callback 請求返回後的回調函數
 */
const mockAjax = (url, s, callback) => {
    setTimeout(() => {
        callback(url + '異步請求耗時' + s + '秒');
    }, 1000 * s)
}
除此之外,我給 Promise 的源碼加上了日誌輸出並增加了構造順序標識,可以清楚的看到構造以及執行過程:
//Demo1
new Promise(resolve => {
  mockAjax('getUserId', 1, function (result) {
    resolve(result);
  })
}).then(result => {
  console.log(result);
})
執行結果如下:
[Promse-1]:constructor
[Promse-1]:then
[Promse-2]:constructor
[Promse-1]:_handle state= pending
[Promse-1]:_handle callbacks= [ { onFulfilled: [Function], resolve: [Function] } ]
=> Promise { callbacks: [], name: 'Promse-2', state: 'pending', value: null }
[Promse-1]:_resolve
[Promse-1]:_resolve value= getUserId異步請求耗時1秒
[Promse-1]:_handle state= fulfilled
getUserId異步請求耗時1秒
[Promse-2]:_resolve
[Promse-2]:_resolve value= undefined
通過打印出來的日誌,可以看到:
-
構造 Promise-1 實例,立即執行 mackAjax('getUserId',callback);
-
調用 Promise-1 的 then 方法,註冊 Promise-1 的 onFulfilled 函數。
-
then 函數內部構造了一個新的 Promise實例:Promise-2。立即執行 Promise-1 的 _handle方法。
-
此時 Promise-1 還是pending的狀態。
-
Promise-1._handle 中就把註冊在 Promise-1 的 onFulfilled 和 Promise-2 的 resolve 保存在 Promise-1 內部的 callbacks。
-
至此當前線程執行結束。返回的是 Promise-2 的 Promise實例。
-
1s後,異步請求返回,要改變 Promise-1 的狀態和結果,執行 resolve(result)。
-
Promise-1 的值被改變,內容爲異步請求返回的結果:"getUserId異步請求耗時1s"。
-
Promise-1 的狀態變成 fulfilled。
-
Promise-1 的 onFulfilled 被執行,打印出了"getUserId異步請求耗時1秒"。
-
然後再調用 Promise-2.resolve。
- 改變 Promise-2 的值和狀態,因爲 Promise-1 的 onFulfilled 沒有返回值,所以 Promise-2的值爲undefined。
上例中,如果把異步的請求改成同步會是什麼的效果?
new Promise(resolve => {
  resolve('getUserId同步請求');
}).then(result => {
    console.log(result);
});

//打印日誌
[Promse-1]:constructor
[Promse-1]:_resolve
[Promse-1]:_resolve value= getUserId同步請求
[Promse-1]:then
[Promse-2]:constructor
[Promse-1]:_handle state= fulfilled
getUserId同步請求
[Promse-2]:_resolve
[Promse-2]:_resolve value= undefined
=> Promise {
  callbacks: [],
  name: 'Promse-2',
  state: 'fulfilled',
  value: undefined }
感興趣的可以自己去分析一下。
三、鏈式調用真正的意義
執行當前 Promise 的 onFulfilled 時,返回值通過調用第二個 Promise 的 resolve 方法,傳遞給第二個 Promise,作爲第二個 Promise 的值。於是我們考慮如下Demo:
//Demo2
new Promise(resolve => {
    mockAjax('getUserId', 1, function (result) {
        resolve(result);
    })
}).then(result => {
    console.log(result);
    //對result進行第一層加工
    let exResult = '前綴:' + result;
    return exResult;
}).then(exResult => {
    console.log(exResult);
});
我們加了一層 then,來看下執行的結果:
[Promse-1]:constructor
[Promse-1]:then
[Promse-2]:constructor
[Promse-1]:_handle state= pending
[Promse-1]:_handle callbacks= [ { onFulfilled: [Function], resolve: [Function] } ]
[Promse-2]:then
[Promse-3]:constructor
[Promse-2]:_handle state= pending
[Promse-2]:_handle callbacks= [ { onFulfilled: [Function], resolve: [Function] } ]
=> Promise { callbacks: [], name: 'Promse-3', state: 'pending', value: null }
[Promse-1]:_resolve
[Promse-1]:_resolve value= getUserId異步請求耗時1秒
[Promse-1]:_handle state= fulfilled
getUserId異步請求耗時1秒
[Promse-2]:_resolve
[Promse-2]:_resolve value= 前綴:getUserId異步請求耗時1秒
[Promse-2]:_handle state= fulfilled
前綴:getUserId異步請求耗時1秒
[Promse-3]:_resolve
[Promse-3]:_resolve value= undefined:
鏈式調用可以無限的寫下去,上一級 onFulfilled return 的值,會變成下一級 onFulfilled 的結果。可以參考Demo3:
我們很容易發現,上述 Demo3 中只有第一個是異步請求,後面都是同步的,我們完全沒有必要這麼鏈式的實現。如下一樣能得到我們想要的三個結果: 分別打印出來的值。
//等價於 Demo3
new Promise(resolve => {
    mockAjax('getUserId', 1, function (result) {
        resolve(result);
    })
}).then(result => {
    console.log(result);
    //對result進行第一層加工
    let exResult = '前綴:' + result;
    console.log(exResult);

    let finalResult = exResult + ':後綴';
    console.log(finalResult);
});
那鏈式調用真正的意義在哪裏呢?
剛纔演示的都是 onFulfilled 返回值是 value 的情況,如果是一個 Promise 呢?是不是就可以通過 onFulfilled,由使用 Promise 的開發者決定後續 Promise 的狀態。
於是在 _resolve 中增加對前一個 Promise onFulfilled 返回值的判斷:
_resolve(value) {

        if (value && (typeof value === 'object' || typeof value === 'function')) {
            var then = value.then;
            if (typeof then === 'function') {
                then.call(value, this._resolve.bind(this));
                return;
            }
        }

        this.state = 'fulfilled';//改變狀態
        this.value = value;//保存結果
        this.callbacks.forEach(callback => this._handle(callback));
    }
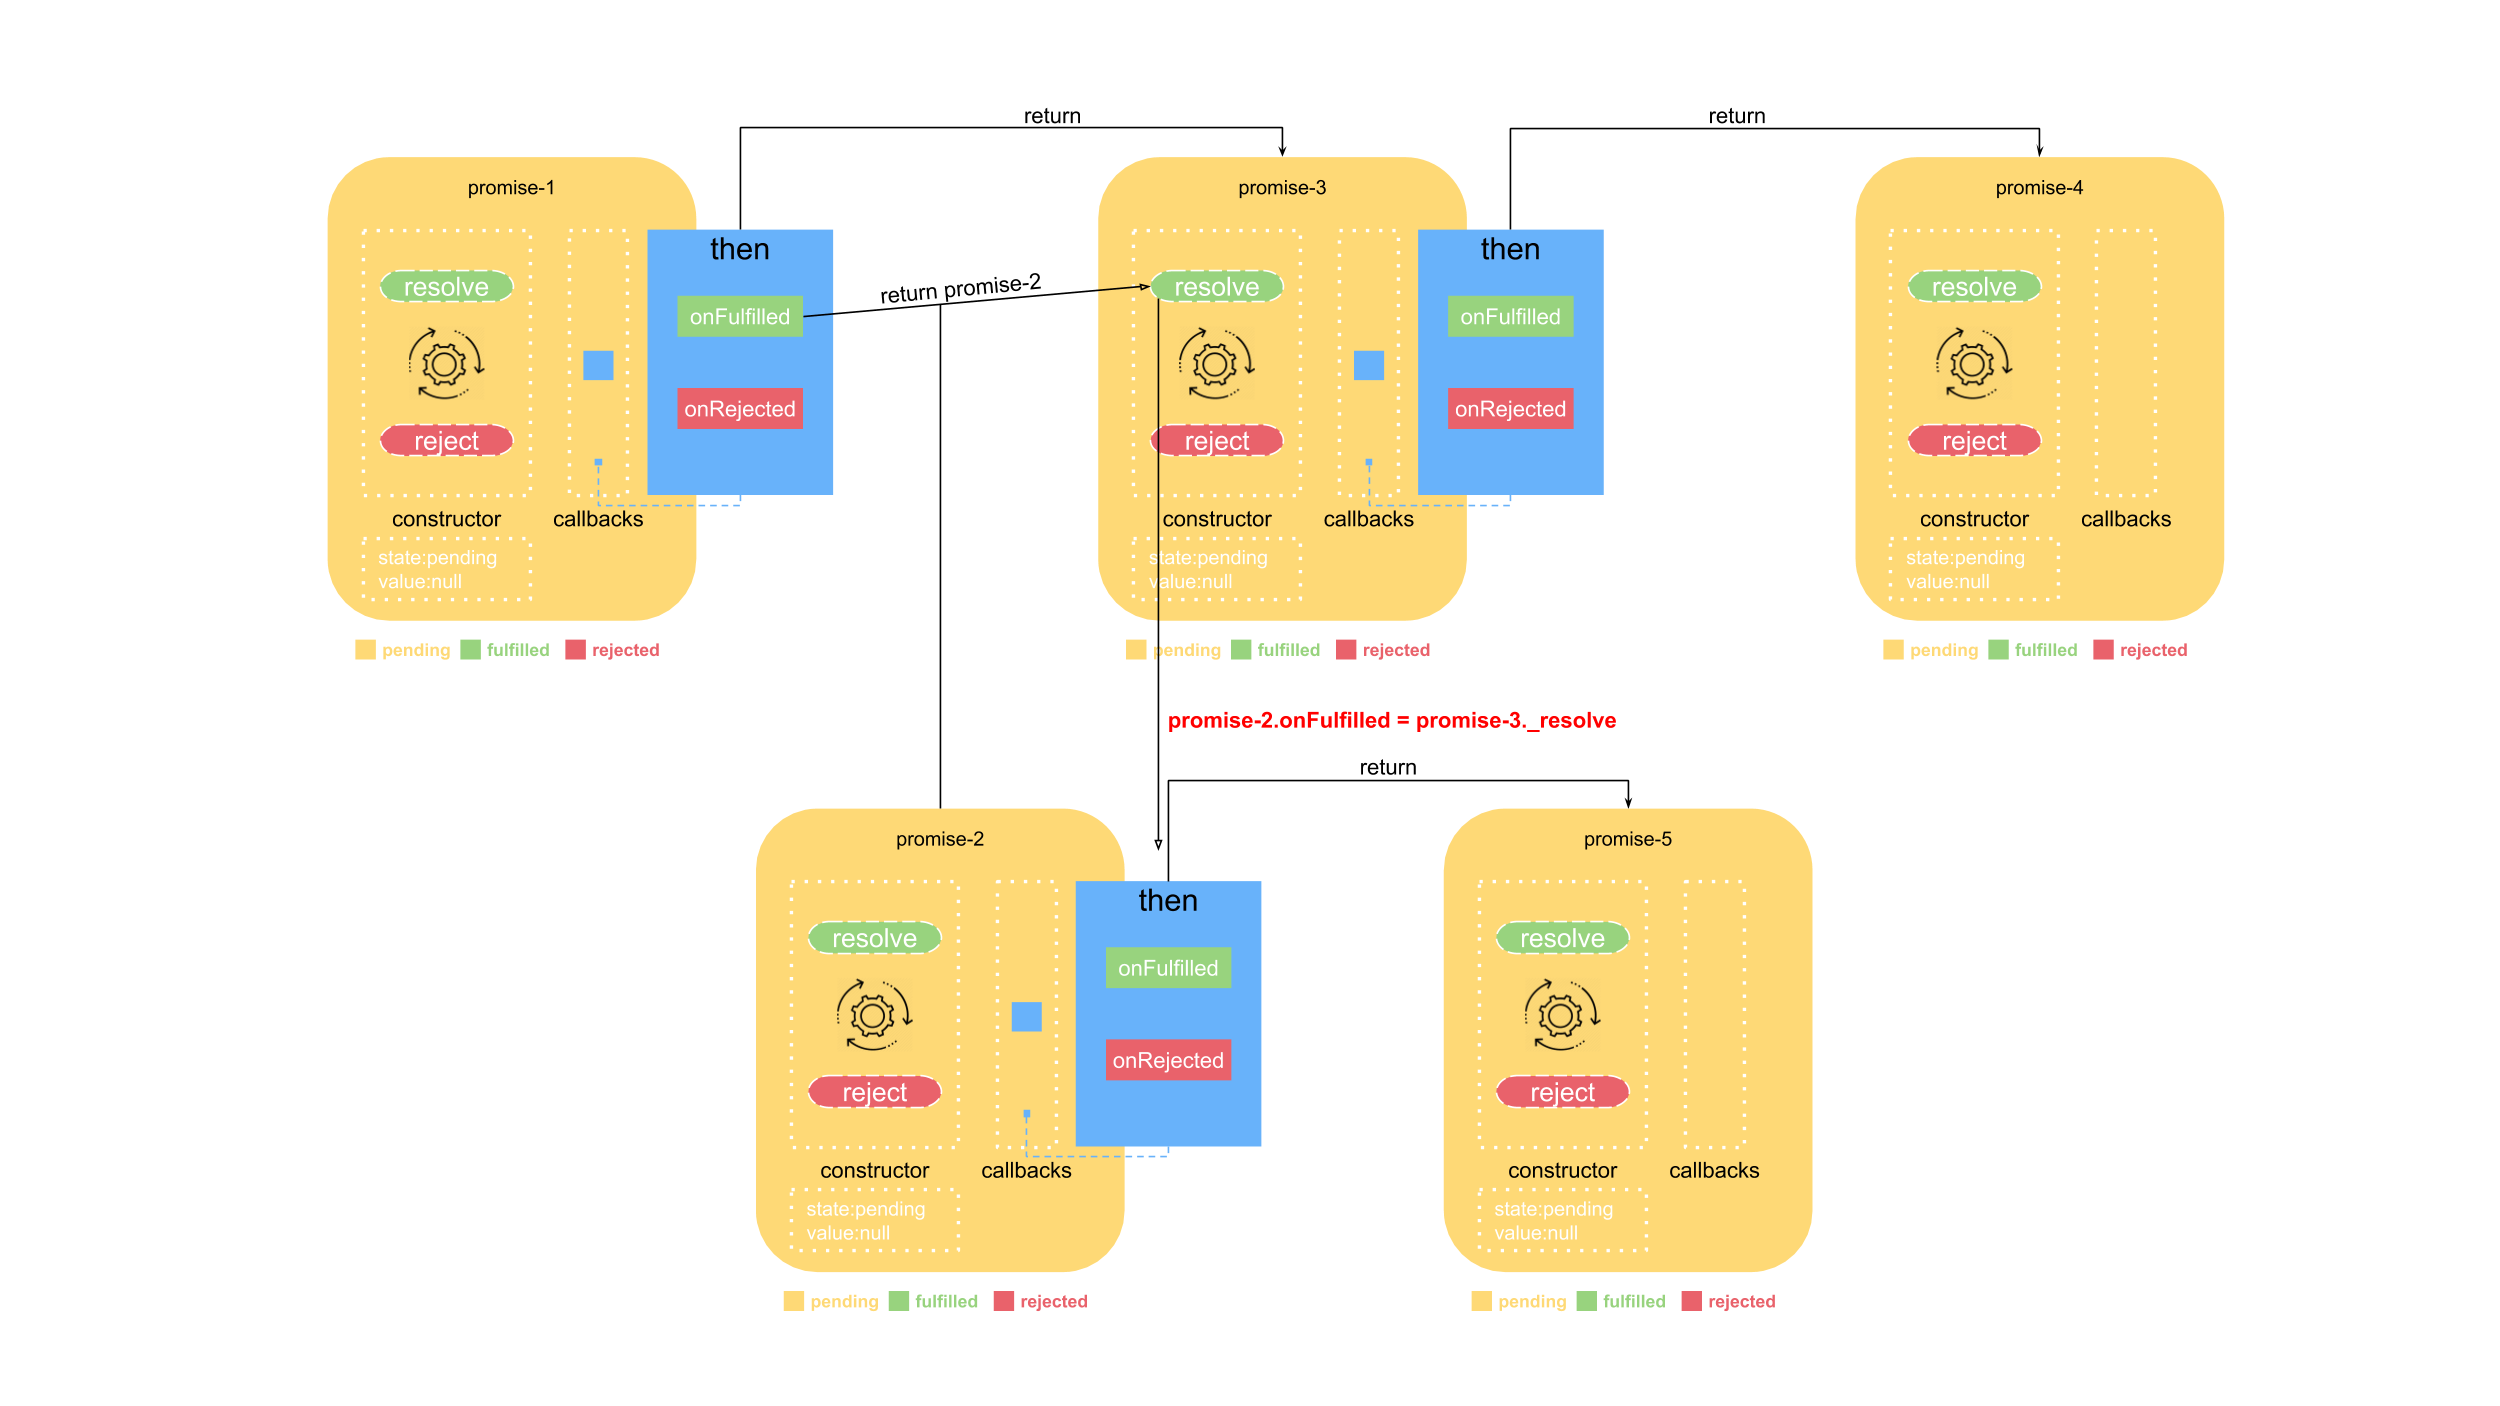
從代碼上看,它是對 resolve 中的值作了一個特殊的判斷,判斷 resolve 的值是否爲 Promise實例,如果是 Promise 實例,那麼就把當前 Promise 實例的狀態改變接口重新註冊到 resolve 的值對應的 Promise 的 onFulfilled 中,也就是說當前 Promise 實例的狀態要依賴 resolve 的值的 Promise 實例的狀態。
//Demo4
const pUserId = new Promise(resolve => {
  mockAjax('getUserId', 1, function (result) {
    resolve(result);
  })
})
const pUserName = new Promise(resolve => {
  mockAjax('getUserName', 2, function (result) {
    resolve(result);
  })
})

pUserId.then(id => {
  console.log(id)
  return pUserName
}).then(name => {
  console.log(name)
})
執行的結果如下:
[Promse-1]:constructor
[Promse-2]:constructor
[Promse-1]:then
[Promse-3]:constructor
[Promse-1]:_handle state= pending
[Promse-1]:_handle callbacks= [ { onFulfilled: [Function], resolve: [Function] } ]
[Promse-3]:then
[Promse-4]:constructor
[Promse-3]:_handle state= pending
[Promse-3]:_handle callbacks= [ { onFulfilled: [Function], resolve: [Function] } ]
=> Promise { callbacks: [], name: 'Promse-4', state: 'pending', value: null }
[Promse-1]:_resolve
[Promse-1]:_resolve value= getUserId異步請求耗時1秒
[Promse-1]:_handle state= fulfilled
getUserId異步請求耗時1秒
[Promse-3]:_resolve
[Promse-3]:_resolve value= Promise { callbacks: [], name: 'Promse-2', state: 'pending', value: null }
[Promse-2]:then
[Promse-5]:constructor
[Promse-2]:_handle state= pending
[Promse-2]:_handle callbacks= [ { onFulfilled: [Function], resolve: [Function] } ]
[Promse-2]:_resolve
[Promse-2]:_resolve value= getUserName異步請求耗時2秒
[Promse-2]:_handle state= fulfilled
[Promse-3]:_resolve
[Promse-3]:_resolve value= getUserName異步請求耗時2秒
[Promse-3]:_handle state= fulfilled
getUserName異步請求耗時2秒
[Promse-4]:_resolve
[Promse-4]:_resolve value= undefined
[Promse-5]:_resolve
[Promse-5]:_resolve value= undefined
一樣的,我做了一個演示動畫,還原了這個過程:

(Promise 真正的鏈式調用)
至此,就實現了 Promise 鏈式調用的全部內容。鏈式調用是 Promise 難點,更是重點。一定要通過實例還有動畫,深刻體會。下一節介紹 Promise 其它原型方法的實現。