


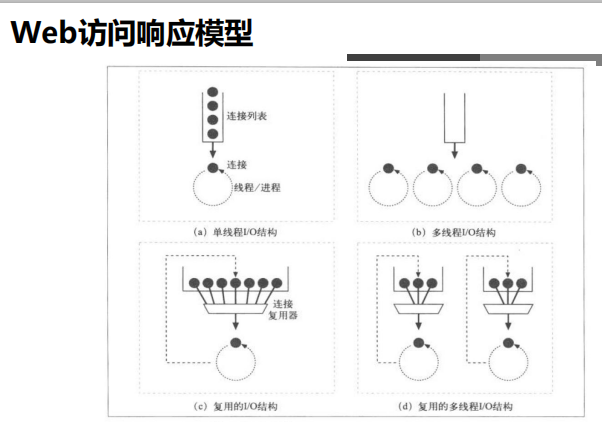
Web訪問響應模型(Web I/O)
單進程I/O模型:啓動一個進程處理用戶請求,而且一次只處理一個,多個請求被串行響應
多進程I/O模型:並行啓動多個進程,每個進程響應一個連接請求
複用I/O結構:啓動一個進程,同時響應N個連接請求
實現方法:多線程模型和事件驅動
多線程模型:一個進程生成N個線程,每線程響應一個連接請求
事件驅動:一個進程處理N個請求
複用的多進程I/O模型:啓動M個進程,每個進程響應N個連接請求,同時接收M*N個請求
一次完整的HTTP請求處理
1、建立連接:接收或拒絕連接請求
2、接收請求:接收客戶端請求報文中對某資源的一次請求的過程
3、處理請求:服務器對請求報文進行解析,並獲取請求的資源及請求方法等相關信息,根據方法,資源,首部和可選的主體部分對請求進行處理
元數據:請求報文首部
<method> <URL> <VERSION>
HEADERS 格式 name:value
<request body>
示例: Host: www.magedu.com 請求的主機名稱 Server: Apache/2.4.7
http常用請求方式:GET POST HEAD PUT DELETE TRACE TRACE OPTIONS
eg:[root@centos7 ~]#telnet www.magedu.com 80
Trying 101.200.188.230...
Connected to www.magedu.com.
Escape character is '^]'.
GET /HTTP/1.1
<!DOCTYPE html>
<html lang="zh-CN">
4、訪問資源:
服務器獲取請求報文中請求的資源web服務器,即存放了web資源的服務器,負責向請求者提供對方請求的靜態資源,或動態運行後生成的資源
web服務器資源路徑映射方式:(a) docroot (b) alias (c) 虛擬主機docroot (d) 用戶家目錄docroot
5、構建響應報文:
一旦Web服務器識別除了資源,就執行請求方法中描述的動作,並返回響應報文。響應報文中 包含有響應狀態碼、響應首部,如果生成了響應主體的話,還包
括響應主體:
1)響應實體:如果事務處理產生了響應主體,就將內容放在響應報文中回去。響應報文中通常包括:描述了響應主體MIME類型的Content-Type首部描述了響應主體長度的Content-Length實際報文的主體
2)URL重定向:web服務構建的響應並非客戶端請求的資源,而是資源另外一個訪問路徑
3)MIME類型: Web服務器要負責確定響應主體的MIME類型。多種配置服務器的方法可將MIME類型與資源管理起來
6、發送響應報文
7、記錄日誌:最後,當事務結束時,Web服務器會在日誌文件中添加一個條目,來描述已執行的事務
HTTP部分:
http服務器程序: httpd apache nginx lighttpd
MPM工作模式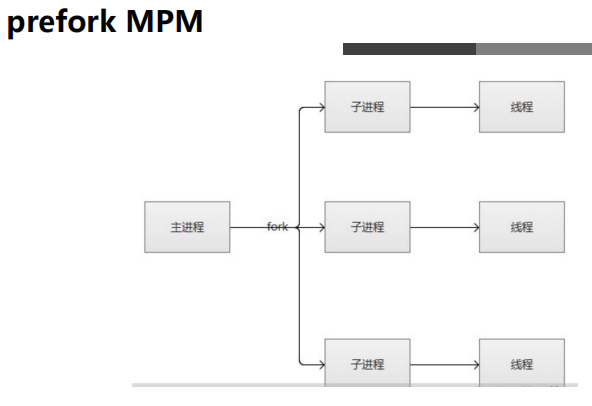
prefork:多進程I/O模型,每個進程響應一個請求,默認模型 一個主進程:生成和回收n個子進程,創建套接字,不響應請求
佔用資源,穩定性好,兼容性強,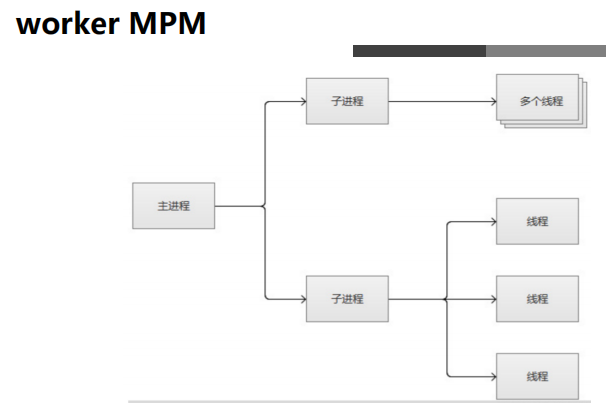
worker:複用的多進程I/O模型,多進程多線程,IIS使用此模型
一個主進程:生成m個子進程,每個子進程負責生個n個線程,每個線程響應一個請求,併發響應請求:mn
節約資源,支持更多用戶訪問,穩定性差,若一個線程出問題,它同一個進程的線程也會被影響。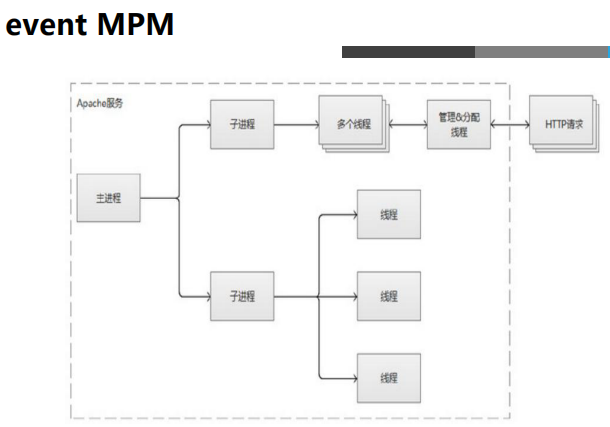
event:事件驅動模型(worker模型的變種)
一個主進程:生成m個子進程,每個進程直接響應n個請求,併發響應請求:mn,有專門的線程來管理這些keep-alive類型的線程,當有真實請求時,將請
求傳遞給服務線程,執行完畢後,又允許釋放。這樣增強了高併發場景下的請求處理能力
“提高高併發,主動釋放連接”
httpd功能
虛擬主機:IP PORT FQDN CGI:Common Gateway Interface,通用網關接口 反向代理 負載均衡 路徑別名 用戶認證機制: basic digest
[root@centos7 ~]#yum info httpd
Loaded plugins: fastestmirror, langpacks
Loading mirror speeds from cached hostfile
Installed Packages
Name : httpd
Arch : x86_64
Version : 2.4.6
Release : 88.el7.centos
Size : 9.4 M
Repo : installed
From repo : base
Summary : Apache HTTP Server
URL : http://httpd.apache.org/
License : ASL 2.0
Description : The Apache HTTP Server is a powerful, efficient, and extensible
: web server.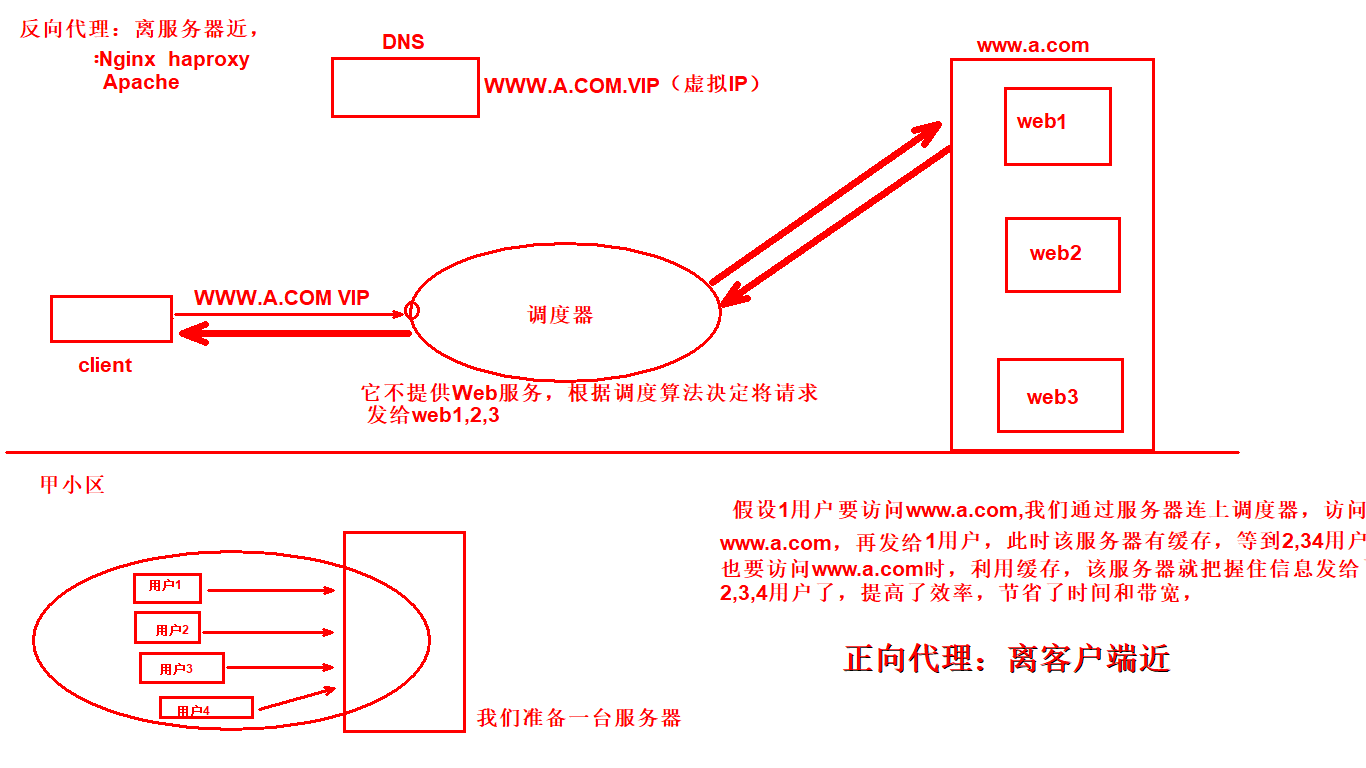
現在,我們自己創建一個頁面:
[root@centos7 ~]#systemctl start httpd
[root@centos7 ~]#ss -ntl 開啓服務並查看端口:80
State Recv-Q Send-Q Local Address:Port Peer Address:Port
LISTEN 0 128 :::80 :::*
[root@centos7 ~]#vim /var/www/html/index.html 文件名爲index.html
<html>
<head>
<title>html語言</title>
</head>
<body>
<img src="http://www.magedu.com/wp-content/uploads/2017/09/logo.png" >
<h1>你好</h1>
<p><a href=http://www.magedu.com>馬哥教育</a>歡迎你</p>
</body>
</html>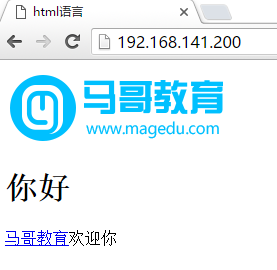
模塊文件路徑:
/etc/httpd/modules
/usr/lib64/httpd/modules
主程序文件: /usr/sbin/httpd 主進程文件: /etc/httpd/run/httpd.pid
[root@centos7 ~]#cd /etc/httpd
[root@centos7 httpd]#ls
conf conf.d conf.modules.d logs modules run
[root@centos7 httpd]#ll run/
total 12
-rw-r--r--. 1 root root 8 Feb 27 13:22 authdigest_shm.6634
-rw-r--r--. 1 root root 8 Feb 27 13:24 authdigest_shm.7991
drwx------. 2 apache apache 40 Feb 27 12:22 htcacheclean
-rw-r--r--. 1 root root 5 Feb 27 13:24 httpd.pid
[root@centos7 httpd]#cat run/httpd.pid
7991
[root@centos7 httpd]#systemctl stop httpd 關停服務就打不開p.id,再開啓服務,p.id會變化
[root@centos7 httpd]#cat run/httpd.pid
cat: run/httpd.pid: No such file or directory
[root@centos7 httpd]#systemctl start httpd
[root@centos7 httpd]#cat run/httpd.pid
18470
[root@centos7 httpd]#ls /var/log/httpd/
access_log 訪問日誌 error_log 錯誤日誌
接着,我們安裝一個httpd-manual 軟件:安裝後,就相當於在本機搭建了一個網站:
[root@centos7 httpd]#yum install httpd-manual (幫助文檔)
[root@centos7 httpd]#systemctl restart httpd
Httpd常見配置 (注:httpd -t 檢查語法專用)
首先創建一個網頁:
[root@centos7 ~]#cd /var/www/html
[root@centos7 html]#ls
index.html
[root@centos7 html]#vim test1.html
<h1>www.magedu.com</h1>
[root@centos7 html]#curl http://192.168.141.200/test1.html
<h1>www.magedu.com</h1>
[root@centos7 html]#curl -I http://192.168.141.200/test1.html
HTTP/1.1 200 OK
Date: Thu, 28 Feb 2019 02:37:18 GMT
Server: Apache/2.4.6 (CentOS)
Last-Modified: Thu, 28 Feb 2019 02:31:27 GMT
ETag: "18-582eb16574d0e"
Accept-Ranges: bytes
Content-Length: 24
Content-Type: text/html; charset=UTF-8
1、顯示服務器版本信息
[root@centos7 html]#vim /etc/httpd/conf/httpd.conf
servertokens prod 添加在文件底,是爲了安全,不暴露版本信息
[root@centos7 html]#systemctl reload httpd
[root@centos7 html]#curl -I http://192.168.141.200/test1.html
HTTP/1.1 200 OK
Date: Thu, 28 Feb 2019 02:46:14 GMT
Server: Apache
Last-Modified: Thu, 28 Feb 2019 02:31:27 GMT
ETag: "18-582eb16574d0e"
Accept-Ranges: bytes
Content-Length: 24
Content-Type: text/html; charset=UTF-8
[root@centos7 html]#curl -I http://172.20.9.200/test1.html
HTTP/1.1 200 OK
Date: Thu, 28 Feb 2019 02:46:32 GMT
Server: Apache
Last-Modified: Thu, 28 Feb 2019 02:31:27 GMT
ETag: "18-582eb16574d0e"
Accept-Ranges: bytes
Content-Length: 24
Content-Type: text/html; charset=UTF-8 訪問本機的2個IP均可以。
2、修改監聽的IP和Port
Listen [IP:]PORT (1) 省略IP表示爲本機所有IP (2) Listen指令至少一個,可重複出現多次 Listen 80 Listen 8080
[root@centos7 html]#vim /etc/httpd/conf/httpd.conf
Listen 192.168.141.200:80 只指定該IP可以訪問。
[root@centos7 html]#systemctl reload httpd
[root@centos7 html]#ss -ntl
State Recv-Q Send-Q Local Address:Port Peer Address:Port
LISTEN 0 50 :3306 :
LISTEN 0 128 :111 :
LISTEN 0 128 :6000 :
LISTEN 0 5 192.168.122.1:53 :
LISTEN 0 128 :22 :
LISTEN 0 128 127.0.0.1:631 :
LISTEN 0 100 127.0.0.1:25 :
[root@centos7 html]#systemctl restart httpd 只有重啓才生效。
[root@centos7 html]#ss -ntl
State Recv-Q Send-Q Local Address:Port Peer Address:Port
LISTEN 0 50 :3306 :
LISTEN 0 128 :111 :
LISTEN 0 128 192.168.141.200:80 :
[root@centos7 html]#vim /etc/httpd/conf/httpd.conf
Listen 192.168.141.200:8080
Listen 127.0.0.1:80 (注:listen命令不可註釋掉)
[root@centos7 html]#systemctl restart httpd
[root@centos7 html]#ss -ntl
State Recv-Q Send-Q Local Address:Port Peer Address:Port
LISTEN 0 50 :3306 :
LISTEN 0 128 :111 :
LISTEN 0 128 127.0.0.1:80 :
LISTEN 0 128 192.168.141.200:8080 :
[root@centos7 html]#curl http://192.168.141.200:8080/test1.html
<h1>www.magedu.com</h1>
3、持久連接
設置:KeepAlive On|Off KeepAliveTimeout 15
測試:telnet WEB_SERVER_IP PORT GET /URL HTTP/1.1 Host: WEB_SERVER_IP
4、動態/靜態模塊設置
[root@centos7 html]#cd /etc/httpd/conf.modules.d/
[root@centos7 conf.modules.d]#ls
00-base.conf 00-dav.conf 00-lua.conf 00-mpm.conf 00-proxy.conf 00-systemd.conf 01-cgi.conf
[root@centos7 httpd]#httpd -l 靜態模塊
Compiled in modules:
core.c
mod_so.c
http_core.c
[root@centos7 ~]#cd /var/www/html
[root@centos7 html]#ls
index.html test1.html
[root@centos7 html]#mkdir /data/www
[root@centos7 html]#cd /data/www
[root@centos7 www]#echo /data/www/index.html > index.html
[root@centos7 ~]#vim /etc/httpd/conf/httpd.conf
<Directory "/data/www">
AllowOverride None
Allow open access:
Require all granted</Directory>
[root@centos6 ~]#curl http://192.168.141.200/
<h1>/data/www/index.html</h1>
[root@centos7 www]#mkdir news/
[root@centos7 www]#echo /data/www/news/index.html > news/index.html
[root@centos7 www]#tree
.
├── index.html
└── news
└── index.html
1 directory, 2 files
[root@centos6 ~]#curl http://192.168.141.200/news/
[root@centos6 ~]#vim /etc/hosts
192.168.141.200 www.a.com www.b.com www.c.com
[root@centos6 ~]#curl www.a.com
<h1>/data/www/index.html</h1>
[root@centos7 ~]#vim /etc/httpd/conf/httpd.conf
<Directory "/data/www">
Options indexes FollowSymLinks
AllowOverride None
Require all granted
</Directory>
<Directory "/data/www/news">
AllowOverride none
</Directory>
[root@centos7 ~]#ls /var/log/httpd
access_log error_log
[root@centos7 ~]#vim /etc/httpd/conf/httpd.conf
ErrorLog: The location of the error log file. 錯誤日誌
If you do not specify an ErrorLog directive within a <VirtualHost>
container, error messages relating to that virtual host will be
logged here. If you do define an error logfile for a <VirtualHost>
container, that host's errors will be logged there and not here.
ErrorLog "logs/error_log"
LogLevel: Control the number of messages logged to the error_log.
Possible values include: debug, info, notice, warn, error, crit,alert, emerg.
LogLevel warn
CustomLog "logs/ " common 訪問日誌
LogFormat "%h %l %u %t \"%r\" %>s %b \"%{Referer}i\" \"%{User-Agent}i\"" combined
[root@centos7 ~]#vim /etc/httpd/conf/httpd.conf
LogFormat "%h %l %u %{%F %T}t \"%r\" %>s %b \"%{Referer}i\" \"%{User-Agent}i\"" combined
[root@centos6 ~]#curl 192.168.141.200 <h1>/data/www/index.html</h1>
12、定義路徑別名 格式:Alias /URL/ "/PATH/"
[root@centos7 html]#mkdir /data/blog/
[root@centos7 html]#echo /data/blog/index.html > /data/blog/index.html
[root@centos7 ~]#vim /etc/httpd/conf/httpd.conf
IncludeOptional conf.d/*.conf
<Directory /data/blog/>
Require all granted
</Directory>
alias /bbs/ /data/blog/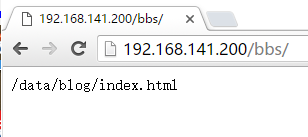
[root@centos7 blog]#cd /var/www/html
[root@centos7 html]#ls --> index.html test.html
[root@centos7 html]#mkdir admin
[root@centos7 html]#echo admin Page > admin/index.html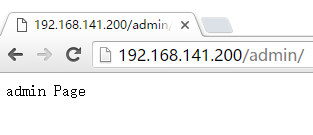
[root@centos7 html]#ls /etc/httpd/conf.d/ 打開存放配置文件的目錄:
autoindex.conf manual.conf README userdir.conf welcome.conf
[root@centos7 html]#htpasswd -c /etc/httpd/conf.d/httpuser huge
New password:
Re-type new password:
Adding password for user huge
[root@centos7 html]#htpasswd /etc/httpd/conf.d/httpuser lige
New password:
Re-type new password:
Adding password for user lige
[root@centos7 html]#cat /etc/httpd/conf.d/httpuser
huge:$apr1$EE5M4N5B$/NttVTuXuhoj1X6Fa7aYh. 這是兩個httpuser
lige:$apr1$S4Aj4WuO$gqmuNqrs3HfvlDIIfacQI1
[root@centos7 html]#vim /etc/httpd/conf.d/auth.conf 指定用戶訪問
<Directory /var/www/html/admin>
AuthType Basic
AuthName "he is a nice boy"
AuthUserFile "/etc/httpd/conf.d/httpuser”
Require user huge
</Directory> 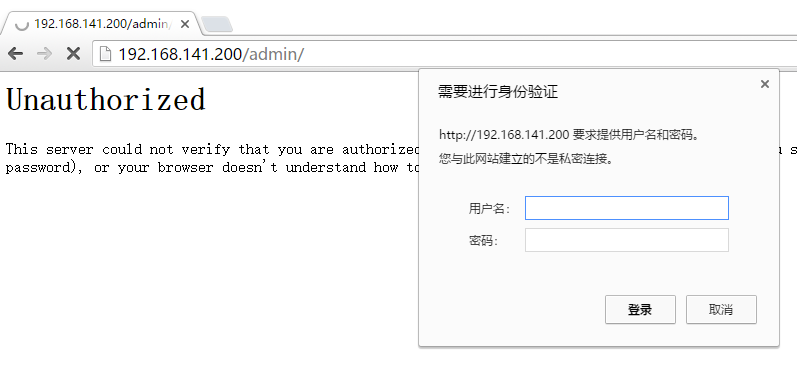
[root@centos7 www]#vim /etc/httpd/conf.d/auth.conf
<directory /var/www/html/admin>
allowoverride authconfig 添加與驗證相關的語句
</directory>
[root@centos7 admin]#vim /var/www/html/admin/.htaccess
<Directory /var/www/html/admin>
AuthType Basic
AuthName "he is a nice boy"
AuthUserFile "/etc/httpd/conf.d/httpuser”
Require valid-user 此處不要再加<directory>的結尾了。
實驗:實現基於basic驗證
創建虛擬用戶
1、htpasswd -c /etc/httpd/conf.d/httpuser tom
htpasswd /etc/httpd/conf.d/httpuser jack
2、vim /etc/httpd/conf.d/auth.conf
<directory /var/www/html/admin>
allowoverride authconfig 添加與驗證相關的語句
</directory>
3、vim /var/www/html/admin/.htaccess
AuthType Basic
AuthName "welcome to adminPage"
AuthUserFile "/etc/httpd/conf.d/httpuser"
Require valid-user
實驗:實現用戶家目錄的http訪問
[root@centos7 ~]#cd ~li
[root@centos7 li]#cd /etc/httpd/conf.d/
[root@centos7 conf.d]#vim userdir.conf
[root@centos7 conf.d]#ll /home/
total 0
drwx------. 3 li li 78 Apr 11 2018 li
[root@centos7 conf.d]#vim userdir.conf 需要在配置文件中修改的東西全在下面
UserDir disabled
UserDir public_html
#<Directory "/home/*/public_html">
AllowOverride FileInfo AuthConfig Limit Indexes
Options MultiViews Indexes SymLinksIfOwnerMatch IncludesNoExec
Require method GET POST OPTIONS
#</Directory>
<directory /home/li/public_html>
require all granted
</directory>
該實驗步驟:1、vim /etc/httpd/conf.d/userdir.conf
#UserDir disabled
UserDir public_html
2、<directory /home/wang/public_html>
authtype basic
authname "wang home"
authuserfile "/etc/httpd/conf.d/httpuser"
require user tom
</directory>
3、mkdir /home/wang/public_html
4、setfacl -m u:apache:x /home/wang/public_htm
[root@centos7 conf.d]#vim /etc/httpd/conf.d/test.conf 編輯網站的狀態信息:
<Location "/status">
SetHandler server-status
</Location>
下圖是詳細的狀態(截取部分):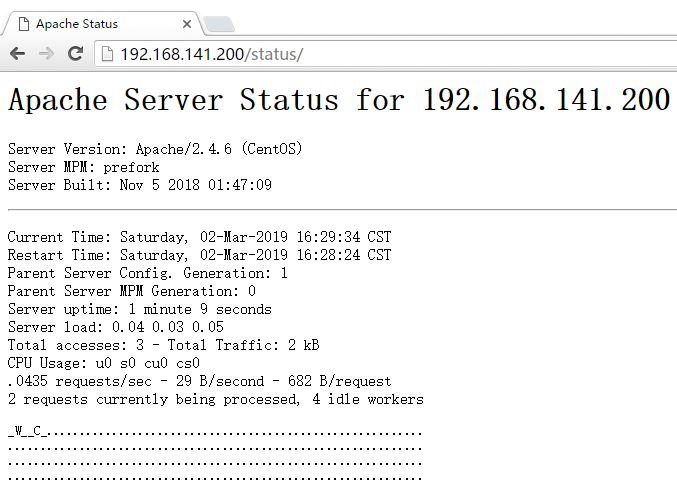
實驗:實現網站狀態頁面 步驟如下:
[root@centos7 conf.d]#vim test.conf
<Location "/status"> 定義了網站的模塊信息
SetHandler server-status
<RequireAny>
Require all denied
require ip 192.168.35.6
</RequireAny>
</Location>
實際操作:[root@centos7 conf.d]#vim /etc/httpd/conf.d/test.conf
<Location "/status">
SetHandler server-status
<RequireAny>
Require all denied
Require ip 192.168.141.253 指定特定IP允許訪問
</RequireAny>
</Location> 此時,我自己200的主機不能訪問了: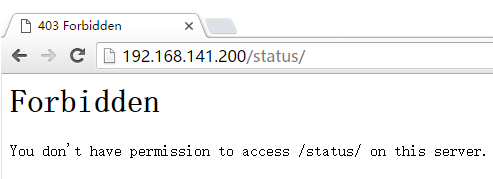
[root@centos6 ~]#curl http://192.168.141.200/status/ 在指定的IP上就可以
<!DOCTYPE HTML PUBLIC "-//W3C//DTD HTML 3.2 Final//EN">
<html><head>
<title>Apache Status</title>
</head><body>
<h1>Apache Server Status for 192.168.141.200 (via 192.168.141.200)</h1>
<dl><dt>Server Version: Apache/2.4.6 (CentOS)</dt>
<dt>Server MPM: prefork</dt>
<dt>Server Built: Nov 5 2018 01:47:09
</dt></dl><hr /><dl> 這樣就既能觀察又能保證安全。
實驗:基於IP的多個虛擬主機
mkdir /data/{a,b,c}site
echo www.a.com > /data/asite/index.html
echo www.b.com > /data/bsite/index.html
echo www.c.com > /data/csite/index.html
vim /etc/httpd/conf.d/test.conf
<VirtualHost 192.168.35.7:80>
ServerName www.a.com
DocumentRoot "/data/asite"
ErrorLog "logs/a_error_log"
CustomLog "logs/a_access_log" combined
<directory /data/asite>
require all granted
</directory>
</VirtualHost>
<VirtualHost 192.168.35.8:80>
ServerName www.b.com
DocumentRoot "/data/bsite"
ErrorLog "logs/b_error_log"
CustomLog "logs/b_access_log" combined
<directory /data/bsite>
require all granted
</directory>
</VirtualHost>
<VirtualHost 192.168.35.9:80>
ServerName www.c.com
DocumentRoot "/data/csite"
ErrorLog "logs/c_error_log"
CustomLog "logs/c_access_log" combined
<directory /data/csite>
require all granted
</directory>
</VirtualHost>
[root@centos6 ~]#vim /etc/hosts
192.168.141.200 www.a.com
192.168.141.201 www.b.com
192.168.141.202 www.c.com
[root@centos6 ~]#curl www.a.com
www.a.com
[root@centos6 ~]#curl www.b.com
www.b.com
[root@centos6 ~]#curl www.c.com
www.c.com
實驗:基於Port的多個虛擬主機
cat /etc/httpd/conf.d/test.conf
listen 8001
listen 8002
listen 8003
<VirtualHost :8001>
ServerName www.a.com
DocumentRoot "/data/asite"
ErrorLog "logs/a_error_log"
CustomLog "logs/a_access_log" combined
<directory /data/asite>
require all granted
</directory>
</VirtualHost>
<VirtualHost :8002>
ServerName www.b.com
DocumentRoot "/data/bsite"
ErrorLog "logs/b_error_log"
CustomLog "logs/b_access_log" combined
<directory /data/bsite>
require all granted
</directory>
</VirtualHost>
<VirtualHost :8003>
ServerName www.c.com
DocumentRoot "/data/csite"
ErrorLog "logs/c_error_log"
CustomLog "logs/c_access_log" combined
<directory /data/csite>
require all granted
</directory>
</VirtualHost>
[root@centos6 ~]#curl www.a.com:8001
www.a.com
[root@centos6 ~]#curl www.a.com:8002
www.b.com
[root@centos6 ~]#curl www.a.com:8003
www.c.com
實驗:實現基於FQDN (full qualified domain name 完整主機名)的多虛擬主機
[root@centos7 ~]# vim /etc/httpd/conf.d/test.conf
ErrorLog "logs/a_error_log"
CustomLog "logs/a_access_log" combined
<directory /data/asite>
require all granted
</directory>
</VirtualHost>
<VirtualHost :80>
ServerName www.b.com
DocumentRoot "/data/bsite"
ErrorLog "logs/b_error_log"
CustomLog "logs/b_access_log" combined
<directory /data/bsite>
require all granted
</directory>
</VirtualHost>
<VirtualHost :80>
ServerName www.c.com
DocumentRoot "/data/csite"
ErrorLog "logs/c_error_log"
CustomLog "logs/c_access_log" combined
<directory /data/csite>
require all granted
</directory>
</VirtualHost>
[root@centos6 ~]#curl www.a.com
www.a.com
[root@centos6 ~]#curl www.b.com
www.b.com
[root@centos6 ~]#curl www.c.com
www.c.com
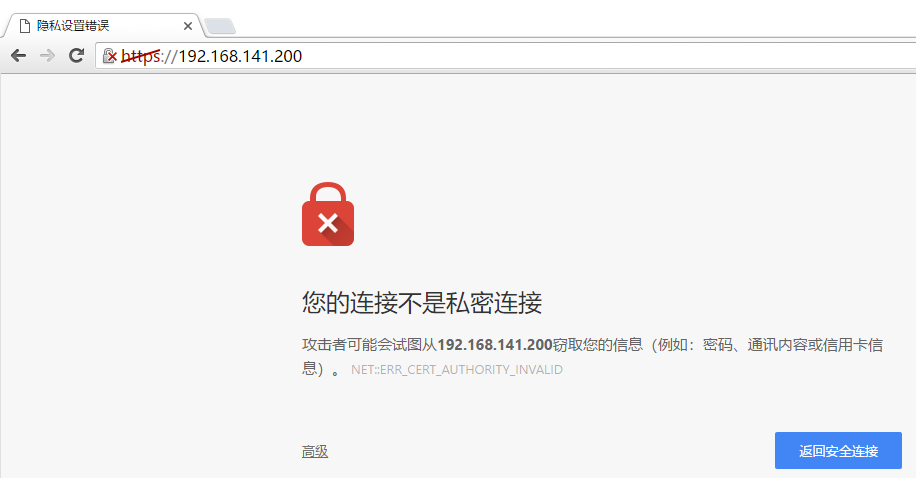
https:http over ssl
SSL會話的簡化過程
(1) 客戶端發送可供選擇的加密方式,並向服務器請求證書
(2) 服務器端發送證書以及選定的加密方式給客戶端
(3) 客戶端取得證書並進行證書驗證
如果信任給其發證書的CA
(a) 驗證證書來源的合法性;用CA的公鑰解密證書上數字簽名(b) 驗證證書的內容的合法性:完整性驗證
(c) 檢查證書的有效期限(d) 檢查證書是否被吊銷(e) 證書中擁有者的名字,與訪問的目標主機要一致
(4) 客戶端生成/data/www/news/index.html臨時會話密鑰(對稱密鑰),並使用服務器端的公鑰加密此數據發送給服務器,
完成密鑰交換
(5) 服務用此密鑰加密用戶請求的資源,響應給客戶端
注意:SSL是基於IP地址實現,單IP的主機僅可以使用一個https虛擬主機
實驗:實現https
[root@centos7 ~]#yum search ssl 搜索出需要安裝的模塊
mod_ssl.x86_64 : SSL/TLS module for the Apache HTTP Server
[root@centos7 ~]#yum install mod_ssl
[root@centos7 ~]#systemctl restart httpd
[root@centos7 ~]#ss -ntl
LISTEN 0 128 :::80 :::
LISTEN 0 128 :::443 443代表現在可以去訪問網站了 :::*
[root@centos7 ~]#vim /etc/httpd/conf.d/ssl.conf 查看該配置文件 放置了私鑰,
開始建證書:1、[root@centos7 ~]#mkdir /data/https/
[root@centos7 ~]#cd /data/https/
[root@centos7 https]#ls /etc/pki/tls/
cert.pem certs misc openssl.cnf private
[root@centos7 https]#openssl genrsa 2048 > cakey.pem
2、[root@centos7 https]#openssl req -new -x509 -key cakey.pem -out cacert.crt -days 3650
3、[root@centos7 https]#openssl req -newkey rsa:2048 -days 365 -nodes -keyout httpd.key > httpd.csr
4、[root@centos7 https]#openssl x509 -req -in httpd.csr -days 365 -CA cacert.crt -CAkey cakey.pem -set_serial 01 > httpd.crt Signature ok
subject=/C=cn/ST=beijing/L=beijing/O=magedu/OU=devops/CN=www.a.com
5、[root@centos7 https]#ll total 20
-rw-r--r--. 1 root root 1342 Mar 2 19:54 cacert.crt
-rw-r--r--. 1 root root 1679 Mar 2 19:53 cakey.pem
-rw-r--r--. 1 root root 1200 Mar 2 19:59 httpd.crt
-rw-r--r--. 1 root root 1005 Mar 2 19:57 httpd.csr
-rw-r--r--. 1 root root 1704 Mar 2 19:57 httpd.key
6、[root@centos7 https]#scp -r /data/https/ 192.168.141.200:/etc/httpd/conf.d/ssl
7、[root@centos7 conf.d]#vim /etc/httpd/conf.d/ssl.conf
SSLCertificateFile /etc/httpd/conf.d/ssl/httpd.crt
SSLCertificateKeyFile /etc/httpd/conf.d/ssl/httpd.key
8、[root@centos7 data]#vim /etc/hosts --> 192.1681.141.200 www.a.com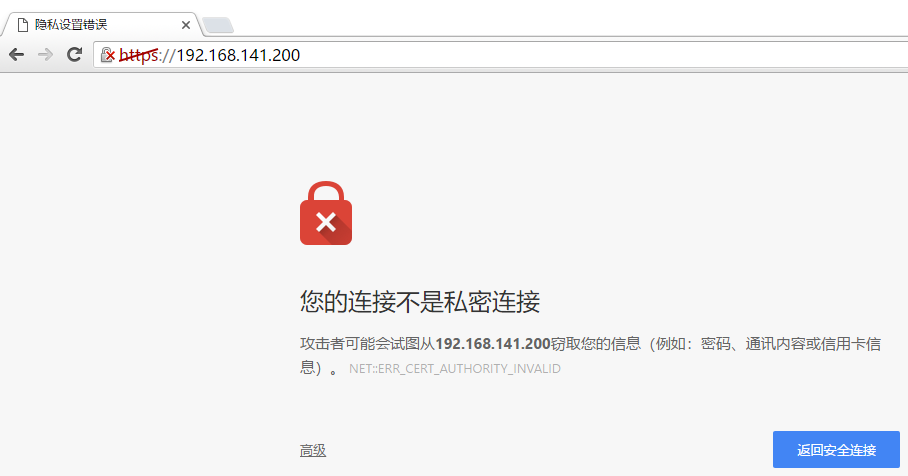
9、此時需要在 [root@centos7 conf.d]#vim /etc/httpd/conf.d/ssl.conf中填入:
SSLCACertificateFile /etc/httpd/conf.d/ssl/cacert.crt
10、在Windows上的c:\windows\system\deriver\hosts修改“192.168.141.200 www.a.com”
此時即可訪問https://www.a.com 彈出頁面即成功。 我沒有做成功,日後再做!!
http重定向https
重定向 Redirect [status] URL-path URL
status狀態:1、Permanent: 返回永久重定向狀態碼 301 2、Temp:返回臨時重定向狀態碼302. 此爲默認值
[root@centos7 conf.d]#vim /etc/httpd/conf.d/test.conf
Redirect / http://www.baidu.com (如果訪問根目錄就會跳轉到百度) 效果如下: 重定向前:
重定向跳轉後:它跳轉2次,先跳到不加密的百度網站,後跳轉到https的網站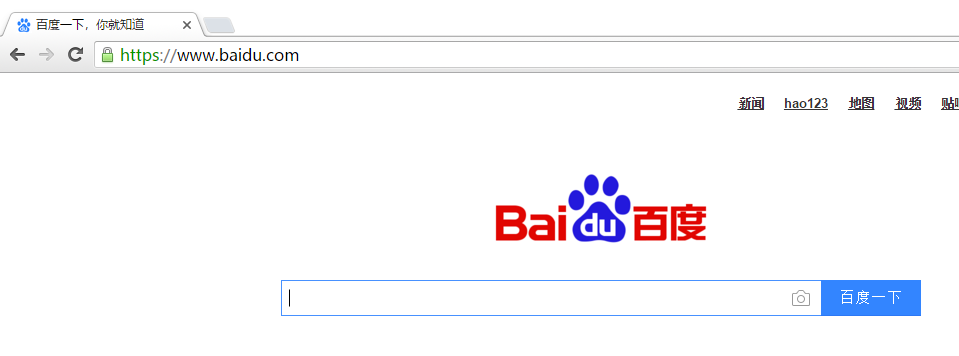
同樣的,在centos6上加"-L"也可看百度:[root@centos6 ~]#curl -L http://192.168.141.200/
<!DOCTYPE html>
<!--STATUS OK--><html> <head><meta http-equiv=content-type content=text/html;charset=utf-8><meta http-equiv=X-UA-Compatible content=IE=Edge><meta content=always name=referrer><link rel=stylesheet type=text/css href=http://s1.bdstatic.com/r/www/cache/bdorz/baidu.min.css><title>百度一下,你就知道</title></head> <body 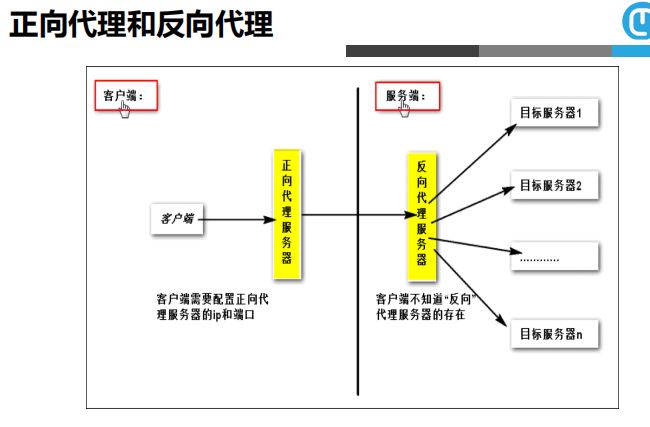
反向代理功能:
啓用反向代理: ProxyPass "/" "http://www.example.com/" ProxyPa*everse "/" "http://www.example.com/"
反向代理實驗:253做服務器,200做反向代理,150做客戶端
[root@centos6 html]#vim /var/www/html/index.html
192.168.141.253
[root@centos6 html]#service httpd restart
[root@centos6 html]#ss -ntl
LISTEN 0 128 :::80 :::
[root@centos6 html]#curl 192.168.141.253
192.168.141.253
[root@centos7 ~]#vim /etc/httpd/conf.d/test.conf
ProxyPass "/" "http://192.168.141.253/"
ProxyPaeverse "/" "http://192.168.141.253/" 沒有重啓服務之前
[root@centos7 ~]#curl 192.168.141.200
<html>
<head>
<title>html語言</title>
</head>
<body>
<img src="http://www.magedu.com/wp-content/uploads/2017/09/logo.png" >
<h1>你好</h1>
<p><a href=http://www.magedu.com>馬哥教育</a>歡迎你</p>
</body>
</html>
[root@centos7 ~]#systemctl restart httpd 將centos7保存重啓後:
[root@centos7 ~]#curl 192.168.141.200
192.168.141.253
此時的253還認爲是200在訪問它,其實是150在訪問它。(真正做到的多臺主機一起併發做到後端轉發,用Nginx )
sendfile:
硬盤 >> kernel buffer >> user buffer >> kernel socket buffer >> 協議棧
一般網絡應用通過讀硬盤數據,寫數據到 socket 來完成網絡傳輸,底層執行過程:
1 系統調用 read() 產生一個上下文切換:從 user mode 切換到 kernel mode,然後DMA 執行拷貝,把文件數據從硬盤讀到一個 kernel buffer 裏。
2 數據從 kernel buffer 拷貝到 user buffer,然後系統調用 read() 返回,這時又產生一個上下文切換:從kernel mode 切換到 user mode
3 系統調用 write() 產生一個上下文切換:從 user mode 切換到 kernel mode,然後把步驟2讀到 user buffer 的數據拷貝到 kernel buffer(數據第2次拷貝到 kernel buffer),不過這次是個不同的 kernel buffer,這個 buffer和 socket 相關聯。
4 系統調用 write() 返回,產生一個上下文切換:從 kernel mode 切換到 user mode(第4次切換),然後DMA從 kernel buffer 拷貝數據到協議棧(第4次拷貝)
上面4個步驟有4次上下文切換,有4次拷貝,如能減少切換次數和拷貝次數將會有效提升性能
在kernel 2.0+ 版本中,系統調用 sendfile() 就是用來簡化上面步驟提升性能的。
sendfile() 不但能減少切換次數而且還能減少拷貝次數
用 sendfile() 來進行網絡傳輸的過程:
sendfile(socket, file, len);
硬盤 >> kernel buffer (快速拷貝到kernel socket buffer) >> 協議棧
1 系統調用 sendfile() 通過 DMA 把硬盤數據拷貝到 kernel buffer,然後數據被
kernel 直接拷貝到另外一個與 socket 相關的 kernel buffer。這裏沒有 user
mode 和 kernel mode 之間的切換,在 kernel 中直接完成了從一個 buffer 到另一個 buffer 的拷貝
2 DMA 把數據從 kernel buffer 直接拷貝給協議棧,沒有切換,也不需要數據從
user mode 拷貝到 kernel mode,因爲數據就在 kernel 裏