


NIO三大核心原理示意圖

- 每個channel(通道)都會對應一個buffer(緩衝區)
- Selector(選擇器)對應一個線程,一個線程對應多個channel(連接)
- 程序切換到那個channel是由事件決定的,==Event(事件)==是一個非常重要概念
- Selector會根據不同的事件,在各個通道上切換
- Buffer就是一個內存塊,底層是一個數組
- 數據的讀寫是通過Buffer,這個和BIO不同的。BIO中要麼是輸入流或者是輸出流,不可能是雙向流動的,但是NIO中的Buffer是可以讀也可以寫,需要用flip()方法切換
- channel是雙向的,可以返回底層操作系統情況,比如Linux系統的底層操作通道就是雙向的
NIO核心之一Buffer
- Buffer基本介紹:緩衝區本質上是一個可以讀寫數據的內存塊。可以理解爲一個容器對象(含數組),該對象提供一組方法,可以輕鬆地使用內存塊,緩衝區對象內置了一些機制,能夠跟蹤和記錄緩衝區的狀態變化情況。Channel提供從文件、網絡讀取數據渠道,但是讀取和寫入數據必須經過Buffer
- 基本使用代碼
	package com.dd.nio;

	import java.nio.IntBuffer;

	public class BasicBuffer {

    	public static void main(String[] args) {

        	//舉例說明buffer的使用

        	//創建一個buffer,大小爲5,既可以存放5個int
        	IntBuffer intBuffer = IntBuffer.allocate(5);

        	//向buffer,存放數據
        	for (int i = 0; i < intBuffer.capacity(); i++) {
            	intBuffer.put(i*2);
        	}
        	//如何從buffer讀取數據
        	//將buffer轉換,讀寫切換.不轉換讀不出數據
        	intBuffer.flip();


        	while (intBuffer.hasRemaining()){
            	System.out.println(intBuffer.get());
        	}
    	}
	}
-
Buffer類定義了所有的緩存區都具有的四個屬性來提供關於其包含數據元素信息
- Capacity:容量,即可以容納的最大數據量;在緩衝區創建時被設定並且不能該變
- Limit:表示緩衝區的當前終點,不能對緩衝區超過極限的位置經行讀寫操作。且極限是可以修改的
- Position:位置,下一個要被讀或寫的元素的索引,每次讀寫緩衝區數據時都會改變值,爲下次讀寫準備
- Mark:標記
-
Buffer及其子類常用API
![在這裏插入圖片描述]()
![在這裏插入圖片描述]()


NIO核心之一Channel
- 基本介紹:通道可以同時進行讀寫,而流只能讀或者只能寫;通道可以實現異步讀寫數據;通道可以從緩衝讀數據,也可以寫數據到緩衝
- BIO中的stream是單向的,例如FileInputStream對象只能進行讀取數據操作,而NIO中的通道(channel)是雙向的,可以讀操作,也可以寫操作
- Channel在NIO中是一個接口
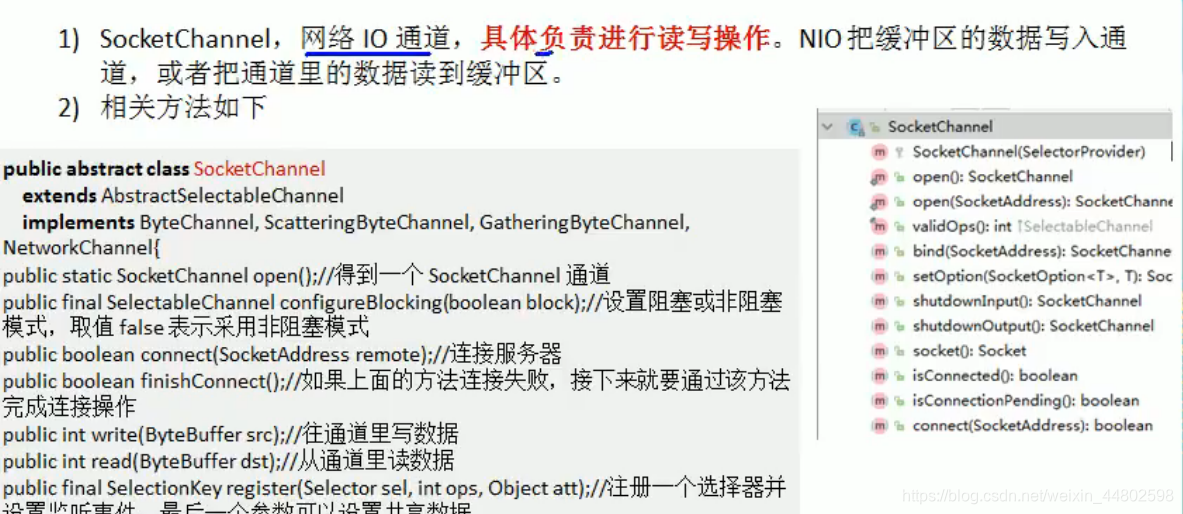
- 常用的Channel類有:FileChannel、DatagramChannel、ServerSocketChannel和SocketChannel
- FileChannel用於文件的數據讀寫,DataGramChannel用於UDP的數據讀寫,ServerSocketChannel和SocketChannel用於TCP的數據讀寫
- 通道寫文件實例
package com.dd.nio;
import java.io.FileOutputStream;
import java.io.IOException;
import java.nio.ByteBuffer;
import java.nio.channels.FileChannel;
public class NIOFileChannel {
public static void main(String[] args) throws IOException {
String str = "hello word";
//創建一個輸出流->channel
FileOutputStream fileOutputStream = new FileOutputStream("d:\\file.txt");
//通過fileOutputStream獲取對應的FileChannel
//這個fileChannel的真實類型爲filechannelImpl
FileChannel channel = fileOutputStream.getChannel();
//創建一個緩衝區byteBuffer
ByteBuffer buffer = ByteBuffer.allocate(8 * 1024);
//將 str 放入到
buffer.put(str.getBytes());
//對byteBuffer經行反轉
buffer.flip();
//將byteBuffer數據寫入到channel中
channel.write(buffer);
fileOutputStream.close();
}
}
- 相關API解釋
![在這裏插入圖片描述]()
- 使用buffer完成文件的拷貝實例

package com.dd.nio;

import java.io.FileInputStream;
import java.io.FileOutputStream;
import java.io.IOException;
import java.nio.ByteBuffer;
import java.nio.channels.FileChannel;

public class NIOFileChannelCopy {
    public static void main(String[] args) throws IOException {

        FileInputStream fileInputStream = new FileInputStream("1.txt");
        FileChannel inChannel = fileInputStream.getChannel();

        FileOutputStream fileOutputStream = new FileOutputStream("2.txt");
        FileChannel outChannel = fileOutputStream.getChannel();

        ByteBuffer buffer = ByteBuffer.allocate(8 * 1024);

        while (true){//循環讀取
            //重要操作,重置標誌位,必須有
            /*
              public final Buffer clear() {
                 position = 0;
                 limit = capacity;
                 mark = -1;
                 return this;
               }
             */
            buffer.clear();

            int read = inChannel.read(buffer);
            if (read == -1 ){
                break;
            }
            //將buffer中的數據寫入到outChannel中
            buffer.flip();
            outChannel.write(buffer);

        }
    }
}
-
關於Buffer和channel的注意事項和細節
1.ByteBuffer支持類型化的put和get,放入的是什麼數據類型,get就應該使用相應的數據類型取出來,否則可能BufferUnderflowException異常
2.可以將一個普通的Buffer,轉換成只讀(asReadOnlyBuffer()方法)
3.NIO還提供了MappedByteBuffer,可以讓文件直接在內存(堆外內存)中進行修改,而如何同步到文件由NIO完成
4.NIO還支持通過多個Buffer完成讀寫操作,即Scattering(分散)和Gathering(聚合)
package com.dd.nio;

import java.io.IOException;
import java.io.RandomAccessFile;
import java.nio.channels.FileChannel;

/*
1.MappedByteBuffer可以讓文件直接在內存(堆外內存)修改,操作系統不需要拷貝依次

 */
public class MappedByteBuffer {
    public static void main(String[] args) throws IOException {

        RandomAccessFile randomAccessFile = new RandomAccessFile("1.txt", "rw");
        //獲取對應的通道
        FileChannel channel = randomAccessFile.getChannel();

        /*
         * 參數1:表示使用的是讀寫模式
         * 參數2:代表可以修改的起始位
         * 參數3:表示映射到內存的大小,即1.txt的多少個字節映射到內存
         * 可以修改的範圍爲0-5,不包含5
         * 實際類型爲DirectByteBuffer
         */
        java.nio.MappedByteBuffer map = channel.map(FileChannel.MapMode.READ_WRITE, 0, 5);
        map.put(0,(byte)'h');
        map.put(3,(byte)'8');

        randomAccessFile.close();
    }
}
package com.dd.nio;

import java.io.IOException;
import java.net.InetSocketAddress;
import java.nio.ByteBuffer;
import java.nio.channels.ServerSocketChannel;
import java.nio.channels.SocketChannel;
import java.util.Arrays;

/*
scattering:將數據寫入到buffer時,可以採用buffer數組,依次寫入
gathering:從buffer讀取數據時,亦可以採用buffer數組,依次讀
 */
public class ScatteringAndGathering {

    public static void main(String[] args) throws IOException {

        //使用serverSocketChannel 和 SocketChannel
        ServerSocketChannel open = ServerSocketChannel.open();

        InetSocketAddress inetSocketAddress = new InetSocketAddress(7000);
        //綁定端口到socket,並啓動
        open.socket().bind(inetSocketAddress);

        //創建buffer數組
        ByteBuffer[] byteBuffers = new ByteBuffer[2];
        byteBuffers[0] = ByteBuffer.allocate(5);
        byteBuffers[1] = ByteBuffer.allocate(2);

        //等待客戶端連接(telnet)
        SocketChannel socketChannel = open.accept();
        int messageLength = 7; //假定接受7個字節
        //循環的讀取
        while (true){
            int byteRead = 0;
            while (byteRead<messageLength){
                long read = socketChannel.read(byteBuffers);
                byteRead += read;
                System.out.println("累計讀取的字節數"+byteRead);
                //使用流打印,看看當前的buffer的position和limit
                Arrays.asList(byteBuffers).stream().map(buffer -> "postion="+buffer.position()+","
                +buffer.limit()).forEach(System.out::println);
            }

            //將所有的buffer經行flip
            Arrays.asList(byteBuffers).forEach(buffer -> buffer.flip());

            long byteWrite = 0;
            //將數據讀出顯示到客戶端
            while(byteWrite < messageLength){
                long write = socketChannel.write(byteBuffers);
                byteWrite += write;

            }

            //將所有的buffer 進行clear
            Arrays.asList(byteBuffers).forEach(buffer -> buffer.clear());

            System.out.println("byteRead="+byteRead+"byteWrite="+byteWrite);
        }

    }
}
NIO核心之一Selector(選擇器)
-
基本介紹:Selector能夠檢測多個註冊的通道上是否是事件發生(注意:多個channel以事件的方式可以註冊到同一個selector)。如果有事件發生,便獲取事件然後針對每個事件進行相應的處理,這樣就可以只有一個單線程去管理多個通道,也就是管理多個連接和請求。只有在 連接/通道 真正有讀寫事件發生時,纔會讀寫,大大減少了系統開銷,並且不必每一個連接都創建一個線程,不用去維護多個線程,減少了多線程之間的上下文切換導致的開銷
-
相關方法
![在這裏插入圖片描述]()
-
注意
1.NIO中的ServerSocketChannel功能類似ServerSocket,SocketChannel功能類似Socket
2.Selector.select()//阻塞,只有至少一個事件發生返回
Selector.select(1000)//阻塞1000毫秒,在1000毫秒後返回,如果沒有事件,也會返回
Selector.wakeup()//喚醒selector阻塞時候使用
Selector.selectNow()//不阻塞,立馬返還 -
Selector、SelectionKey、ServerScoketChannel和SocketChannel關係梳理圖
![在這裏插入圖片描述]()
說明:1.當客戶端連接時,會通過ServerSocketChannel得到對應的SocketChannel; 2.將SocketChannel註冊到Selector上,register(Selector sel,int ops),一個selector上可以註冊多個socketChannel 3.註冊後返回一個SelectionKey,會和該Selector以集合的方式關聯 4.Sekector通過select()方法進行監聽,會返回有事件產生的通道的個數 5.進一步得到各個SelectorKey(事件發生的) 6.再通過SelectorKey,反向獲取socketChannel 7.通過channel,完成業務處理 -
通過代碼解讀上面模型代碼
客戶端


package com.dd.nio;

import java.io.IOException;
import java.net.InetSocketAddress;
import java.nio.ByteBuffer;
import java.nio.channels.SocketChannel;

public class NIOClient {
    public static void main(String[] args) throws IOException {

        //得到一個網絡通道
        SocketChannel socketChannel = SocketChannel.open();

        //設置非阻塞模式
        socketChannel.configureBlocking(false);

        //提供服務器端的ip和端口
        InetSocketAddress inetSocketAddress = new InetSocketAddress("127.0.0.1", 6666);

        //連接服務器
        if (!socketChannel.connect(inetSocketAddress)){
            while (!socketChannel.finishConnect()){
                System.out.println("因爲連接需要時間,客戶端不會阻塞,可以做其他工作");
            }
        }

        //如果連接成功就發送數據
        String srt ="hello word 哈塞給";

        //這個方法根據字節數組的大小生成buffer 相當於
        //ByteBuffer allocate = ByteBuffer.allocate(srt.length());
        //allocate.put(srt.getBytes());
        ByteBuffer buffer = ByteBuffer.wrap(srt.getBytes());

        //發送數據,將buffer數據寫入到channel
        socketChannel.write(buffer);
        //讓代碼停在這裏
        System.in.read();


    }
}
服務端
package com.dd.nio;

import java.io.IOException;
import java.net.InetSocketAddress;
import java.nio.ByteBuffer;
import java.nio.channels.*;
import java.util.Iterator;
import java.util.Set;

public class NIOServer {
    public static void main(String[] args) throws IOException {

        //創建servserSocketChannel -> serverSocket
        ServerSocketChannel serverSocketChannel = ServerSocketChannel.open();

        //創建一個sekector對象
        Selector selector = Selector.open();

        //綁定端口
        serverSocketChannel.socket().bind(new InetSocketAddress(6666));

        //設置爲非阻塞模式
        serverSocketChannel.configureBlocking(false);

        //把serverSocketChannel 註冊到 selector 上       關心事件爲op_accept
        serverSocketChannel.register(selector, SelectionKey.OP_ACCEPT);

        //循環等待客戶端連接
        while(true){

            //這裏的等待一秒,如果沒有事件發生就繼續
            if (selector.select(1000) == 0){//沒有事件發生
                System.out.println("服務器等待一秒,無連接");
                continue;
            }

            //如果返回>0,獲取到相關的selectionKey集合
            //通過這個方法返回關注事件的集合,然後反向獲取通道
            Set<SelectionKey> selectionKeys = selector.selectedKeys();

            //遍歷
            Iterator<SelectionKey> Keyiterator = selectionKeys.iterator();

            while (Keyiterator.hasNext()){
                SelectionKey key = Keyiterator.next();

                //根據key 對應通道發生事件做相應的處理
                if (key.isAcceptable()){//如果時OP_ACCEPT ,有新的客戶端連接

                    //該客戶端分配一個SocketChannel
                    //注意,accept()方法不是阻塞的嗎?
                    //其實BIO中accept阻塞是因爲不知道客戶端連接,而NIO是由事件驅動的,咱們上面已經判斷是連接事件,所以並不會阻塞
                    SocketChannel socketChannel = serverSocketChannel.accept();

                    //將socketChannel設置成非阻塞
                    socketChannel.configureBlocking(false);

                    //將SocketChannel註冊到 seletor上 , 關注事件爲OP_READ
                    //同時給socketChannel關聯一個buffer
                    socketChannel.register(selector,SelectionKey.OP_READ, ByteBuffer.allocate(1024));

                    //從2,3,4.。。。
                    System.out.println("註冊後的selectionKey 數量="+selector.keys().size());
                }

                if (key.isReadable()){//發生了OP_READ事件

                    //通過key 反向獲取到對應的channel
                    SocketChannel channel = (SocketChannel)key.channel();

                    //獲取到該channel關聯的buffer
                    ByteBuffer buffer = (ByteBuffer)key.attachment();

                    channel.read(buffer);
                    System.out.println("客戶端發送的數據是:"+new String(buffer.array()));
                }


                //手動從集合中移除當前的selectionKey,防止重複操作
                Keyiterator.remove();

            }
        }

    }
}
SelectionKey說明
- SelectionKey表示Selector和網絡通道的註冊關係,共四種
![在這裏插入圖片描述]()
![在這裏插入圖片描述]()

