Websocket是HTML5的一項新技術,可以讓服務端和客戶端進行實時的通信,主要的使用場景有: 實時的聊天系統,對實時性要求比較高的遊戲,或者金融行業對股票市場數據的及時獲取等。在Spring3的時候就已經有了對Websocket的支持,不過需要一些高版本的web容器來運行,比如Tomcat7.0.47+,Jetty9等。
在Spring的官網上有關於Websocket的示例工程,https://spring.io/guides/gs/messaging-stomp-websocket/,裏面簡單介紹瞭如何通過Spring-boot來進行Websocket系統的構建。我們的例子將基於這個例子進行修改,但是是使用傳統的Spring的方式進行配置。
依賴包
首先我們需要添加相關的依賴包:
- Websocket需要servlet3.1的版本
- spring-websocket和spring-messaging是Spring關於Websocket的組件
- 使用Jackson進行json數據的處理
build.gradle
1
2
3
4
5
6
7
8
9
10
11
12
13
14
15
16
17
18
|
String springVersion = "4.1.4.RELEASE"
String jacksonDatabindVersion = "2.5.0"
String jacksonVersion = "1.9.13"
dependencies {

    //websocket
    compile("javax.websocket:javax.websocket-api:1.1")
    compile("javax.servlet:javax.servlet-api:3.1.0")

  //spring
    compile("org.springframework:spring-messaging:" + springVersion)
    compile("org.springframework:spring-websocket:" + springVersion)

    //json
    compile "com.fasterxml.jackson.core:jackson-databind:" + jacksonDatabindVersion
    compile "org.codehaus.jackson:jackson-mapper-asl:" + jacksonVersion
    compile "org.codehaus.jackson:jackson-core-asl:" + jacksonVersion
}
|
xml配置(類配置)
我們有兩種方式進行Websocket的配置,一種是通過xml文件的方式,在這裏我們定義了websocket的配置信息,這樣服務器往客戶端發送消息就可以通過/topic/xx來發送,客戶端則可以通過/app/hello來發送消息到服務端。
1
2
3
4
5
6
7
8
9
10
11
12
13
14
15
|
<beans xmlns="http://www.springframework.org/schema/beans"
       xmlns:xsi="http://www.w3.org/2001/XMLSchema-instance"
       xmlns:websocket="http://www.springframework.org/schema/websocket"
       xsi:schemaLocation="http://www.springframework.org/schema/beans http://www.springframework.org/schema/beans/spring-beans-4.0.xsd
        http://www.springframework.org/schema/websocket http://www.springframework.org/schema/websocket/spring-websocket.xsd">

    ...... // other configurations

    <websocket:message-broker application-destination-prefix="/app">
        <websocket:stomp-endpoint path="/hello">
            <websocket:sockjs/>
        </websocket:stomp-endpoint>
        <websocket:simple-broker prefix="/topic"/>
    </websocket:message-broker>
</beans>
|
另外一種方式是通過類的方式,代碼如下,功能與上面的xml配置相同:
WebSocketConfig.java
1
2
3
4
5
6
7
8
9
10
11
12
13
14
15
16
17
18
19
20
21
|
import org.springframework.context.annotation.Configuration;
import org.springframework.messaging.simp.config.MessageBrokerRegistry;
import org.springframework.web.socket.config.annotation.AbstractWebSocketMessageBrokerConfigurer;
import org.springframework.web.socket.config.annotation.EnableWebSocketMessageBroker;
import org.springframework.web.socket.config.annotation.StompEndpointRegistry;

@Configuration
@EnableWebSocketMessageBroker
public class WebSocketConfig extends AbstractWebSocketMessageBrokerConfigurer {

  @Override
  public void configureMessageBroker(MessageBrokerRegistry config) {
      config.enableSimpleBroker("/topic");
      config.setApplicationDestinationPrefixes("/app");
  }

  @Override
  public void registerStompEndpoints(StompEndpointRegistry registry) {
      registry.addEndpoint("/hello").withSockJS();
  }
}
|
消息類和Controller定義
Controller定義:
WebSocketConfig.java
1
2
3
4
5
6
7
8
9
10
11
12
13
14
15
|
import com.zzm.wechat.model.Greeting;
import com.zzm.wechat.model.HelloMessage;
import org.springframework.messaging.handler.annotation.MessageMapping;
import org.springframework.messaging.handler.annotation.SendTo;
import org.springframework.stereotype.Controller;

@Controller
public class GreetingController {
    @MessageMapping("/hello")
    @SendTo("/topic/greetings")
    public Greeting greeting(HelloMessage message) throws Exception {
        Thread.sleep(3000); // simulated delay
        return new Greeting("Hello, " + message.getName() + "!");
    }
}
|
消息model的定義:
WebSocketConfig.java
1
2
3
4
5
6
7
8
9
10
11
12
13
14
15
16
17
18
19
|
public class Greeting {
    private String content;

    public Greeting(String content) {
        this.content = content;
    }

    public String getContent() {
        return content;
    }
}

public class HelloMessage {
    private String name;

    public String getName() {
        return name;
    }
}
|
在web.xml中設置controller的url前綴,這樣可以避免一些頁面的url被controller攔截。
web.xml
1
2
3
4
5
6
7
8
9
10
|
    <servlet>
      <servlet-name>mvc-dispatcher</servlet-name>
      <servlet-class>org.springframework.web.servlet.DispatcherServlet</servlet-class>
        <load-on-startup>1</load-on-startup>
  </servlet>

  <servlet-mapping>
      <servlet-name>mvc-dispatcher</servlet-name>
      <url-pattern>/api/*</url-pattern>
  </servlet-mapping>
|
客戶端頁面
首先下載stomp.js和sockjs.js,然後編寫一個html頁面進行客戶端websocket的連接,並實現發送消息和接收消息的功能。我們使用SockJS的方式來創建Websocket連接,注意url要加上domain名稱(這裏是server)和api前綴。
demo.html
1
2
3
4
5
6
7
8
9
10
11
12
13
14
15
16
17
18
19
20
21
22
23
24
25
26
27
28
29
30
31
32
33
34
35
36
37
38
39
40
41
42
43
44
45
46
47
48
49
50
51
52
53
54
55
56
57
58
59
60
61
62
63
64
65
66
|
<!DOCTYPE html>
<html>
<head>
    <title>Hello WebSocket</title>
    <script src="resources/sockjs-0.3.4.js"></script>
    <script src="resources/stomp.js"></script>
    <script type="text/javascript">
        var stompClient = null;

        function setConnected(connected) {
            document.getElementById('connect').disabled = connected;
            document.getElementById('disconnect').disabled = !connected;
            document.getElementById('conversationDiv').style.visibility = connected ? 'visible' : 'hidden';
            document.getElementById('response').innerHTML = '';
        }

        function connect() {
            var socket = new SockJS('/server/api/hello');
            stompClient = Stomp.over(socket);
            stompClient.connect({}, function(frame) {
                setConnected(true);
                console.log('Connected: ' + frame);
                stompClient.subscribe('/topic/greetings', function(greeting){
                    showGreeting(JSON.parse(greeting.body).content);
                });
            });
        }

        function disconnect() {
            if (stompClient != null) {
                stompClient.disconnect();
            }
            setConnected(false);
            console.log("Disconnected");
        }

        function sendName() {
            var name = document.getElementById('name').value;
            stompClient.send("/app/hello", {}, JSON.stringify({ 'name': name }));
        }

        function showGreeting(message) {
            var response = document.getElementById('response');
            var p = document.createElement('p');
            p.style.wordWrap = 'break-word';
            p.appendChild(document.createTextNode(message));
            response.appendChild(p);
        }
    </script>
</head>
<body onload="disconnect()">
<noscript><h2 style="color: #ff0000">Seems your browser doesn't support Javascript! Websocket relies on Javascript being enabled. Please enable
    Javascript and reload this page!</h2></noscript>
<div>
    <div>
        <button id="connect" onclick="connect();">Connect</button>
        <button id="disconnect" disabled="disabled" onclick="disconnect();">Disconnect</button>
    </div>
    <div id="conversationDiv">
        <label>What is your name?</label><input type="text" id="name" />
        <button id="sendName" onclick="sendName();">Send</button>
        <p id="response"></p>
    </div>
</div>
</body>
</html>
|
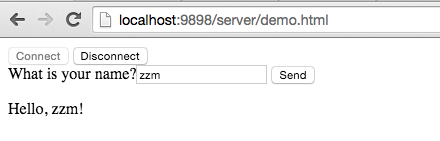
運行結果:
![]()
瀏覽器console信息:
1
2
3
4
5
6
7
8
9
10
11
12
13
14
15
16
17
18
19
20
21
22
23
24
25
26
27
28
29
30
31
32
33
34
35
|
Disconnected
chrome-extension://fhhdlnnepfjhlhilgmeepgkhjmhhhjkh/js/detector.js:505 detector
chrome-extension://fhhdlnnepfjhlhilgmeepgkhjmhhhjkh/js/detector.js:506 Object
stomp.js:130 Opening Web Socket...
stomp.js:130 Web Socket Opened...
stomp.js:130 >>> CONNECT
accept-version:1.1,1.0
heart-beat:10000,10000

<<< CONNECTED
version:1.1
heart-beat:0,0

connected to server undefined
demo.html:22 Connected: CONNECTED
heart-beat:0,0
version:1.1

>>> SUBSCRIBE
id:sub-0
destination:/topic/greetings

>>> SEND
destination:/app/hello
content-length:14

{"name":"zzm"}
<<< MESSAGE
destination:/topic/greetings
content-type:application/json;charset=UTF-8
subscription:sub-0
message-id:3657pj5u-0
content-length:25

{"content":"Hello, zzm!"}
|
gradle運行jetty9
gradle內置的Jetty版本是Jetty6,由於版本較低不支持websocket,所以我們測試的話需要打包並部署到Jetty9或Tomcat7.0.47+上,但我們可以通過其他gradle插件來把我們的本地服務運行到Jetty9上。這裏介紹2個插件,Gretty和Cargo。
Gretty
在build.gradle中添加如下腳本:
build.gradle
1
2
3
4
5
6
7
8
9
10
11
12
13
14
15
16
17
18
19
|
buildscript {
    repositories {
        maven {
            url "http://maven.oschina.net/content/groups/public/"
        }
    }

    dependencies {
        classpath 'org.akhikhl.gretty:gretty:+'
    }
}

apply plugin: 'org.akhikhl.gretty'
// apply plugin: 'jetty' 注意要註釋掉原來的jetty插件

gretty {
    httpPort = 9898 // 指定web服務的http端口
    servletContainer = 'jetty9' // 這裏可以指定tomcat,jetty的幾個版本
}
|
然後運行gradle appRun即可。
Cargo
在build.gradle中添加如下腳本,注意要先下載jetty9的安裝包並解壓:
build.gradle
1
2
3
4
5
6
7
8
9
10
11
12
13
14
15
16
17
18
19
20
|
buildscript {
    repositories {
        maven {
            url "http://maven.oschina.net/content/groups/public/"
        }
    }

    dependencies {
        classpath 'com.bmuschko:gradle-cargo-plugin:2.1'
    }
}

apply plugin: 'com.bmuschko.cargo'
cargo {
    containerId = 'jetty9x'
    port = 9898
    local {
        homeDir = file('/Users/zhaozhiming/tools/jetty-distribution-9.2.10.v20150310')
    }
}
|
然後運行gradle war CargoRunLocal,注意首先要打出war包,然後插件會自動部署war包到Jetty9的安裝目錄下,這種方式不大靈活,比如一些頁面的修改都需要重新部署才能進行測試。
最後附上Spring關於Websocket的文檔鏈接,請見這裏。