


搭建個人雲存儲一般會想到ownCloud,堪稱是自建雲存儲服務的經典。而Nextcloud是ownCloud原開發團隊打造的號稱是“下一代”存儲。初一看覺得“口氣”不小,剛推出來就重新“定義”了Cloud,真正試用過後就由衷地贊同這個Nextcloud:它是個人云存儲服務的絕佳選擇。可以說Nextcloud 是一款自由 (開源) 的類 Dropbox 軟件,由 ownCloud 分支演化形成。它使用 PHP 和 JavaScript 編寫,支持多種數據庫系統,比如 MySQL/MariaDB、PostgreSQL、Oracle 數據庫和 SQLite。它可以使你的桌面系統和雲服務器中的文件保持同步,Nextcloud 爲 Windows、Linux、Mac、安卓以及蘋果手機都提供了客戶端支持。同時,Nextcloud 也並非只是 Dropbox 的克隆,它還提供了很多附加特性,如日曆、聯繫人、計劃任務以及流媒體 Ampache。
與ownCloud相比,Nextcloud的功能絲毫沒有減弱,甚至由於可以安裝雲存儲服務應用,自制性更強,也更符合用戶的需求。Nextcloud官網的幫助文檔寫得相當地詳細,幾乎任何關於Nextcloud的問題都可以找到答案,這說明Nextcloud開發團隊確實比ownCloud更加優秀。
一開始以爲Nextcloud只是一個網盤雲存儲,後來看到Nextcloud內置了Office文檔、圖片相冊、日曆聯繫人、兩步驗證、文件管理、RSS閱讀等豐富的應用,我發現Nextcloud已經僅僅可以用作個人或者團隊存儲與共享,還可以打造成爲一個個人辦公平臺,幾乎相當於一個個人的Dropbox了。
以下內容將介紹如何在 CentOS 7 服務器中安裝和配置最新版本的 Nextcloud 12,並且會通過 Nginx 和 PHP7-FPM 來運行 Nextcloud,同時使用 MariaDB 做爲數據庫系統。Nextcloud雲盤環境部署後,可以實現web網頁端、手機移動端和桌面客戶端三者數據同步,其中桌面客戶端可以在本地設置一個文件夾,用於同步數據,這樣也就相當於在本地備份了數據。同時客戶端只要設置開機啓動,即只要是啓動狀態中,它和網頁端的數據就是自動同步的。廢話不多說了,直接看部署筆記:
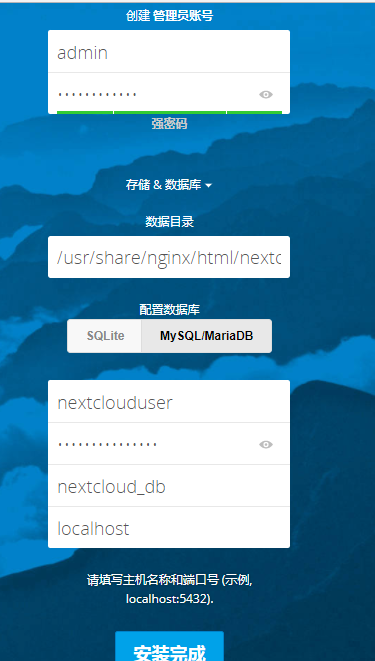
1 2 3 4 5 6 7 8 9 10 11 12 13 14 15 16 17 18 19 20 21 22 23 24 25 26 27 28 29 30 31 32 33 34 35 36 37 38 39 40 41 42 43 44 45 46 47 48 49 50 51 52 53 54 55 56 57 58 59 60 61 62 63 64 65 66 67 68 69 70 71 72 73 74 75 76 77 78 79 80 81 82 83 84 85 86 87 88 89 90 91 92 93 94 95 96 97 98 99 100 101 102 103 104 105 106 107 108 109 110 111 112 113 114 115 116 117 118 119 120 121 122 123 124 125 126 127 128 129 130 131 132 133 134 135 136 137 138 139 140 141 142 143 144 145 146 147 148 149 150 151 152 153 154 155 156 157 158 159 160 161 162 163 164 165 166 167 168 169 170 171 172 173 174 175 176 177 178 179 180 181 182 183 184 185 186 187 188 189 190 191 192 193 194 195 196 197 198 199 200 201 202 203 204 205 206 207 208 209 210 211 212 213 214 215 216 217 218 219 220 221 222 223 224 225 226 227 228 229 230 231 232 233 234 235 236 237 238 239 240 241 242 243 244 245 246 247 248 249 250 251 252 253 254 255 256 257 258 259 260 261 262 263 264 265 266 267 268 269 270 271 272 273 274 275 276 277 278 279 280 281 282 283 284 285 286 287 288 289 290 291 292 | 部署機器的系統是Centos7.4版本[root@nextcloud-server ~]# cat /etc/redhat-releaseCentOS Linux release 7.4.1708 (Core) 一、安裝並配置Nginx和php-fpm================================================================將自帶的epel、nginx、php全部卸載(rpm -e ... --nodeps)[root@nextcloud-server ~]# rpm -qa|grep php[root@nextcloud-server ~]# rpm -qa|grep php-common[root@nextcloud-server ~]# rpm -qa|grep nginx===============================================================CentOS默認的yum源中並不包含Nginx和php-fpm,首先要爲CentOS添加epel源:[root@nextcloud-server ~]# yum -y install epel-release[root@nextcloud-server ~]# yum -y install nginx 需要再添加一個yum源來安裝php-fpm,可以使用webtatic(這個yum源對國內網絡來說恐怕有些慢,當然你也可以選擇其它的yum源)[root@nextcloud-server ~]# rpm -Uvh https://mirror.webtatic.com/yum/el7/webtatic-release.rpm 安裝php7-fpm和一些其它的必要的組件[root@nextcloud-server ~]# yum -y install php70w-fpm php70w-cli php70w-gd php70w-mcrypt php70w-mysql php70w-pear php70w-xml php70w-mbstring php70w-pdo php70w-json php70w-pecl-apcu php70w-pecl-apcu-devel 完成後,檢查一下php-fpm是否已正常安裝[root@nextcloud-server ~]# php -vPHP 7.0.25 (cli) (built: Oct 29 2017 13:43:03) ( NTS )Copyright (c) 1997-2017 The PHP GroupZend Engine v3.0.0, Copyright (c) 1998-2017 Zend Technologies 配置php-fpm[root@nextcloud-server ~]# vim /etc/php-fpm.d/www.conf.....user = nginx //將用戶和組都改爲nginxgroup = nginx.....listen = 127.0.0.1:9000 //php-fpm所監聽的端口爲9000......env[HOSTNAME] = $HOSTNAME //去掉下面幾行註釋env[PATH] = /usr/local/bin:/usr/bin:/binenv[TMP] = /tmpenv[TMPDIR] = /tmpenv[TEMP] = /tmp 在/var/lib目錄下爲session路徑創建一個新的文件夾,並將用戶名和組設爲nginx[root@nextcloud-server ~]# mkdir -p /var/lib/php/session[root@nextcloud-server ~]# chown nginx:nginx -R /var/lib/php/session/[root@nextcloud-server ~]# ll -d /var/lib/php/session/drwxr-xr-x. 2 nginx nginx 4096 1月 25 09:47 /var/lib/php/session/ 啓動Nginx和php-fpm服務,並添加開機啓動[root@nextcloud-server ~]# systemctl start php-fpm[root@nextcloud-server ~]# systemctl start nginx[root@nextcloud-server ~]# systemctl enable php-fpm[root@nextcloud-server ~]# systemctl enable nginx 二、安裝並配置MariaDB使用MaraiDB作爲Nextcloud數據庫。yum安裝MaraiDB服務[root@nextcloud-server ~]# yum -y install mariadb mariadb-server 啓動MariaDB服務並添加開機啓動[root@nextcloud-server ~]# systemctl start mariadb[root@nextcloud-server ~]# systemctl enable mariadb 接下來設置MariaDB的root密碼[root@nextcloud-server ~]# mysql_secure_installation //按照提示設置密碼,首先會詢問當前密碼,密碼默認爲空,直接回車即可Enter current password for root (enter for none): //直接回車Set root password? [Y/n] YNew password: //輸入新密碼Re-enter new password: //再次輸入新密碼 Remove anonymous users? [Y/n] YDisallow root login remotely? [Y/n] YRemove test database and access to it? [Y/n] YReload privilege tables now? [Y/n] Y==============================================================================================或者採用另一種修改密碼的方式:跳過授權表1)在/etc/my.cnf文件裏添加"skip-grant-tables"2)重啓mariadb服務3)無密碼登陸mariadb,然後重置mysql密碼MariaDB [(none)]> update mysql.user set password=password("kevin@123") where user="root";4)去掉/etc/my.cnf文件裏的"skip-grant-tables"內容5)重啓mariadb服務6)這樣就可以使用上面重置的新密碼kevin@123登陸mariadb了============================================================================================== 設置完MariaDB的密碼後,使用命令行登錄MariaDB,併爲Nextcloud創建相應的用戶和數據庫。例如數據庫爲nextcloud_db,用戶爲nextclouduser,密碼爲nextcloudpasswd:[root@nextcloud-server ~]# mysql -p......MariaDB [(none)]> create database nextcloud_db; MariaDB [(none)]> create user nextclouduser@localhost identified by 'nextcloudpasswd';MariaDB [(none)]> grant all privileges on nextcloud_db.* to nextclouduser@localhost identified by 'nextcloudpasswd';MariaDB [(none)]> flush privileges; 三、爲Nextcloud生成自簽名SSL證書爲SSL證書創建一個新的文件夾:[root@nextcloud-server ~]# cd /etc/nginx/cert/[root@nextcloud-server cert]# openssl req -new -x509 -days 365 -nodes -out /etc/nginx/cert/nextcloud.crt -keyout /etc/nginx/cert/nextcloud.key.....Country Name (2 letter code) [XX]:cn //國家State or Province Name (full name) []:beijing //省份Locality Name (eg, city) [Default City]:beijing //地區名字Organization Name (eg, company) [Default Company Ltd]:kevin //公司名Organizational Unit Name (eg, section) []:Technology //部門Common Name (eg, your name or your server's hostname) []:kevin //CA主機名Email Address []:[email protected] 然後將證書文件的權限設置爲660[root@nextcloud-server cert]# chmod 700 /etc/nginx/cert[root@nextcloud-server cert]# chmod 600 /etc/nginx/cert/* 四、下載並安裝Nextcloud[root@nextcloud-server ~]# yum -y install wget unzip[root@nextcloud-server ~]# cd /usr/local/src/[root@nextcloud-server src]# wget https://download.nextcloud.com/server/releases/nextcloud-12.0.4.zip[root@nextcloud-server src]# unzip nextcloud-12.0.4.zip[root@nextcloud-server src]# lsnextcloud nextcloud-12.0.4.zip[root@nextcloud-server src]# mv nextcloud /usr/share/nginx/html/ 進入Nginx的root目錄,併爲Nextcloud創建data目錄,將Nextcloud的用戶和組修改爲nginx[root@nextcloud-server src]# cd /usr/share/nginx/html/[root@nextcloud-server html]# mkdir -p nextcloud/data/[root@nextcloud-server html]# chown nginx:nginx -R nextcloud/[root@nextcloud-server html]# ll -d nextclouddrwxr-xr-x. 15 nginx nginx 4096 1月 24 17:04 nextcloud 五、設置Nginx虛擬主機進入Nginx的虛擬主機配置文件所在目錄並創建一個新的虛擬主機配置(記得修改兩個server_name爲自己的域名):[root@nextcloud-server ~]# cd /etc/nginx/conf.d/[root@nextcloud-server conf.d]# vim nextcloud.confupstream php-handler { server 127.0.0.1:9000; #server unix:/var/run/php5-fpm.sock;} server { listen 80; server_name nextcloud.kevin-inc.com; # enforce https return 301 https://$server_name$request_uri;} server { listen 443 ssl; server_name nextcloud.kevin-inc.com; ssl_certificate /etc/nginx/cert/nextcloud.crt; ssl_certificate_key /etc/nginx/cert/nextcloud.key; # Add headers to serve security related headers # Before enabling Strict-Transport-Security headers please read into this # topic first. add_header Strict-Transport-Security "max-age=15768000; includeSubDomains; preload;"; add_header X-Content-Type-Options nosniff; add_header X-Frame-Options "SAMEORIGIN"; add_header X-XSS-Protection "1; mode=block"; add_header X-Robots-Tag none; add_header X-Download-Options noopen; add_header X-Permitted-Cross-Domain-Policies none; # Path to the root of your installation root /usr/share/nginx/html/nextcloud/; location = /robots.txt { allow all; log_not_found off; access_log off; } # The following 2 rules are only needed for the user_webfinger app. # Uncomment it if you're planning to use this app. #rewrite ^/.well-known/host-meta /public.php?service=host-meta last; #rewrite ^/.well-known/host-meta.json /public.php?service=host-meta-json # last; location = /.well-known/carddav { return 301 $scheme://$host/remote.php/dav; } location = /.well-known/caldav { return 301 $scheme://$host/remote.php/dav; } # set max upload size client_max_body_size 512M; fastcgi_buffers 64 4K; # Disable gzip to avoid the removal of the ETag header gzip off; # Uncomment if your server is build with the ngx_pagespeed module # This module is currently not supported. #pagespeed off; error_page 403 /core/templates/403.php; error_page 404 /core/templates/404.php; location / { rewrite ^ /index.php$uri; } location ~ ^/(?:build|tests|config|lib|3rdparty|templates|data)/ { deny all; } location ~ ^/(?:\.|autotest|occ|issue|indie|db_|console) { deny all; } location ~ ^/(?:index|remote|public|cron|core/ajax/update|status|ocs/v[12]|updater/.+|ocs-provider/.+|core/templates/40[34])\.php(?:$|/) { include fastcgi_params; fastcgi_split_path_info ^(.+\.php)(/.*)$; fastcgi_param SCRIPT_FILENAME $document_root$fastcgi_script_name; fastcgi_param PATH_INFO $fastcgi_path_info; fastcgi_param HTTPS on; #Avoid sending the security headers twice fastcgi_param modHeadersAvailable true; fastcgi_param front_controller_active true; fastcgi_pass php-handler; fastcgi_intercept_errors on; fastcgi_request_buffering off; } location ~ ^/(?:updater|ocs-provider)(?:$|/) { try_files $uri/ =404; index index.php; } # Adding the cache control header for js and css files # Make sure it is BELOW the PHP block location ~* \.(?:css|js)$ { try_files $uri /index.php$uri$is_args$args; add_header Cache-Control "public, max-age=7200"; # Add headers to serve security related headers (It is intended to # have those duplicated to the ones above) # Before enabling Strict-Transport-Security headers please read into # this topic first. add_header Strict-Transport-Security "max-age=15768000;includeSubDomains; preload;"; add_header X-Content-Type-Options nosniff; add_header X-Frame-Options "SAMEORIGIN"; add_header X-XSS-Protection "1; mode=block"; add_header X-Robots-Tag none; add_header X-Download-Options noopen; add_header X-Permitted-Cross-Domain-Policies none; # Optional: Don't log access to assets access_log off; } location ~* \.(?:svg|gif|png|html|ttf|woff|ico|jpg|jpeg)$ { try_files $uri /index.php$uri$is_args$args; # Optional: Don't log access to other assets access_log off; }} 接下來測試以下配置文件是否有錯誤,確保沒有問題後重啓Nginx服務。[root@nextcloud-server conf.d]# nginx -tnginx: the configuration file /etc/nginx/nginx.conf syntax is oknginx: configuration file /etc/nginx/nginx.conf test is successful[root@nextcloud-server conf.d]# systemctl restart nginx 六、爲Nextcloud設置Firewalld防火牆和SELinux可以選擇關閉Firewalld和SELinux[root@nextcloud-server ~]# systemctl stop firewalld[root@nextcloud-server ~]# systemctl disable firewalld[root@nextcloud-server ~]# setenforce 0[root@nextcloud-server ~]# getenforcedisable[root@nextcloud-server ~]# cat /etc/sysconfig/selinux......SELINUX=disabled 如果打開了防火牆,則需要設置Firewalld和SELinux首先需要安裝SElinux管理工具policycoreutils-python[root@nextcloud-server ~]# yum -y install policycoreutils-python 接着設置SELinux[root@nextcloud-server ~]# semanage fcontext -a -t httpd_sys_rw_content_t '/usr/share/nginx/html/nextcloud/data(/.*)?'[root@nextcloud-server ~]# semanage fcontext -a -t httpd_sys_rw_content_t '/usr/share/nginx/html/nextcloud/config(/.*)?'[root@nextcloud-server ~]# semanage fcontext -a -t httpd_sys_rw_content_t '/usr/share/nginx/html/nextcloud/apps(/.*)?'[root@nextcloud-server ~]# semanage fcontext -a -t httpd_sys_rw_content_t '/usr/share/nginx/html/nextcloud/assets(/.*)?'[root@nextcloud-server ~]# semanage fcontext -a -t httpd_sys_rw_content_t '/usr/share/nginx/html/nextcloud/.htaccess'[root@nextcloud-server ~]# semanage fcontext -a -t httpd_sys_rw_content_t '/usr/share/nginx/html/nextcloud/.user.ini'[root@nextcloud-server ~]# restorecon -Rv '/usr/share/nginx/html/nextcloud/' 接下來設置Firewlld防火牆,爲Nextcloud開放http和https兩個端口[root@nextcloud-server ~]# systemctl start firewalld[root@nextcloud-server ~]# systemctl enable firewalld[root@nextcloud-server ~]# firewall-cmd --permanent --add-service=http[root@nextcloud-server ~]# firewall-cmd --permanent --add-service=https[root@nextcloud-server ~]# firewall-cmd --reload 七、安裝Nextcloud解析上面nginx中配置的域名nextcloud.kevin-inc.com,訪問訪問http://nextcloud.kevin-inc.com進行Nextcloud界面安裝(訪問http域名會自動跳轉到https,安裝提示安裝即可!) |
==================NextCloud安全與性能優化==================
1 2 3 4 5 6 7 8 9 10 11 12 13 14 15 16 | 這種提示一般在NextCloud的服務器管理中可以看到,建議緩存類的直接安裝一個即可,安裝多了也沒有什麼用。爲了Nextcloud服務的安全和性能, 請將所有設置配置正確.PHP 模塊 ‘fileinfo’ 缺失. 我們強烈建議啓用此模塊以便在 MIME 類型檢測時獲得最準確的結果.HTTP 請求頭 “Strict-Transport-Security” 沒有配置爲至少 “15552000” 秒. 出於增強安全性考慮, 推薦按照安全提示中的說明啓用HSTS.內存緩存未配置. 如果可用, 需要配置 memcache 以增強性能.PHP 的組件 OPcache 沒有正確配置. 爲了提供更好的性能, 我們建議在php.ini文件中使用下列設置:opcache.enable=1opcache.enable_cli=1opcache.interned_strings_buffer=8opcache.max_accelerated_files=10000opcache.memory_consumption=128opcache.save_comments=1opcache.revalidate_freq=1 |
==================NextCloud添加Memcached緩存=============
1 2 3 4 5 6 7 8 9 10 11 12 13 14 15 16 17 18 19 20 21 22 23 24 25 26 27 28 29 30 31 32 33 34 35 36 37 38 39 40 | 修改nextcloud程序目錄下的config目錄中的config.php文件,在配置文件中添加如下,這個是多個Memcached實例,單個自己改: 'memcache.local' => '\OC\Memcache\APCu','memcache.distributed' => '\OC\Memcache\Memcached','memcached_servers' => array( array('localhost', 11211), array('server1.example.com', 11211), array('server2.example.com', 11211), ),==================================================================依據本篇如上安裝記錄,添加memcache緩存的方法(本機單機安裝memcahced)[root@nextcloud src]# yum -y install memcached[root@nextcloud src]# cat /etc/sysconfig/memcachedPORT="11211"USER="memcached"MAXCONN="1024"CACHESIZE="64"OPTIONS=""[root@nextcloud src]# systemctl start memcached[root@nextcloud src]# systemctl enable memcachedCreated symlink from /etc/systemd/system/multi-user.target.wants/memcached.service to /usr/lib/systemd/system/memcached.service.[root@nextcloud src]# lsof -i:11211COMMAND PID USER FD TYPE DEVICE SIZE/OFF NODE NAMEmemcached 146026 memcached 26u IPv4 3320544 0t0 TCP *:memcache (LISTEN)memcached 146026 memcached 27u IPv6 3320545 0t0 TCP *:memcache (LISTEN)memcached 146026 memcached 28u IPv4 3320549 0t0 UDP *:memcachememcached 146026 memcached 29u IPv6 3320550 0t0 UDP *:memcache修改nextcloud的config配置文件,添加memcached緩存配置[root@nextcloud config]# pwd/usr/share/nginx/html/nextcloud/config[root@nextcloud config]# cp config.php config.php.bak[root@nextcloud config]# vim config.php...... 'memcache.local' => '\OC\Memcache\APCu', 'memcache.distributed' => '\OC\Memcache\Memcached', 'memcached_servers' => array( array('localhost', 11211), ), |
==================NextCloud添加Redis緩存==================
1 2 3 4 5 6 7 8 9 10 11 12 13 14 15 16 17 18 19 | 在nextcloud的config配置文件中添加如下,這個是通過TCP連接的:'memcache.local' => '\OC\Memcache\Redis','redis' => array( 'host' => 'localhost', 'port' => 6379, ),還有性能更好的UNIX連接:'memcache.local' => '\OC\Memcache\Redis','redis' => array( 'host' => '/var/run/redis/redis.sock', 'port' => 0, 'dbindex' => 0, 'password' => 'secret', 'timeout' => 1.5, ),同時,官方還推薦加入如下,來用於存儲文件鎖:'memcache.locking' => '\OC\Memcache\Redis', |
========Nextcloud的郵件發信設置========
Nextcloud發送郵件信息的前提:每個用戶(包括管理員)都要事先設置好自己的郵箱地址!
1)使用管理員賬號登陸Nextcloud。點擊右上角的設置圖標裏的"管理"-"其他設置"
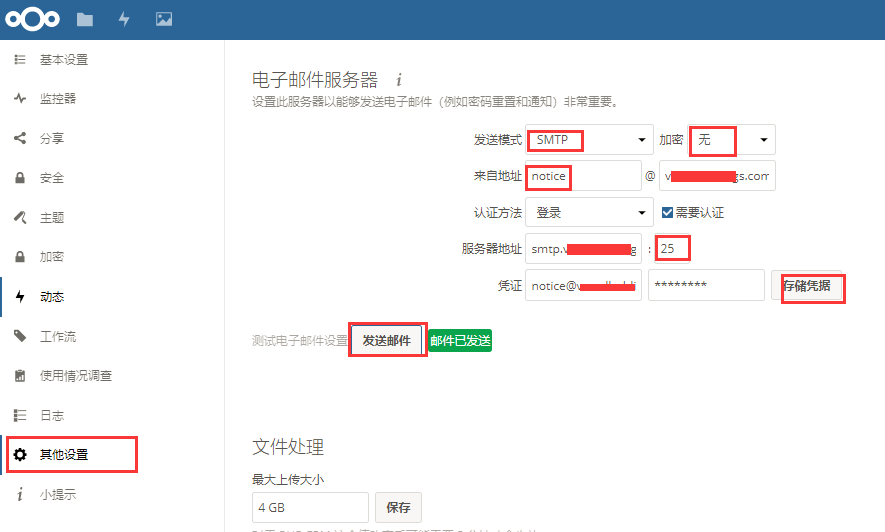
前提是管理員(admin)要事先設置好自己的郵箱地址。如下設置好郵箱地址後,按Enter鍵後就會顯示一個"對勾"

滿足條件:
1 2 3 | 1)在admin登陸後的"管理"->"其他設置"的後臺裏配置好"電子郵件服務器"(配置後可以測試發送郵件是否成功,前提是admin也要事先配置好自己的郵箱地址)2)各用戶創建並登陸後,要記得配置各自的郵箱地址。比如wangshibo用戶登錄後,配置自己的郵箱地址3)在分享文件的時候,只要使用對方賬號名進行分享,對方郵箱裏就會收到一封分享信息的郵件! |
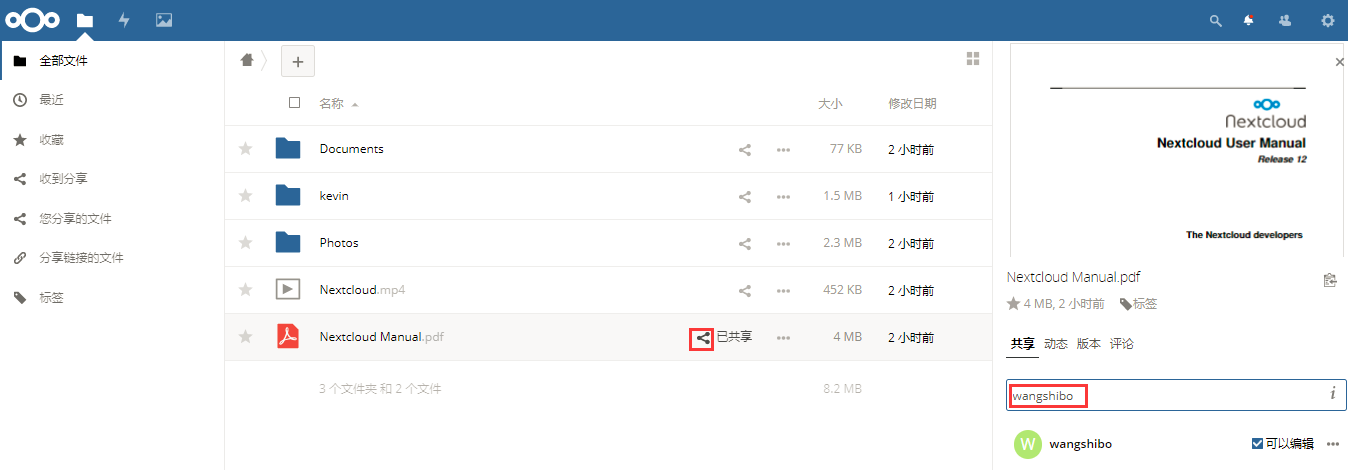
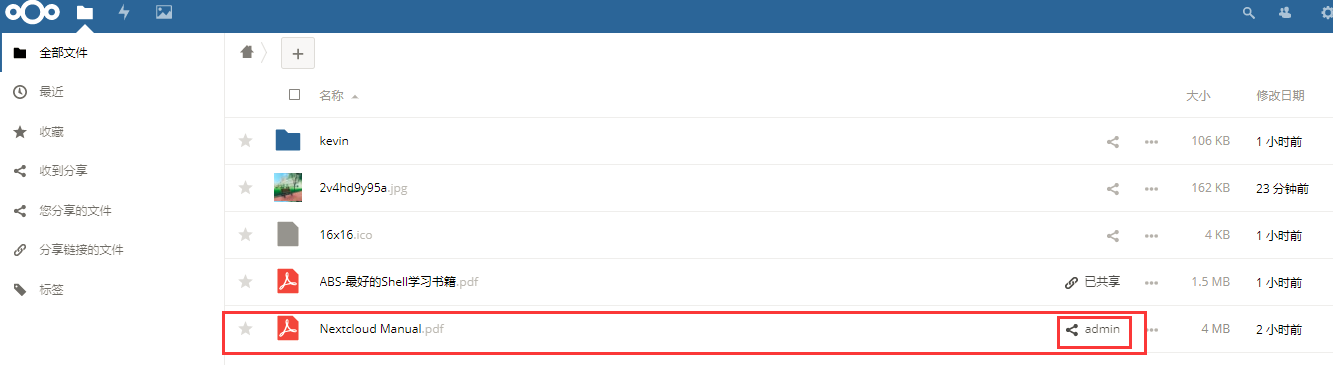
如下,在admin賬號下分享Nextcloud Manual.pdf這個文件給wangshibo用戶
然後登陸wangshibo用戶,就會發現Nextcloud Manual.pdf文件已經分享過來了
登陸wangshibo賬號配置的郵箱,就會發現有上面分享的郵件信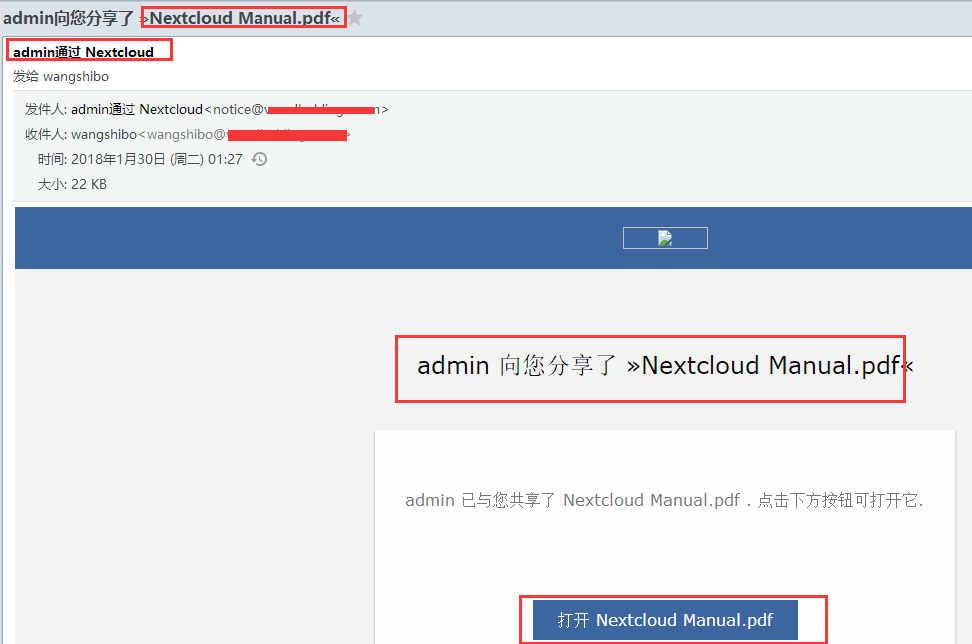
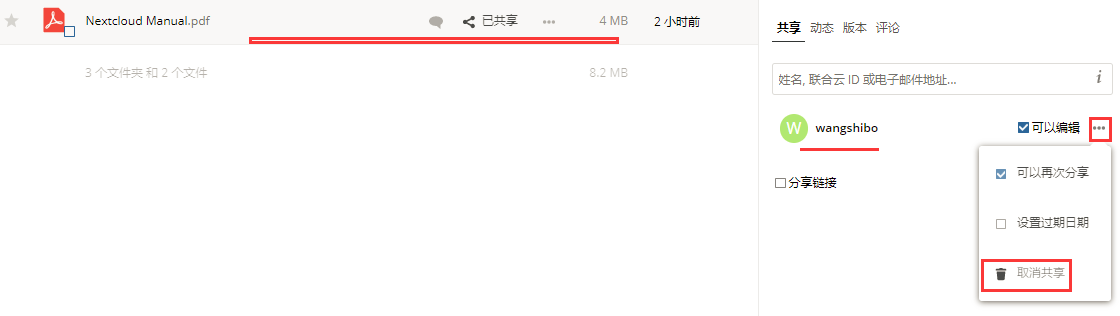
也可以在文件來源方取消分享
==========雲盤上傳文件大小限制==============
nextcloud上傳文件大小的自身限制爲512M,如果要想調整這個大小,操作方法如下:
1 2 3 4 5 6 7 8 9 10 11 12 13 14 15 16 17 18 19 | 1)修改php.ini上傳文件大小限制[root@nextcloud ~]# vim /etc/php.ini......max_execution_time = 0 #默認是30秒,改爲0,表示沒有限制......post_max_size = 10800M #設定 POST 數據所允許的最大大小,如果POST數據尺寸大於post_max_size $_POST 和 $_FILES superglobals 便會爲空.......upload_max_filesize = 10240M #表示所上傳的文件的最大大小#另外要說明的是,post_max_size 大於 upload_max_filesize 爲佳.2)修改nginx.conf[root@nextcloud ~]# vim /etc/nginx/conf.d/nextcloud.conf.....client_max_body_size 10240M;3)重啓php和nginx服務[root@nextcloud ~]# systemctl restart php-fpm[root@nextcloud ~]# systemctl restart nginx |
==========雲盤創建新用戶==============
碰到一個問題:在admin管理員登錄nextclod,點擊右上角的"用戶",創建新用戶時候,點擊"創建"無反應,即無法在web界面裏創建新用戶!
此時可以去數據庫中創建新用戶:
1 2 3 4 5 6 7 8 9 10 11 12 13 14 15 16 17 18 19 20 21 22 23 24 25 26 27 28 29 30 31 32 33 34 35 36 37 38 39 40 41 42 43 44 45 46 47 48 49 50 51 52 53 54 55 56 57 58 59 60 61 62 63 64 65 | [root@nextcloud ~]# mysql -pnextcloud@123Welcome to the MariaDB monitor. Commands end with ; or \g.Your MariaDB connection id is 53445Server version: 5.5.56-MariaDB MariaDB ServerCopyright (c) 2000, 2017, Oracle, MariaDB Corporation Ab and others.Type 'help;' or '\h' for help. Type '\c' to clear the current input statement.MariaDB [(none)]> show databases;+----------------------+| Database |+----------------------+| information_schema || binlog || mysql || #mysql50#mysql.mysql || nextcloud_db || performance_schema |+----------------------+6 rows in set (0.00 sec)MariaDB [(none)]> use nextcloud_db;Reading table information for completion of table and column namesYou can turn off this feature to get a quicker startup with -ADatabase changedMariaDB [nextcloud_db]> select * from oc_users;+--------------+---------------------------+----------------------------------------------------------------+| uid | displayname | password |+--------------+---------------------------+----------------------------------------------------------------+| admin | NULL | 1|$2y$10$EeJacmgPRJW1VWcJVyEtA.u37fjWh3YRLvSKN1fxtdYDxRUdM4pSu || kevin | 信息科技部-kevin | 1|$2y$10$GA18mMkIyZ58eDvE/e6eMuQMJQyWP7BgwyhymuUpykDgWLKQdFotC || grace | 信息科技部-grace | 1|$2y$10$eCsuuK.ZrWx7qGrMKi88l.myL6GAj33TYtJ9x288SWq7qx25xiFN2 |添加新用戶"wangshibo",密碼爲"wangshibo@123"MariaDB [nextcloud_db]> insert into oc_users(uid,password) valuses("wangshibo","wangshibo@123");再次查看:MariaDB [nextcloud_db]> select * from oc_users;+--------------+---------------------------+----------------------------------------------------------------+| uid | displayname | password |+--------------+---------------------------+----------------------------------------------------------------+| admin | NULL | 1|$2y$10$EeJacmgPRJW1VWcJVyEtA.u37fjWh3YRLvSKN1fxtdYDxRUdM4pSu || kevin | 信息科技部-kevin | 1|$2y$10$GA18mMkIyZ58eDvE/e6eMuQMJQyWP7BgwyhymuUpykDgWLKQdFotC || grace | 信息科技部-grace | 1|$2y$10$eCsuuK.ZrWx7qGrMKi88l.myL6GAj33TYtJ9x288SWq7qx25xiFN2 || grace | NULL | wangshibo@123 |發現在數據庫中創建的新用戶的密碼是明文保存的。接着用admin管理員登錄nextcloud,點擊右上角"用戶",就能看到上面在數據庫中新創建的wangshibo用戶了,然後在這裏重置密碼!(重置密碼時,輸入新密碼,然後按"Enter"鍵回車即可),最後確保用新重置的密碼登錄wangshibo賬號的雲盤。wangshibo賬號登錄成功後,再登錄數據庫發現,該用戶的密碼就會密文保存了!========================================================================創建用戶組的正確方法:點擊右上角"用戶",在"分組"->"添加分組"。也可以登錄數據庫裏創建:MariaDB [nextcloud_db]> select * from oc_groups;MariaDB [nextcloud_db]> insert into oc_groups values("運維組");可以將新用戶分組到對應的組內,也可以禁用或刪除用戶。點擊左下角的"設置",可以顯示用戶的存儲目錄,郵件地址等。 |