一、Linux集羣
Linux集羣系統保護集羣管理器和集羣節點兩部分組成。集羣節點簡稱爲節點、服務器或服務器節點,是用來提供資源,進行集羣的實際工作。一般來說,它必須進行配置後才能稱爲集羣的一部分,同時也要運行集羣用到的應用程序。Linux集羣管理器再將各節點捆綁在一起,它用於將任務分解到所有的節點。簡單的說,就是按照某種方式把服務器連起來來完成一種特定的任務,提高服務器的響應能力。 scale up 在單臺主機上提高服務器性能, scale out 增加服務器的數量來提高,負載均衡的集羣。
二、Linux集羣類型
集羣類型有三種:
1、 LB(Load Balancing) 負載均衡 前端有個調度器(Director)負責接收客戶端的請求分發服務到後端的realserver上(或者dispatcher, balancer 都是調度器)
2、 HA(Hight Availability) 高可用集羣(7x24 99.999% ;時時在線的提供服務,只有一個在線服務,另外的做備份)
3、 HP(hight Performance) 高性能集羣,把任務分片發給集羣服務器,然後把結果收集,計算速度非常快
三、負載均衡-lvs
4層負載均衡器----Linux Virtual Server ,工作在傳輸層,因此又被稱爲四層路由或四層交換
3.1、lvs工作方式: ipvsadm / ipvs
ipvsadm:用戶空間的命令行工具,用於管理集羣服務
ipvs:工作內核上的netfilter的INPUT鏈上
3.2、lvs的術語:director/realserver
調度器:director, dispatcher, balancer
VIP:Virtual IP 提供集羣服務的ip地址,虛擬ip地址(公網ip)
DIP: Director IP 作爲負載均衡器與後端服務器通信的ip地址(director的ip)
RIP: Real Server IP 後端真實服務器的ip地址
CIP:Client IP 客戶端ip地址
3.3、lvs的類型 :
lvs-nat Network Address Translation : MASQUERADE
lvs-dr (Direct Routing) : GATEWAY
lvs-tun (IP tunneling) : IPIP
lvs-fullnat
四、lvs類型介紹(圖示:左側爲源ip,右側爲目標ip)
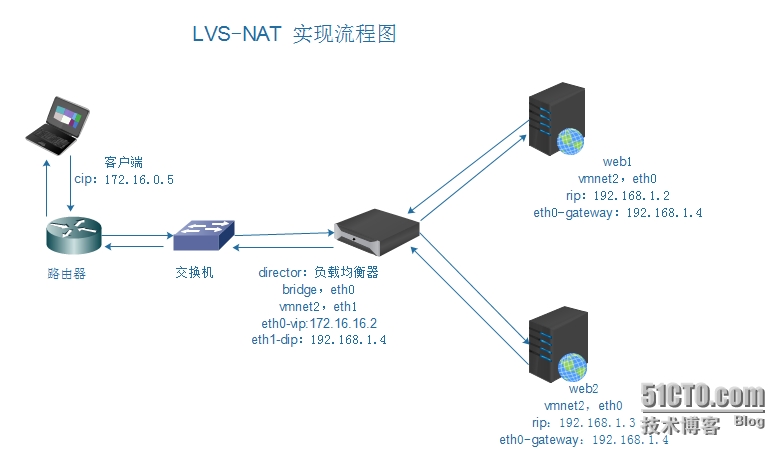
4.1、lvs-nat
(1)通過網絡地址轉換的方法來實現調度的。首先調度器(director)接收到客戶的請求數據包時(請求的目標ip爲vip)
(2)根據調度算法決定將請求發送給哪個後端的真實服務器(realserver)。然後調度器就把客戶端發送的請求數據包的目標ip地址及端口改成後端真實服務器的ip地址(rip),這樣真實服務器(realserver)就能夠接收到客戶的請求數據包了
(3)realserver響應完請求後,查看默認路由(NAT模式下需要把realserver的默認路由設置爲director服務器的dip,realserver把響應後的數據包發送給director,這時候的源ip爲rip,目標ip爲cip
(4)director接收到響應包後,把包的源地址改成虛擬地址(vip)然後發送回給客戶端。
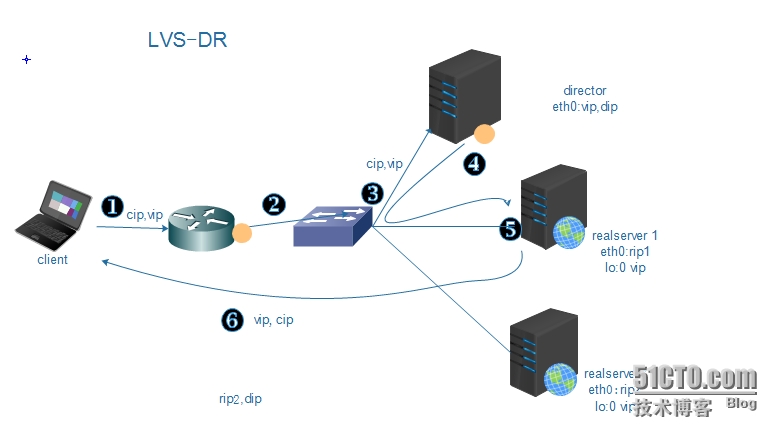
4.2、lvs-dr
dr模式是通過改寫請求報文的目標mac地址,將請求發給真實服務器的,而真實服務器響應後的處理結果直接返回給客戶端用戶。同tun模式一樣,dr模式可以極大的提高集羣系統的伸縮性。而且DR模式沒有ip隧道的開銷,對集羣中的真實服務器也沒有必要必須支持ip隧道協議的要求。
要點:
<1>director要配置2個ip地址,1個是vip(公網地址),另1個是dip(負責和realserver進行通信)
<2>realserver也要配置2個ip地址,1個是rip,另一個是vip
<3>director主機和realserver都要配置vip地址
<4>客戶端發出請求的時候,realserver不能響應,而只能有director進行響應
<5>一般來講,dip和rip要在同一物理網絡中,爲了方便可以在同一網段中,保證director發出的對rip的arp請求,能夠正常取得realserver的mac地址,即只要能夠保證在同一路由器中就可以
<6>路由器的某個接口要是vip的網關
<7>各realserver與外部通信所使用的ip地址必須是rip,因此它的網關必須要跟rip在同一個網段中,如果rip是公網的ip,那麼rip的網關要指向路由器的另外的某個接口上,或者是指向其他的路由器(要能到互聯網)
<8>對linux內核而言,響應報文從哪塊網卡出去,那麼源ip地址就是這個網卡的ip地址
(1)客戶端發起請求,源ip地址爲cip,目標地址爲vip(提供某個服務的ip地址)
(2)假設客戶端的請求經過層層路由,已經進入本地網絡,而本地通信靠的是mac地址,這時候路由器就要做arp廣播,交換機是不會隔離廣播報文的,所以這個時候director主機發現自己的mac地址是路由器廣播的,做出迴應,路由器收到迴應後,封裝源mac,目標mac(director的mac地址),發給交換機
(3)收到請求報文後,交換機內部有mac地址表,通過某個接口發給director主機
(4),director轉發客戶端的請求報文,但是不能改源ip和目標ip,因此只能改目標mac,通過調度算法挑一個realserver進行響應,得到這個realserver對ip地址,然後再通過arp廣播的方式得到這個realserver的mac地址,調度的時候源ip(cip)和目標ip(vip)都沒變,而重新封裝mac報文,源mac爲director的mac,目標mac爲挑選出的realserver的mac,封裝後通過交換機發送給realserver
(5)realserver收到請求報文,拆封後,發現源ip(cip)和目標ip(vip),vip是本機的ip地址,要提供客戶端所請求的服務
(6)響應客戶端的請求,將其請求的結果發送給客戶端
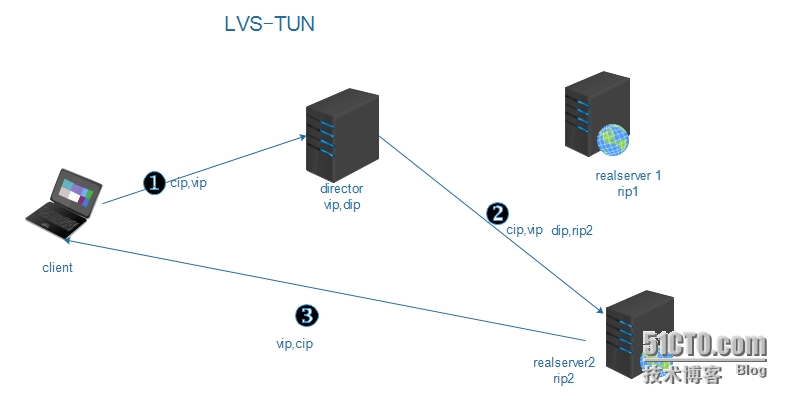
4.3、lvs-tun
採用NAT模式時,由於請求和響應的報文必須通過調度器地址重寫,當客戶請求越來越多時,調度器處理能力將成爲瓶頸。爲了解決這個問題,調度器把請求的報文通過ip隧道轉發到真實的服務器。真實的服務器將響應處理後的數據直接返回給客戶端,這樣調度器就只處理請求入站報文。
(1)調度器(director)接收到客戶的請求數據包時(請求的目的ip爲vip)
(2)不修改請求報文的ip首部,而是通過在原有的ip首部之外(cip,vip),再封裝1個ip首部(dip,rip)
(3)realserver收到調度器發來的報文後,解封裝,直接響應給客戶端(vip,cip)
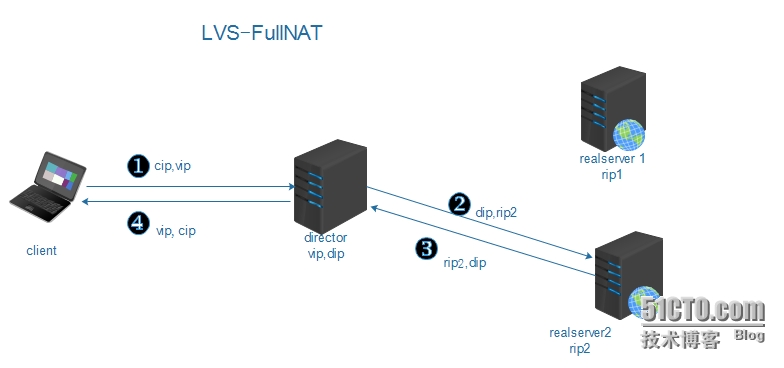
4.4、lvs-fullnat
原理: director通過同時修改請求報文的目標地址和源地址進行轉發
(1)調度器(Director)接收到客戶的請求數據包時(請求的目的IP爲VIP)
(2)根據調度算法決定將請求發送給哪個後端的真實服務器(RS)。然後調度器就把客戶端發送的請求數據包的源ip和目標IP地址及端口改成director的dip及後端真實服務器的ip地址(rip)
(3)這樣真實服務器(realserver)就能夠接收到director發來的請求數據包。真實服務器響應請求
(4)realserver把響應後的數據包發送給director,director接收到響應包後,把包的源地址改成虛擬地址(vip),目標ip改成客戶端ip(cip)後再發送回給客戶端。
五、lvs調度算法
LVS調度方法,算法10種:
1、rr:Round-robin(輪詢),客戶端請求到達的時候,director會按照realserver在集羣服務中從上至下的順序循環分配請求
2、wr:Weighted Round-Robin(加權輪詢),按照realserver的性能分配一個權重,確定請求發給誰,權重越大分到請求越多
3、sh:Source Hash(源地址hash),相當於SNAT,表示來源於同一個cip的請求將始終被定向至同一個realserver上去,保證源地址不變
4、dh:Destination Hashing(目標地址hash)相當於DNAT,不管來自哪個客戶端都始終被定向至同一個主機,保證目標地址不變
5、lc(最少連接) 新的連接請求將被分配至當前連接數最少的realserver上;缺陷是如果一個realserver的性能足夠好,那麼很有可能客戶端的所有請求都會分配給它,而性能差的realserver沒有任何請求出現
6、wlc(加權最少連接) 在原有的最少連接的基礎上給realserver一個權重,計算方法爲:overload=(active*256+inactive)/weight ,缺陷:請求很有可能是從RS列表自上而下進行響應,很有可能是權重最小的
7、sed:最短期望延遲,對wlc的改進,可以讓前幾個請求使用讓權重大的來響應
8、nq :永不排隊,對sed簡單改進,還檢查當前服務器有沒有連接
9、lblc:基於本地的最少連接,動態的DH,不僅檢查是不是請求是不是同一個ip還檢查當前有沒有連接
10、lblcr:帶複製的最少連接,對lblc的改進,當第二個realserver上的全部請求斷開,允許第一個realserver上的請求複製到第二個realserver上響應,減輕第一個realserver上的負擔
六、lvs-nat類型實現http和https的方法
6.1、測試環境:
director和realserver的操作系統爲:centos 6.6
web1和web2的httpd:使用操作系統提供的httpd
配置好3臺服務器的ip地址
6.2、http
director:提供簡單的腳本來實現
[root@localhost shell]# vim lvs-nat.sh

#!/bin/bash
# auto install lvm-nat
# date 2015-10-9

# ip_forward=1
sed -i "[email protected]_forward = [email protected]_forward = 1@" /etc/sysctl.conf && sysctl -p &>/dev/null               //開啓轉發功能

# install ipvsadm
rpm -q ipvsadm
if [ $? -eq 1 ]; then
    yum install -y ipvsadm &> /dev/null              //安裝ipvsadm
fi

# define variable
IPVSADM=`which ipvsadm`
VIP=172.16.16.2
RS1=192.168.1.2
RS2=192.168.1.3

# define lvs-nat
$IPVSADM -C                       //清空規則
$IPVSADM -A -t $VIP:80 -s rr            //添加httpd集羣服務,使用輪詢調度算法
$IPVSADM -a -t $VIP:80 -r $RS1:80 -m -w 1      //向httpd集羣服務添加節點
$IPVSADM -a -t $VIP:80 -r $RS2:80 -m -w 1
[root@localhost ~]# ipvsadm -L -n
IP Virtual Server version 1.2.1 (size=4096)
Prot LocalAddress:Port Scheduler Flags
  -> RemoteAddress:Port           Forward Weight ActiveConn InActConn
TCP  172.16.16.2:80 rr
  -> 192.168.1.2:80               Masq    1      0          0
  -> 192.168.1.3:80               Masq    1      0          0
web1
[root@node1 ~]# vim realserver.sh
#!/bin/bash
# lvs-nat node define
#

# define hostname
name=node1.bengbengtu.com
hostname $name
sed -i "s/HOSTNAME=localhost/HOSTNAME=$name/" /etc/sysconfig/network

# define ip and gateway
ipaddr=192.168.1.2
gateway=192.168.1.4
sed -i -e "s/ONBOOT=.*/ONBOOT=yes/; s/BOOTPROTO=.*/BOOTPROTO=static/; s/IPADDR=.*/IPADDR=$ipaddr/; s/GATEWAY=.*/GATEWAY=$gateway/; /NETMASK=.*/d" /etc/sysconfig/network-scripts/ifcfg-eth0
service network restart

# yum install httpd
rpm -q httpd
if [ $? -eq 1 ];then
    yum install -y httpd &> /dev/null
fi

chkconfig httpd on
service httpd start &> /dev/null && ss -tanl | grep 80
if [ $? -eq 0 ]; then
   echo -e "httpd start \033[32m[OK]\033[0m"
   echo $name > /var/www/html/index.html
else
   echo -e "httpd start \033[31m[fail]\033[0m"
   exit 2
fi
web2
[root@node2 ~]# vim realserver.sh
#!/bin/bash
# lvs-nat node define
#

# define hostname
name=node2.bengbengtu.com
hostname $name
sed -i "s/HOSTNAME=localhost/HOSTNAME=$name/" /etc/sysconfig/network

# define ip and gateway
ipaddr=192.168.1.3
gateway=192.168.1.4
sed -i -e "s/ONBOOT=.*/ONBOOT=yes/; s/BOOTPROTO=.*/BOOTPROTO=static/; s/IPADDR=.*/IPADDR=$ipaddr/; s/GATEWAY=.*/GATEWAY=$gateway/; /NETMASK=.*/d" /etc/sysconfig/network-scripts/ifcfg-eth0
service network restart

# yum install httpd
rpm -q httpd
if [ $? -eq 1 ];then
    yum install -y httpd &> /dev/null
fi

chkconfig httpd on
service httpd start &> /dev/null && ss -tanl | grep 80
if [ $? -eq 0 ]; then
   echo -e "httpd start \033[32m[OK]\033[0m"
   echo $name > /var/www/html/index.html
else
   echo -e "httpd start \033[31m[fail]\033[0m"
   exit 2
fi
測試即可~~
5.3、https
爲了簡化過程,在web1上直接創建CA,並簽發證書(www.bengbengtu.com)
director
# ipvsadm -t 172.16.16.2:443 -s rr
# ipvsadm -t 172.16.16.2:443 -r 192.168.1.2:443 -m
# ipvsadm -t 172.16.16.2:443 -r 192.168.1.2:443 -m
web1
[root@node1 ~]# mkdir /etc/httpd/ssl/
[root@node1 ~]# touch /etc/pki/CA/{serial,index.txt}
[root@node1 ~]# echo 01 > /etc/pki/CA/serial
[root@node1 ~]# (umask 077; openssl genrsa -out /etc/pki/CA/private/cakey.pem 2048)
[root@node1 ~]# openssl req -new -x509 -key /etc/pki/CA/private/cakey.pem -out /etc/pki/CA/cacert.pem -days 3650
Country Name (2 letter code) [XX]:CN
State or Province Name (full name) []:Beijing
Locality Name (eg, city) [Default City]:Beijing
Organization Name (eg, company) [Default Company Ltd]:bengbengtu
Organizational Unit Name (eg, section) []:IT
Common Name (eg, your name or your server's hostname) []:ca.lvs.bengbengtu.com
Email Address []:[email protected]
[root@node1 ~]# (umask 077; openssl genrsa -out /etc/httpd/ssl/httpd.key 2048)
Generating RSA private key, 2048 bit long modulus
..........+++
.......................................................................+++
e is 65537 (0x10001)
[root@node1 ~]# openssl req -new -key /etc/httpd/ssl/httpd.key -out /etc/httpd/ssl/httpd.csr -days 365
Country Name (2 letter code) [XX]:CN
State or Province Name (full name) []:Beijing
Locality Name (eg, city) [Default City]:Beijing
Organization Name (eg, company) [Default Company Ltd]:bengbengtu
Organizational Unit Name (eg, section) []:IT
Common Name (eg, your name or your server's hostname) []:www.bengbengtu.com
Email Address []:[email protected]

Please enter the following 'extra' attributes
to be sent with your certificate request
A challenge password []:
An optional company name []:
[root@node1 ~]# openssl ca -in /etc/httpd/ssl/httpd.csr -out /etc/pki/CA/certs/www.bengbengtu.com.crt -days 365
Using configuration from /etc/pki/tls/openssl.cnf
Check that the request matches the signature
Signature ok
Certificate Details:
        Serial Number: 1 (0x1)
        Validity
            Not Before: Oct 10 01:21:31 2015 GMT
            Not After : Oct  9 01:21:31 2016 GMT
        Subject:
            countryName               = CN
            stateOrProvinceName       = Beijing
            organizationName          = bengbengtu
            organizationalUnitName    = IT
            commonName                = www.bengbengtu.com
            emailAddress              = [email protected]
        X509v3 extensions:
            X509v3 Basic Constraints:
                CA:FALSE
            Netscape Comment:
                OpenSSL Generated Certificate
            X509v3 Subject Key Identifier:
                1C:6A:9C:33:06:C9:66:00:31:2D:FD:01:0E:12:81:15:16:D2:D7:1B
            X509v3 Authority Key Identifier:
                keyid:80:9F:80:C7:D0:9C:3F:E0:CA:B1:53:ED:6E:9F:3D:B3:3F:30:69:64

Certificate is to be certified until Oct  9 01:21:31 2016 GMT (365 days)
Sign the certificate? [y/n]:y

1 out of 1 certificate requests certified, commit? [y/n]y
Write out database with 1 new entries
Data Base Updated

[root@node1 ~]# yum install mod_ssl
 [root@node1 ~]# cp /etc/pki/CA/certs/www.bengbengtu.com.crt /etc/httpd/ssl/
[root@node1 ~]# vim /etc/httpd/conf/httpd.conf
ServerName 192.168.1.2

[root@node1 ~]# vim /etc/httpd/conf.d/ssl.conf
<VirtualHost www.bengbengtu.com:443>
#DocumentRoot "/var/www/html"
ServerName www.bengbengtu.com
SSLCertificateFile /etc/httpd/ssl/www.bengbengtu.com.crt
SSLCertificateKeyFile /etc/httpd/ssl/httpd.key

[root@node1 ~]# service httpd restart
Stopping httpd:                                            [  OK  ]
Starting httpd:                                            [  OK  ]
拷貝https需要用到的證書及配置文件ssl.conf 到web2 [root@www ~]# scp /etc/httpd/ssl/www.bengbengtu.com.crt [email protected]:/etc/httpd/ssl/ [email protected]'s password: www.bengbengtu.com.crt 100% 4659 4.6KB/s 00:00 [root@www ~]# scp /etc/httpd/conf.d/ssl.conf [email protected]:/etc/httpd/conf.d/ [email protected]'s password: ssl.conf 100% 9474 9.3KB/s 00:00 [root@www ~]# scp /etc/httpd/ssl/httpd.key [email protected]:/etc/httpd/ssl/ [email protected]'s password: httpd.key 100% 1679 1.6KB/s 00:00
web2
[root@node2 ~]# mkdir /etc/httpd/ssl
[root@node2 ~]# yum install mod_ssl -y
[root@node2 ~]# vim /etc/httpd/conf/httpd.conf
ServerName 192.168.1.3
[root@node2 ~]# service httpd start
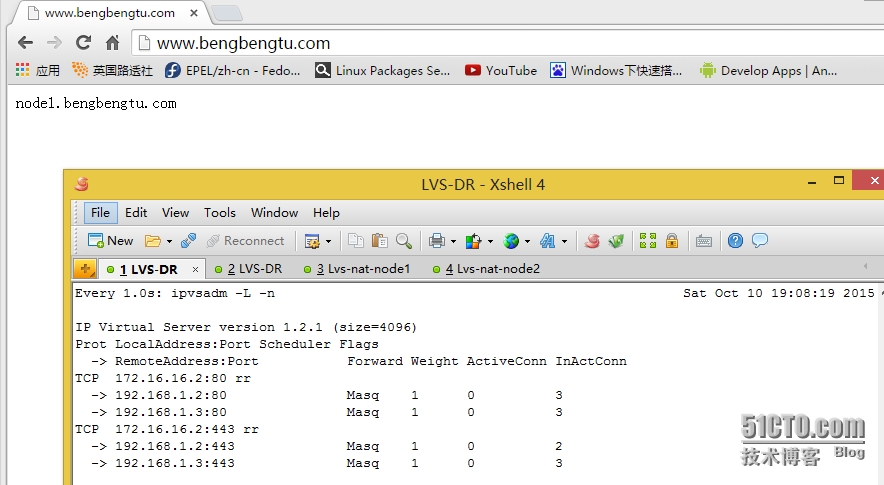
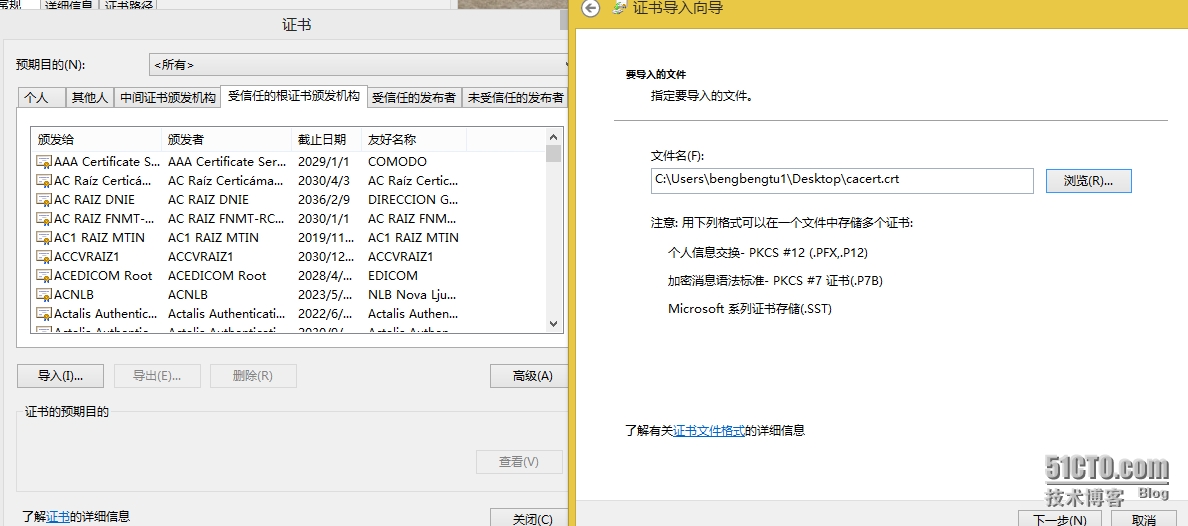
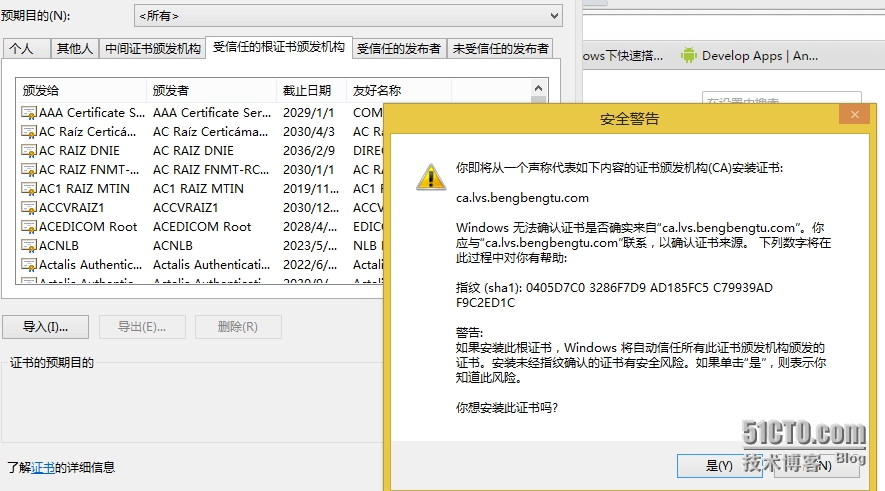
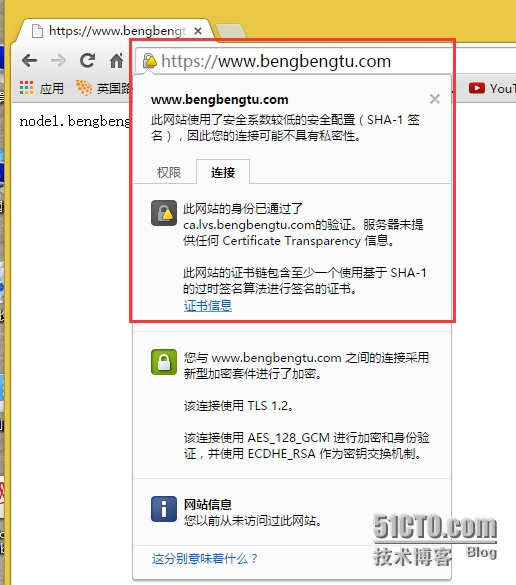
測試結果
下次講解lvs-dr類型實現過程!!!


