


在使用Cocos2d-iPhone框架開發iOS遊戲的時候,對於每一個場景(CCScene)的編輯是比較麻煩的,好在有外國的牛人提供了非常棒的場景編輯器----CocosBuilder。下面我將詳細介紹CocosBuilder結合Cocos2d-iPhone框架的使用。
工具:CocosBuilder 2.0 beta,Xcode4.3
一、打開Xcode,新建一個cocos2d iOS工程
二、在包含.xcodeproj文件的地方新建一個文件夾,叫CCBuilder吧,然後再在這個新建好的文件夾下建兩個文件夾,分別叫Projects和Resources,用於放置CocosBuilder工程和資源文件
三、打開安裝好的CocosBuilder,打開File菜單下的New,選擇New Project,新建一個CocosBuilder工程,並將這個新建的工程保存到/CCBuilder/Projects文件夾下面。然後打開File菜單下的Project Setting菜單,如下圖所示
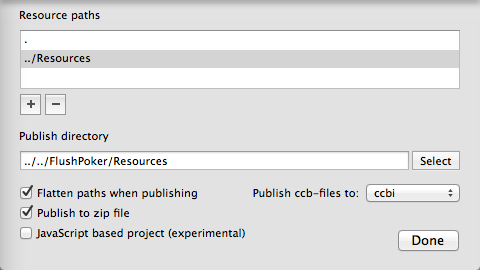
點擊"+"號,分別把/Projects和/Resources文件夾加進來
然後在Publish directory這裏,選擇之前新建的Xcode工程的資源文件夾
將"Flatten paths when publishing"和"Publish to zip file"勾上,減少生成的文件的體積
全部完成後點擊"Done"按鈕
四、打開File菜單下的New,選擇New File,新建一個CocosBuilder文件,並將這個新建的文件保存到/CCBuilder/Projects文件夾下面,比如這裏新建的ccb文件叫StartGame.ccb,現在就可以在Object菜單下選擇添加Cocos2d元素了
五、在完成ccb文件的編輯後,點擊File菜單下的Publish,這樣將會在Xcode工程的資源文件夾下生成一個ccb.zip文件,將這個文件添加到Xcode的引用中,就可以使用了
六、爲了解析生成的ccb.zip文件,你需要將附件中的文件添加到Xcode工程中,也就是將 CCBReader(用於讀取ccb文件)和SSZipArchive(用於解壓縮zip文件)添加進去。並且需要在Xcode工程的build settings下更改Preprocessor Macros,添加一個參數"CCB_ENABLE_UNZIP"
七、在調用cocos2d的中CCFileUtils的[CCFileUtils sharedFileUtils]之前,需要調用一下[CCBFileUtils sharedFileUtils];
- director_ = (CCDirectorIOS*) [CCDirector sharedDirector];
- director_.wantsFullScreenLayout = YES;
- [CCBFileUtils sharedFileUtils];
- // Display FSP and SPF
- [director_ setDisplayStats:YES];
- // set FPS at 60
- [director_ setAnimationInterval:1.0/60];
- // attach the openglView to the director
- [director_ setView:glView];
- // for rotation and other messages
- [director_ setDelegate:self];
- // 2D projection
- [director_ setProjection:kCCDirectorProjection2D];
- / [director setProjection:kCCDirectorProjection3D];
- // Enables High Res mode (Retina Display) on iPhone 4 and maintains low res on all other devices
- if( ! [director_ enableRetinaDisplay:YES] )
- CCLOG(@"Retina Display Not supported");
- // Create a Navigation Controller with the Director
- navController_ = [[UINavigationController alloc] initWithRootViewController:director_];
- navController_.navigationBarHidden = YES;
- // set the Navigation Controller as the root view controller
- / [window_ setRootViewController:rootViewController_];
- [window_ addSubview:navController_.view];
- // make main window visible
- [window_ makeKeyAndVisible];
- // Default texture format for PNG/BMP/TIFF/JPEG/GIF p_w_picpaths
- // It can be RGBA8888, RGBA4444, RGB5_A1, RGB565
- // You can change anytime.
- [CCTexture2D setDefaultAlphaPixelFormat:kCCTexture2DPixelFormat_RGBA8888];
- // If the 1st suffix is not found and if fallback is enabled then fallback suffixes are going to searched. If none is found, it will try with the name without suffix.
- // On iPad HD : "-ipadhd", "-ipad", "-hd"
- // On iPad : "-ipad", "-hd"
- // On iPhone HD: "-hd"
- CCFileUtils *sharedFileUtils = [CCFileUtils sharedFileUtils];
八、使用ccb文件
- [CCBReader unzipResources:@"ccb.zip"];
- // Use the CCBReader to load the HelloCocosBuilder scene
- // from the ccbi-file.
- CCScene* scene = [CCBReader sceneWithNodeGraphFromFile:@"StartGame.ccbi" owner:self];
- // Add the scene to the stack. The director will run it when it automatically when the view is displayed.
- [director_ pushScene: scene];
這樣就可以正常的使用了