博文結構
反向代理
proxy緩存
一.反向代理(案例)
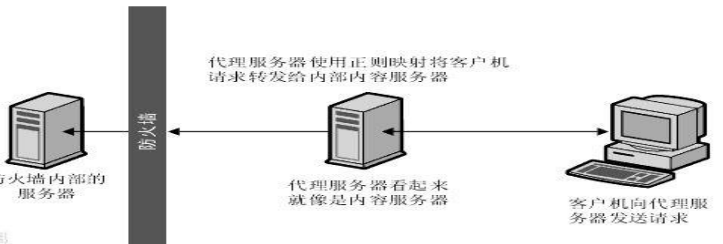
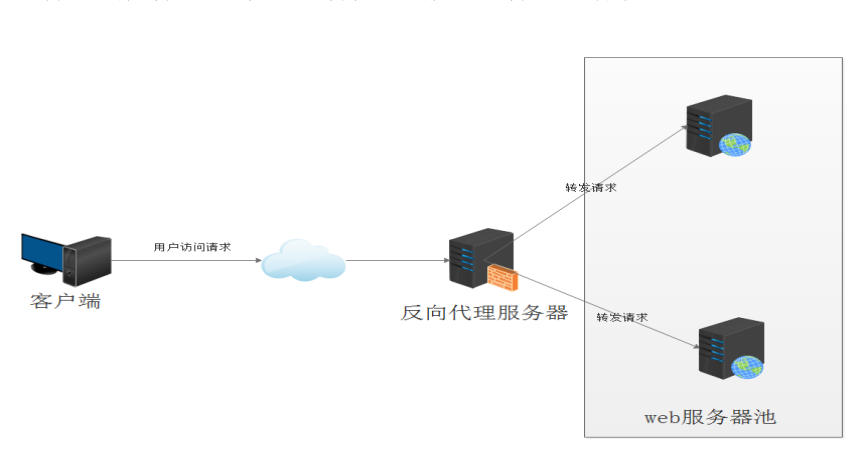
1、反向代理(Reverse Proxy)方式是指以代理服務器來接受客戶端的連接請求,然後將請求轉發給網絡上的 web 服務器(可能是 apache、nginx、tomcat、iis 等),並將從 web 服務器上得到的結果返回給請求連接的客戶端,此時代理服務器對外就表現爲一個服務器。
如圖可以看出:反向代理服務器代理網站 Web 服務器接收 Http 請求,對請求進行轉發。而且nginx作爲反向代理服務器可以根據用戶請求的內容把請求轉發給後端不同的web服務器,例如靜動分離,再例如在 nginx 上創建多個虛擬主機,這樣就成功的做到了在瀏覽器中輸入不同域名(url)的時候訪問後端的不同 web 服務器或 web 羣集。
2、反向代理的作用
①保護網站安全:任何來自 Internet 的請求都必須先經過代理服務器
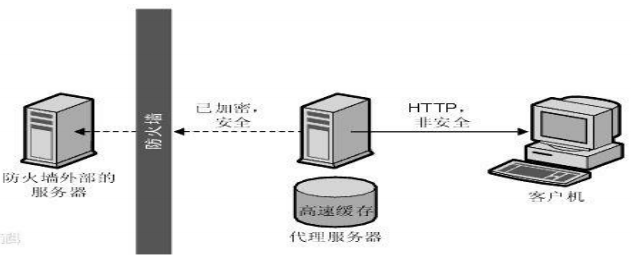
②通過配置緩存功能加速 Web 請求:可以緩存真實 Web 服務器上的某些靜態資源,減輕真實 Web 服務器的負載壓力
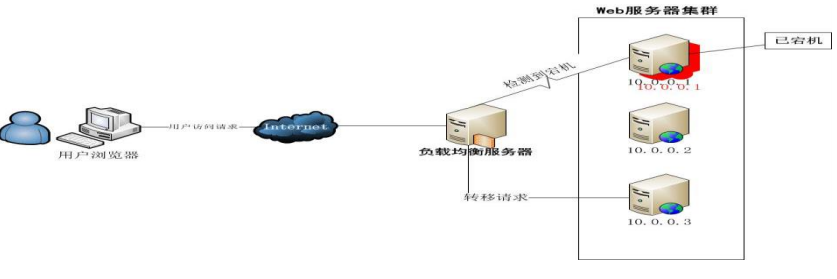
③實現負載均衡:充當負載均衡服務器均衡地分發請求,平衡集羣中各個服務器的負載壓力;
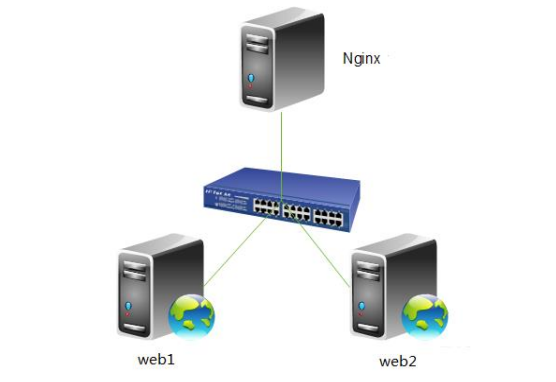
- 實驗環境
192.168.222.128 nginx服務器
192.168.222.129 web
192.168.222.130 web
- nginx服務器操作如下:
[root@localhost / ]#tar zxf ngx_cache_purge-2.3.tar.gz
[root@localhost / ]#unzip nginx-sticky-module.zip
[root@localhost / ]#tar zxf nginx-1.14.0.tar.gz
[root@localhost /]# yum -y install pcre-devel openssl-devel
[root@localhost /]#cd nginx-1.14.0/
[root@localhost nginx-1.14.0]#./configure --prefix=/usr/local/nginx   \
--user=nginx --group=nginx --with-http_stub_status_module --with-http_realip_module --with-http_ssl_module  \
--with-http_gzip_static_module --http-client-body-temp-path=/var/tmp/nginx/client  \
--http-fastcgi-temp-path=/var/tmp/nginx/fcgi  \
--with-pcre  --add-module=../ngx_cache_purge-2.3  \
--add-module=../nginx-sticky-module  \
--with-http_flv_module  \
[root@localhost nginx-1.14.0]# make && make install
[root@localhost nginx-1.14.0]# ln -s /usr/local/nginx/sbin/nginx  /usr/local/sbin/
[root@localhost nginx-1.14.0]# nginx -t
nginx: the configuration file /usr/local/nginx/conf/nginx.conf syntax is ok
nginx: [emerg] getpwnam("nginx") failed
\\可以看到報錯,沒有創建nginx用戶
[root@localhost nginx-1.14.0]# useradd -s /sbin/nologin -M nginx
[root@localhost nginx-1.14.0]# nginx -t
nginx: the configuration file /usr/local/nginx/conf/nginx.conf syntax is ok
nginx: [emerg] mkdir() "/var/tmp/nginx/client" failed (2: No such file or directory)
nginx: configuration file /usr/local/nginx/conf/nginx.conf test failed
\\報錯顯示沒有創建目錄
[root@localhost nginx-1.14.0]# mkdir -p /var/tmp/nginx/client
[root@localhost nginx-1.14.0]# nginx -t
nginx: the configuration file /usr/local/nginx/conf/nginx.conf syntax is ok
nginx: configuration file /usr/local/nginx/conf/nginx.conf test is successful
[root@localhost nginx-1.14.0]# nginx
[root@localhost ~]# netstat -anpt | grep nginx
tcp        0      0 0.0.0.0:80              0.0.0.0:           LISTEN      9886/nginx: master
[root@localhost ~]# vim /usr/local/nginx/conf/nginx.conf
\\在http中添加如下
 upstream backend {
        sticky;
        server 192.168.222.129:80 weight=1 max_fails=2 fail_timeout=10s;
        server 192.168.222.130:80 weight=1 max_fails=2 fail_timeout=10s;
}
\\
weight : 輪詢權值也是可以用在 ip_hash 的,默認值爲 1
max_fails :允許請求失敗的次數,默認爲 1。當超過最大次數時,返回 proxy_next_upstream模塊定義的錯誤。
fail_timeout : 有兩層含義,一是在 10s 時間內最多容許 2 次失敗;二是在經歷了 2 次失敗以後,10s 時間內不分配請求到這臺服務器。

\\在location添加,可以把以前的localtion註釋掉
 location / {
        proxy_pass http://backend;
}
[root@localhost /]# nginx -s reload //重載nginx服務- 模塊解釋
nginx-sticky-module 模塊:這個模塊的作用是通過 cookie 黏貼的方式將來自同一個客戶端(瀏覽器)的請求發送到同一個後端服務器上處理,這樣一定程度上可以解決多個 backend servers 的 session 同步的問題 —— 因爲不再需要同步,而 RR 輪詢模式必須要運維人員自己考慮 session 同步的實現。
load-balance 其它調度方案:
-
輪詢(默認) : 每個請求按時間順序逐一分配到不同的後端服務器,如果後端某臺服務器,故障系統被自動剔除,使用戶訪問不受影響。Weight 指定輪詢權值,Weight 值越大,分配到的訪問機率越高,主要用於後端每個服務器性能不均的情況下。
ip_hash : 每個請求按訪問 IP 的 hash 結果分配,這樣來自同一個 IP 的訪客固定訪問一個後端服務器,有效解決了動態網頁存在的 session 共享問題。當然如果這個節點不可用了,會發到下個節點,而此時沒有 session 同步的話就註銷掉了。
least_conn :請求被髮送到當前活躍連接最少的 realserver 上。會考慮 weight 的值。
url_hash : 此方法按訪問 url 的 hash 結果來分配請求,使每個 url 定向到同一個後端服務
器,可以進一步提高後端緩存服務器的效率。Nginx 本身是不支持 url_hash 的,如果需要使用這種調度算法,必須安裝 Nginx 的 hash 軟件包 nginx_upstream_hash 。
fair :這是比上面兩個更加智能的負載均衡算法。此種算法可以依據頁面大小和加載時間長短智能地進行負載均衡,也就是根據後端服務器的響應時間來分配請求,響應時間短的優先分配。Nginx 本身是不支持 fair 的,如果需要使用這種調度算法,必須下載 Nginx 的upstream_fair 模塊。 - web
[root@localhost ~]# yum -y install httpd
[root@localhost ~]# echo aaaaaaaaaa > /var/www/html/index.html
[root@localhost ~]# systemctl start httpd- 另一臺web
[root@localhost ~]# yum -y install httpd
[root@localhost ~]# echo bbbbbbbbbbb > /var/www/html/index.html
[root@localhost ~]# systemctl start httpd- 測試效果如下
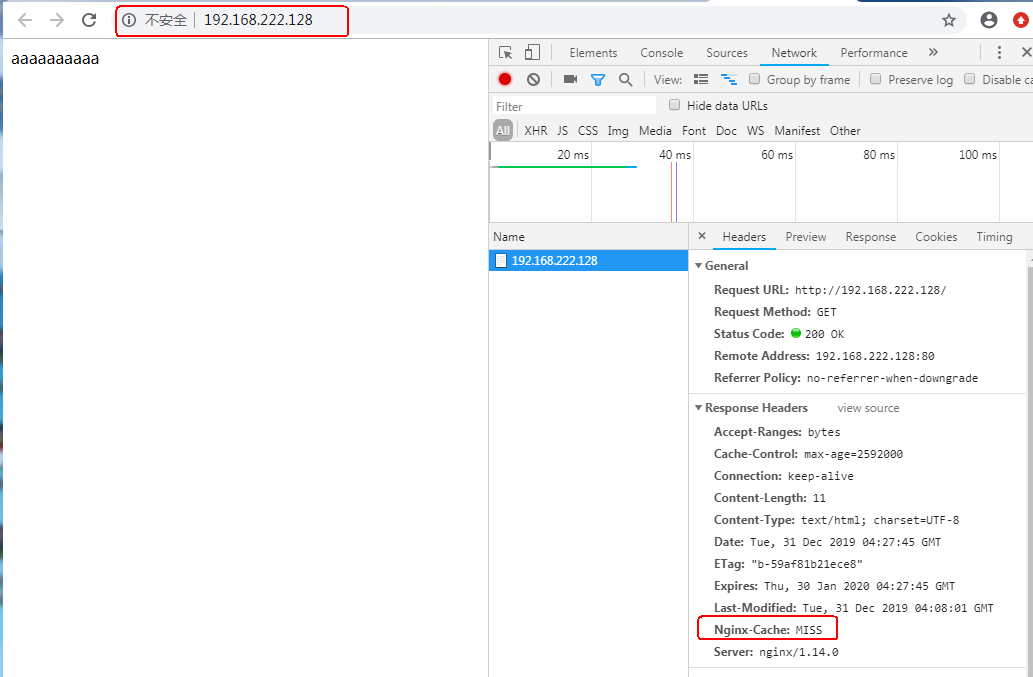
[root@localhost ~]# curl 127.0.0.1
aaaaaaaaaaaaaaa
[root@localhost ~]# curl 127.0.0.1
bbbbbbbbbbbb
[root@localhost ~]# curl 127.0.0.1
aaaaaaaaaaaaaaa
[root@localhost ~]# curl 127.0.0.1
bbbbbbbbbbbb
\\可以看到nginx服務器把請求分別給兩臺web- 可以編輯nginx啓動腳本
[root@localhost ~]# vim /etc/init.d/nginx
#!/bin/bash
#chkconfig: 2345 99 20
#description: Nginx Service Control Script
PROG="/usr/local/nginx1.10/sbin/nginx"
PIDF="/usr/local/nginx1.10/logs/nginx.pid"
case "$1" in
        start)
           netstat -anplt |grep ":80" &> /dev/null && pgrep "nginx" &> /dev/null
           if [ $? -eq 0 ]
           then
              echo "Nginx service already running."
           else
              $PROG -t &> /dev/null
              if [ $? -eq 0 ] ; then
                $PROG
                echo "Nginx service start success."
              else
                $PROG -t
              fi
           fi
        ;;
        stop)
           netstat -anplt |grep ":80" &> /dev/null && pgrep "nginx" &> /dev/null
           if [ $? -eq 0 ]
           then
                kill -s QUIT $(cat $PIDF)
                echo "Nginx service stop success."
            else
                echo "Nginx service already stop"
            fi
        ;;
        restart)
                $0 stop
                $0 start
        ;;
        status)
           netstat -anplt |grep ":80" &> /dev/null && pgrep "nginx" &> /dev/null
           if [ $? -eq 0 ]
           then
                echo "Nginx service is running."
           else
                echo "Nginx is stop."
           fi
        ;;
        reload)
           netstat -anplt |grep ":80" &> /dev/null && pgrep "nginx" &> /dev/null
           if [ $? -eq 0 ]
           then
                $PROG -t &> /dev/null
              if [ $? -eq 0 ] ; then
                kill -s HUP $(cat $PIDF)
                echo "reload Nginx config success."
              else
                $PROG -t
              fi
           else
                echo "Nginx service is not run."
           fi
        ;;
        *)
                echo "Usage: $0 {start|stop|restart|reload}"
                exit 1
        esac
[root@localhost ~]#  chmod +x /etc/init.d/nginx
[root@localhost ~]# chkconfig --add nginx
[root@localhost ~]# service nginx start
Nginx service start success.
[root@localhost ~]# service nginx status
Nginx service is running.
二.nginx緩存使用
緩存也就是將 js、css、image 等靜態文件從後端服務器緩存到 nginx 指定的緩存目錄下,既可以減輕後端服務器負擔,也可以加快訪問速度,但這樣緩存及時清理成爲了一個問題,所以需要 ngx_cache_purge 這個模塊來在過期時間未到之前,手動清理緩存。
nginx的web緩存功能只要就是由proxy_cache、fastcgi_cache指令集和相關指令集完成:
proxy_cache:負責反向代理緩存後端服務器的靜態內容;
fastcgi_cache:主要用來處理fastcgi動態進程緩存;
- 在nginx主配置文件中添加如下
[root@localhost ~]# vim /usr/local/nginx/conf/nginx.conf
…………    //省略部分內容
log_format  main  '$remote_addr - $remote_user [$time_local] "$request" '
                      '$status $body_bytes_sent "$http_referer" '
                      '"$http_user_agent" "$http_x_forwarded_for"'
                      '"$upstream_cache_status"';            //記錄緩衝命中率,注意這是一個整段,所以只在末尾有一個分號
//以上內容原本已經存在,只需添加最後一行即可!
    access_log  logs/access.log  main;
     proxy_buffering on;        //代理時,開啓緩衝後端服務器的響應
    proxy_temp_path /usr/local/nginx/proxy_temp;        //定義緩存臨時目錄
    proxy_cache_path /usr/local/nginx/proxy_cache levels=1:2 keys_zone=my-cache:100m inactive=600m max_size=2g;
//定義緩存目錄,具體信息已在配置文件外部進行說明
…………    //省略部分內容
        location ~/purge(/.*) {                 //定義緩存清除策略
                allow 127.0.0.1;
                allow 192.168.222.0/24;
                deny all;
                proxy_cache_purge my-cache $host$1$is_args$args;
        }

        location / {
                proxy_pass http://lzj;            //請求轉向lzj定義的服務器列表
                proxy_redirect off;            指定是否修改被代理服務器返回的響應頭中的 location 頭域跟 refresh 頭域數值
#例如:
 設置後端服務器“Location”響應頭和“Refresh”響應頭的替換文本。 假設後端服務器返回的
 響應頭是 “Location: http://localhost:8000/two/some/uri/”,那麼指令proxy_redirect
# http://localhost:8000/two/ http://frontend/one/;將把字符串改寫爲 “Location:
# http://frontend/one/some/uri/”。
                proxy_set_header Host $host;    //允許重新定義或者添加發往後端服務器的請求頭
#Host 的含義是表明請求的主機名,nginx 反向代理服務器會向後端真實服務器發送請求,
#並且請求頭中的host字段重寫爲proxy_pass指令設置的服務器。因爲nginx作爲反向代理使
#用,而如果後端真實的服務器設置有類似防盜鏈或者根據 http 請求頭中的 host 字段來進行
#路由或判斷功能的話,如果反向代理層的nginx不重寫請求頭中的host字段,將會導致請求失敗。
                proxy_set_header X-Real-IP $remote_addr;
                                //web 服務器端獲得用戶的真實 ip 但是,實際上要獲得用戶的真實 ip,也可以通過下面的X-Forward-For

                proxy_set_header X-Forwarded-For $proxy_add_x_forwarded_for;
                                #後端的 Web服務器可以通過 X-Forwarded-For 獲取用戶真實 IP,X_Forward_For 字段
#表示該條 http 請求是有誰發起的?如果反向代理服務器不重寫該請求頭的話,那麼後端
#真實服務器在處理時會認爲所有的請求都來自反向代理服務器,如果後端有防護策略
#的話,那麼機器就被封掉了。因此,在配置用作反向代理的 nginx 中一般會增加兩條配置,以便修改 http 的請求頭部
                proxy_next_upstream error timeout invalid_header http_500 http_502 http_503 http_504;
                                #增加故障轉移,如果後端的服務器返回 502、504、執行超時等錯誤,
#自動將請求轉發到upstream 負載均衡池中的另一臺服務器,實現故障轉移。
                proxy_cache my-cache;
                add_header Nginx-Cache $upstream_cache_status;
                proxy_cache_valid 200 304 301 302 8h;
                proxy_cache_valid 404 1m;
                proxy_cache_valid any 1d;
                proxy_cache_key $host$uri$is_args$args;
                expires 30d;
        }
[root@localhost ~]# nginx -t
nginx: the configuration file /usr/local/nginx/conf/nginx.conf syntax is ok
nginx: configuration file /usr/local/nginx/conf/nginx.conf test is successful
//檢測配置文件沒有問題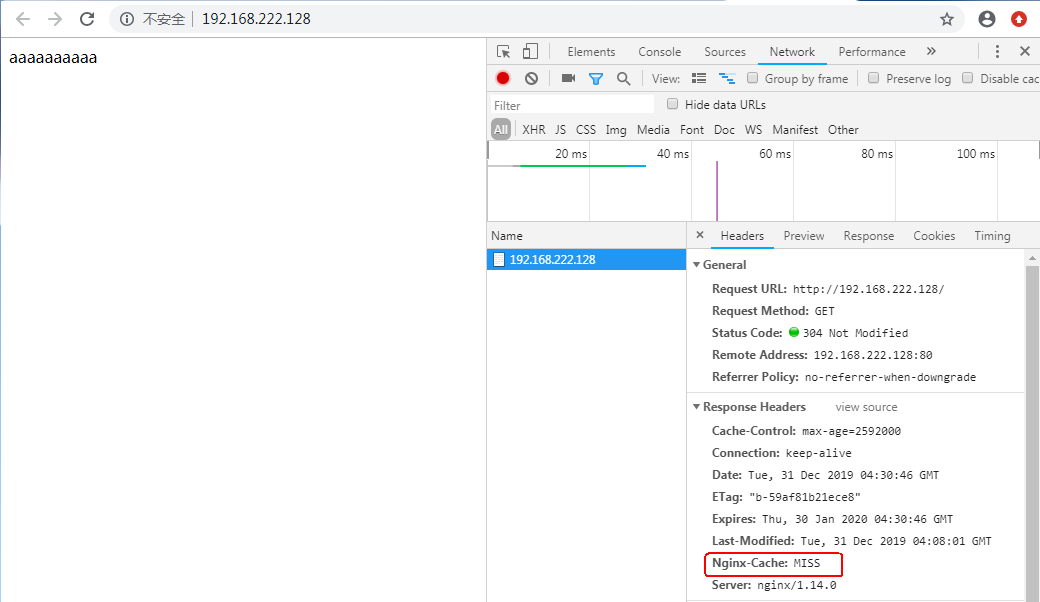
[root@localhost ~]# nginx -s reload //重新加載nginx配置文件- 訪問如下:
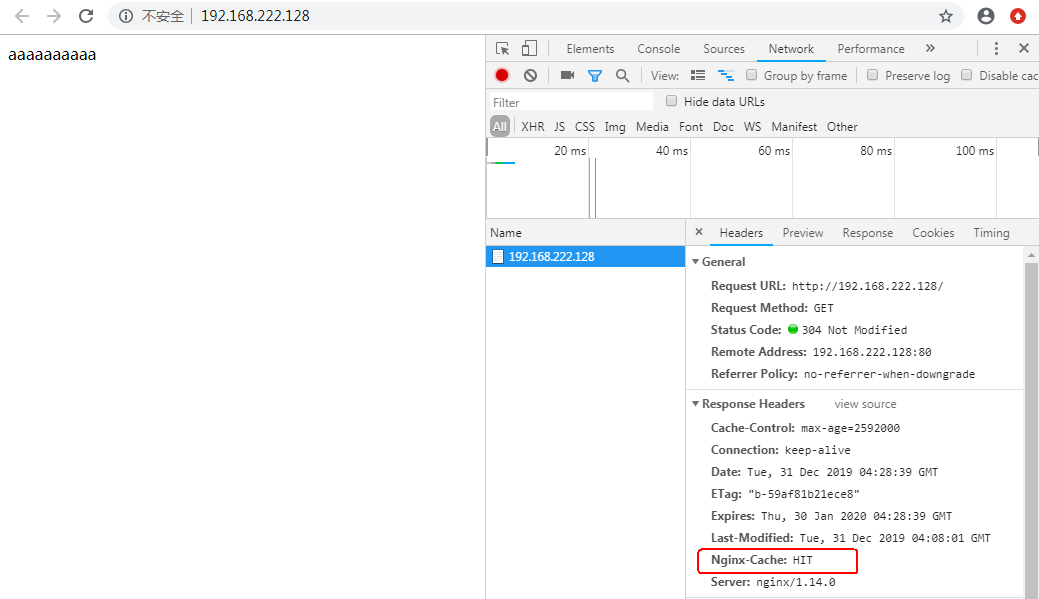
刷新一下顯示如:
- 清除緩存
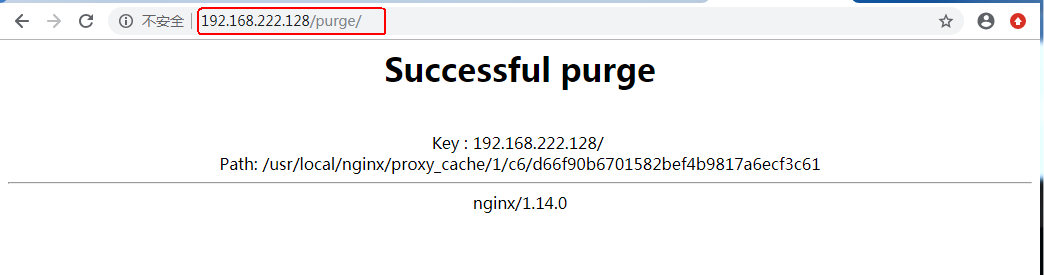
- 再重新訪問192.168.222.128時,如下:可以看到已經清楚緩存了