


1 Kong基本介紹
Kong 基於Nginx和lua實現的API GateWay,用於管控Restful接口:
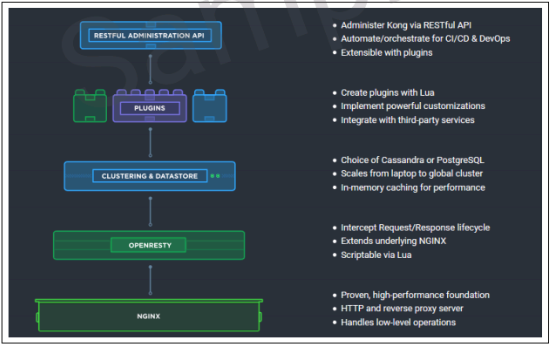
- 使用修改過的Nginx作爲代理服務器,即Openrestry,該服務器負責處理Api請求。
- Cassandra或者postgresql用作數據存儲(Datastore)服務器,存儲來自kong操作的數據。數據持久化建議採用Cassandra,原因如下:1)易於構建分佈式 2)易於擴展。
- 基於Apache license認證。Kong 隨着openrestry分發,已經包含lua-nginx-module.Openrestry不是nginx分支版本,而是擴展了nginx的一組module.核心包還是用nginx官方的。(Kong is distributed along with OpenResty, which already includes lua-nginx-module. OpenResty is not a fork of Nginx, but a bundle of modules extending its capabilities.)
1.1 產品結構![KONG GATEWAY 基本介紹及安裝]()
1.2 總體架構

注:生產環境下,將DNS解析到kong即可,或者kong通過LVS負載分發,將DNS解析到LVS所在節點即可。
1.3 特徵
1.3.1 Restful接口
Restful Interface
1.3.2 平臺無關
Platform Agnostic
1.3.3 面向插件
Plugin oriented
1.3.4 擴展簡單
Simple Scaling
1.3.5 高性能
Kong本事性能與nginx在一個級別上,另外可以實現靈活快速擴展,滿足分佈式環境下高併發大流量訪問接入。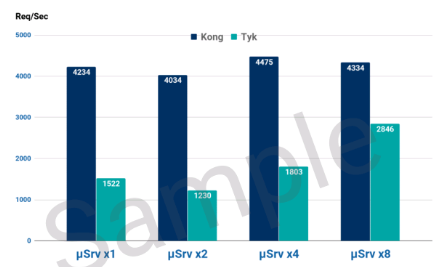
上圖是在基本認證開啓情況下,kong與tyk性能對比,橫座標表示服務運行數量,縱座標表示QPS,即每秒請求數量。
1.4 產品功能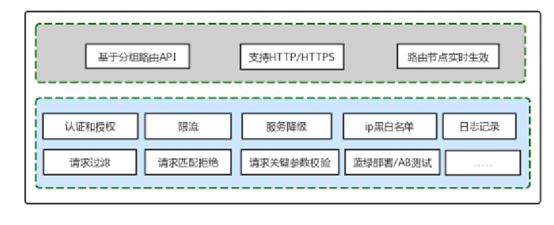
1.5 適用場景
作爲API-GATEWAY,kong在通用互聯網架構適用場景:
2 Kong 安裝
2.1 軟件環境
CentOS Linux release 7.3.1611 64位
KongServer version =>1.0.3
PostgreSQL => 10.1 Schema:kong || User:kong
Nodejs: node-v8.11.3-linux-x64.tar
2.2 安裝數據庫
yum install https://download.postgresql.org/pub/repos/yum/10/redhat/rhel-7-x86_64/pgdg-redhat10-10-2.noarch.rpm
yum install postgresql10
yum install postgresql10-server
/usr/pgsql-10/bin/postgresql-10-setup initdb
vi /var/lib/pgsql/10/data/postgresql.conf
listen_addresses = '*'
vi pg_hba.conf
host all all 0.0.0.0/0 md5
systemctl enable postgresql-10
systemctl start postgresql-10
2.3 安裝node and npm
xz -d node-v8.11.3-linux-x64.tar.xz
tar -xvf ./node-v8.11.3-linux-x64.tar
vi /etc/profile
export NODE_HOME=/opt/node
export PATH=${NODE_HOME}/bin/:$PATH
source /etc/profile
2.4 創建數據庫
su - postgres
psql
1>create user kong with password 'icfw1602';
2>CREATE DATABASE kong OWNER kong;
3> grant all privileges on database kong to kong;
2.5 安裝並啓動kongserver
yum install -y perl-Time-HiRes.x86_64
rpm -ivh kong-community-edition-1.0.3.el7.noarch.rpm
cp /etc/kong/kong.conf.default /etc/kong/kong.conf
vi /etc/kong/kong.conf => configure postgresql port and password
/usr/local/bin/kong migrations bootstrap [-c /etc/kong/kong.conf] =>初始化數據庫
/usr/local/bin/kong start
2.6 安裝可視化管理工具
1)下載源碼(AngularJS )並編譯
npm install -g bower
npm install -g gulp
npm install -g sails
git clone https://github.com/pantsel/konga.git
cd konga
npm install --unsafe-perm
2)配置數據庫
su - postgres
psql
1>CREATE DATABASE konga OWNER kong;
2>grant all privileges on database konga to kong;
#cp konga/.env_example konga/.env
#vi .env
PORT=8080
NODE_ENV=production
KONGA_HOOK_TIMEOUT=120000
DB_ADAPTER=postgres
DB_HOST=192.168.20.22
DB_DATABASE=konga
DB_USER=kong
DB_PASSWORD=icfw1602
3) 初始化數據庫
su - postgres
cd konga
node ./bin/konga.js prepare --adapter postgres --uri postgresql://192.168.20.22:5432/konga
(創建數據庫,如出現數據庫連接異常,設置vi pg_hba.conf,將host all all 0.0.0.0/0
md5中md5調整爲trust並重啓數據庫,創建數據庫後,還原爲md5.並確認konga數據庫、創建表owner爲用戶kong,如不是則調整)
alter table xx owner to kong;
4)啓動konga
nohup npm run production >run.log & (已daemon方式啓動)
Konga GUI will be available at http://localhost:8080
3 引用資源
Kong 在線資源:https://docs.konghq.com/
Konga 在線資源:https://github.com/pantsel/konga
Kong 中文資源:https://www.pocketdigi.com/book/kong/