


圖
圖(Graph)是由頂點和連接頂點的邊構成的離散結構。在計算機科學中,圖是最靈活的數據結構之一,很多問題都可以使用圖模型進行建模求解。圖的結構很簡單,就是由頂點集和邊集構成,因此圖可以表示成G=(V,E)。 它也分爲無向圖、有向圖、加權圖。
在使用圖地過程中經常會用到隊列、優先隊列、棧等的輔助。所以本例中除了圖相關的定義外,還定義了隊列和優先隊列。
定義隊列類
class Queue():
    # 定義隊列類,先進先出
    def __init__(self):
        self.items = []

    def isEmpty(self):
        return self.items == []

    def enqueue(self, item):
        self.items.insert(0, item)

    def size(self):
        return len(self.items)

    def dequeue(self):
        return self.items.pop()
定義圖中的頂點
class Vertex:
    # 包含了頂點信息,以及頂點連接邊信息

    def __init__(self, key):
        self.id = key
        self.connectedTo = {}
        self.distance = 0     # 距離
        self.previous = None  # 標記前一個頂點
        self.color = 'white'
        self.disc = 0  # 標記discoveryTime
        self.fin = 0   # 標記finishTime

    def getId(self):
        return self.id

    def addNeighbor(self, nbrKey, weight):
        self.connectedTo[nbrKey] = weight

    def getConnections(self):
        return self.connectedTo.keys()

    def __str__(self):
        return str(self.id) + ' connectedTo: ' + str([x.id for x in self.connectedTo])

    def getWeight(self, nbrkey):
        return self.connectedTo[nbrkey]

    def setColor(self,color):
        self.color = color

    def getColor(self):
        return self.color

    def setDistance(self, distance):
        self.distance = distance

    def getDistance(self):
        return self.distance

    def setPred(self,preVertex):
        self.previous = preVertex

    def getPred(self):
        return self.previous

    def setDiscovery(self,dtime):
        self.disc = dtime

    def getDiscovery(self):
        return self.disc

    def setFinish(self,ftime):
        self.fin = ftime

    def getFinish(self):
        return self.fin
定義圖
class Graph:
    # 包含了各頂點和連接邊的圖

    def __init__(self):
        self.vertList = {}
        self.numVertices = 0

    def addVertex(self, key):
        self.numVertices += 1
        newVertex = Vertex(key)
        self.vertList[key] = newVertex
        return newVertex

    def getVertex(self, key):
        if key in self.vertList:
            return self.vertList[key]
        else:
            return None

    def __contains__(self, key):
        return key in self.vertList

    def addEdge(self, fromKey, toKey, cost=0):
        if fromKey not in self.vertList:
            nv = self.addVertex(fromKey)
        if toKey not in self.vertList:
            nv = self.addVertex(toKey)
        self.vertList[fromKey].addNeighbor(self.vertList[toKey],cost)

    def getVertices(self):
        return self.vertList.keys()

    def __iter__(self):
        return iter(self.vertList.values())
圖的應用舉例1--詞梯
WordLetter 方法1: 首先將所有單詞作爲頂點加入圖中,再高潮建立頂點之間的邊; 它的時間複雜度爲O(n^2),n爲單詞個數。
方法2: 創建多個桶,每個桶可以存儲多個單詞,桶使用通配符""作爲標記,""佔空一個字母,所以匹配標記的單詞都放到同一個桶中;然後再對同一個桶中的單詞之間建立邊。
def buildWordGraph(wordFile):
    d = {}
    g = Graph()
    wfile = open(wordFile,'r')
    for line in wfile:
        word = line[:-1]
        for i in range(len(word)):
            #每個單詞產生四種bucket,判斷字典中是否存在該桶,如果存在則該桶直接追加單詞,如果不存在則創建該桶,並存放單詞
            bucket = word[:i] + '_' + word[i+1:]
            if bucket in d:
                d[bucket].append(word)
            else:
                d[bucket] = [word]

    #爲每個桶中的不同單詞建立邊
    for bucket in d.keys():
        for word1 in d[bucket]:
            for word2 in d[bucket]:
                if word1 != word2 :
                    g.addEdge(word1, word2)
    return g
廣度優先搜索算法Breadth First Search(BFS)
給定圖G 及開始搜索的起始頂點s: BFS搜索所有從s可到達目標頂點的邊;在達到更遠距離k+1的頂點之前,BFS會找到全部距離爲k的頂點;
可以把s想象成爲樹根,構建一棵樹的過程,從頂點向下逐步增加層次,BFS可以保證在增加距離(層次)之前,添加了所有兄弟節點到樹中。從隊首取出一個頂點作爲當前頂點(出隊);遍歷從當前頂點到鄰接頂點,如果是白色,則將其改爲灰色,距離加1,其前驅頂點爲當前頂點,將其加入到隊列中; 遍歷完成後,將當前頂點設置爲黑色,循環回到步驟1的隊首取當前頂點。
def bfs(graph, start):
    start.setDistance(0)
    start.setPred(None)
    vertQueue = Queue()
    vertQueue.enqueue(start)
    while (vertQueue.size() > 0):
        currentVert = vertQueue.dequeue()
        for nbr in currentVert.getConnections():
            if (nbr.getColor() == "white") :
                nbr.setColor('gray')
                nbr.setDistance(currentVert.getDistance() + 1)
                nbr.setPred(currentVert)
                vertQueue.enqueue(nbr)
        currentVert.setColor('black')

def traverse(targetVertex):
    x = targetVertex
    while (x.getPred()):
        print(x.getId(), end=" <- ")
        x = x.getPred()
    print(x.getId())

sourceFile='/Users/yuanjicai/PycharmProjects/stucture/fourletterwords.txt'
wordgraph = buildWordGraph(sourceFile)
bfs(wordgraph, wordgraph.getVertex('FOOL'))
traverse(wordgraph.getVertex('SAGE'))
算法分析 : BFS主體使用兩個循環嵌套, while對每個頂點訪問一次,所以複雜度爲O(\V);而內循環for,由於每條邊只有在它的頂點u出隊時纔會被檢查一次,且每個頂點最多出隊一次,所以每條邊最多被檢查1次;
綜合起來BFS的時間複雜度爲O(\V+\E);創建單詞關係圖也需要時間,最多爲O(\v\^2);回逆時的複雜度爲O(n)。
深度優先算法Depth First Search(DFS)
深度優先算法Depth First Search(DFS),它沿着樹的的單支儘量深入向下搜索,如果到無法繼續的程度還未找到問題的解,就回溯到上一層再搜索下一分支.
算法1: 專門解決騎士周遊問題,每個頂點僅訪問一次;
算法2: 允許頂點被重複訪問,可作爲其它圖算法的基礎,更加通用.
解決思路: 如果沿着單支深入搜索到無法繼續(所有合法移動都被走過)時,路徑的長度還沒達到預定值(8*8-1),那麼就清除顏色標記,返回到上一層,然後換一個分支繼續深入搜索. 操作過程需要引入棧來記錄路徑,以便進行回溯操作。
DFS的應用舉例--騎士周遊問題
解決步驟:
- 首先將合法走棋次序表示爲一個圖;
- 其次採用圖搜索算法搜尋一個長度爲(行*列-1)的路徑,路徑上包含每個頂點恰好一次;
- 將棋盤格做爲頂點;按照"馬走日"規則的走棋步驟作爲連接邊;建立每一個棋盤格的所有合法走棋步驟能夠到達的棋盤格關係圖;
def genLegalMoves(x, y, bdSize):
    newMoves = []
    # 以當前位置x,y座標爲參考,"馬"可以跳的合法相對座標位置
    moveOffsets = [(-1,-2),(-1,2),(-2,-1),(-2,1),(1,-2),(1,2),(2,-1),(2,1)]

    for i in moveOffsets:
        newX = x + i[0]
        newY = y + i[1]
        if legalCoord(newX, bdSize) and legalCoord(newY, bdSize):
            newMoves.append((newX, newY))
    return newMoves

def legalCoord(x, bdSize):
    if x >= 0 and x < bdSize:
        return True
    else:
        return False

def buildKnightGraph(bdSize):
    ktGraph = Graph()
    for row in range(bdSize):
        for col in range(bdSize):
            nodeId = posToNodeId(row, col, bdSize)
            newPostions = genLegalMoves(row, col, bdSize)
            for e in newPostions:
                nextNodeId = posToNodeId(e[0], e[1], bdSize)
                # 當前棋格和下一跳產生關係
                ktGraph.addEdge(nodeId, nextNodeId)
    return ktGraph

def posToNodeId(row, col, bdsize):
    #根據行、列座標生成棋盤格的id
    return row*bdsize+col

def orderByAvail(currentVertex):
    # 將當前節點的neighbor排序,按neighbor是否擁有下一個neighbor的規則排序(一種啓發式算法)
    resList = []
    for v in currentVertex.getConnections():
        if v.getColor() == 'white':
            c = 0
            for w in v.getConnections():
                if w.getColor() == 'white':
                    c += 1
            resList.append((c,v))
    resList.sort(key=lambda x: x[0])
    return [y[1] for y in resList]

def knightTour(n, path, currentVertex, limit):
    # n表示層次; path使用列表的append和pop方法實現入棧和出棧;
    currentVertex.setColor('gray')
    path.append(currentVertex)  #遞歸調用 每次都會把當前頂點設置爲'灰色',然後先入棧,如果不滿足條件再出棧
    if n < limit:
        # nbrList = list(currentVertex.getConnections())
        nbrList = orderByAvail(currentVertex)  #返回已經排序的neighbor列表,優先從棋盤邊角搜索
        i = 0
        done = False
        while i < len(nbrList) and not done:
            if nbrList[i].getColor() == 'white':
                done = knightTour(n + 1, path, nbrList[i], limit)
            i += 1
        if not done:
            path.pop()  # 如果不滿足條件,則把當前頂點從棧中彈出
            currentVertex.setColor('white')
    else:
        done = True
    return done

n = 5
kgGraph = buildKnightGraph(n)   #生成5行5列的圖(棋盤)
resultPath = []    #可行路徑
start = 4             #開始搜索的節點
knightTour(0, resultPath, kgGraph.getVertex(start), n * n - 1)
print("可行路徑爲", end=": ")
for i in range(len(resultPath)):  #輸出路徑
    if i != len(resultPath) - 1:
        print(resultPath[i].getId(), end=' ->')
    else:
        print(resultPath[i].getId())
另一種比較通用的DFS算法
它需要擴展原Graph類,如下所示:
class DFSGraph(Graph):
    def __init__(self):
        super().__init__()
        self.time = 0

    def dfs(self):
        for aVertex in self:
            aVertex.setColor('white')
            aVertex.setPred("None")
        for aVertex in self:
            if aVertex.getColor() == 'white':
                self.dfsvisit(aVertex)

    def dfsvisit(self,startVertex):
        startVertex.setColor('gray')
        self.time += 1
        startVertex.setDiscovery(self.time)
        for nextVertex in startVertex.getConnections():
            if nextVertex.getColor() == 'white':
                nextVertex.setPred(startVertex)
                self.dfsvisit(nextVertex)
        startVertex.setColor('black')
        self.time += 1
        startVertex.setFinish(self.time)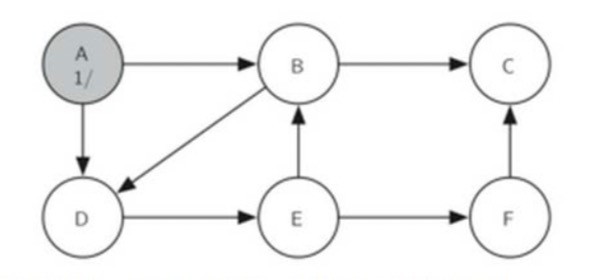
按上圖構建Graph如下所示
def buildTestGraph():
    g = DFSGraph()
    list1 = ['A', 'B', 'C', 'D', 'E', 'F']
    for i in list1:
        g.addVertex(i)
    g.addEdge('A', 'B')
    g.addEdge('A', 'D')
    g.addEdge('B', 'C')
    g.addEdge('B', 'D')
    g.addEdge('D', 'E')
    g.addEdge('E', 'F')
    g.addEdge('E', 'B')
    g.addEdge('F', 'C')
    return g

testGraph = buildTestGraph()
testGraph.dfs()

d1 = {}
l1 = []
for key in testGraph.getVertices():
    currentVertex = testGraph.getVertex(key)
    d1[currentVertex.getId()] = (currentVertex.getDiscovery(), currentVertex.getFinish())
    l1.append((currentVertex.getId(), currentVertex.getDiscovery(), currentVertex.getFinish()))

l1.sort(key=lambda tup: tup[2], reverse=True)
print("深度優先算法(DFS)遍歷圖後的結果(列表輸出方式)如下: %s" % l1)
d2 = sorted(d1.items(), key=lambda tup: tup[1])
print("深度優先算法(DFS)遍歷圖後的結果(字典輸出方式)如下: %s" % d2)
DFS後Graph的效果如下: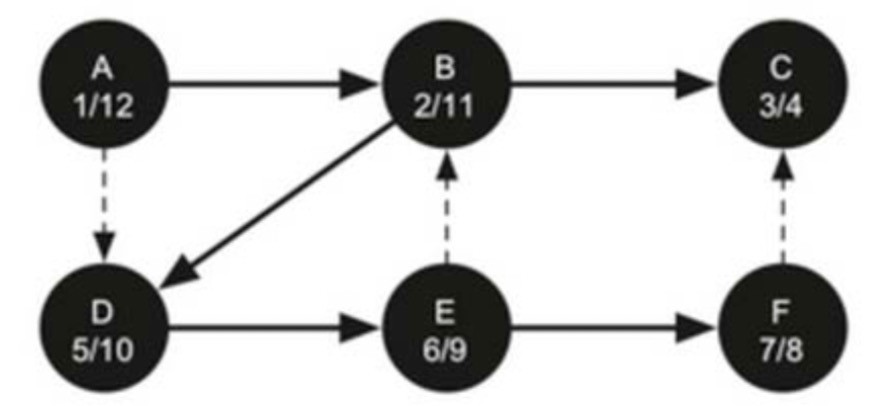
以上代碼輸出結果如下:
深度優先算法(DFS)遍歷圖後的結果(列表輸出方式)如下: [('A', 1, 12), ('B', 2, 11), ('D', 5, 10), ('E', 6, 9), ('F', 7, 8), ('C', 3, 4)]
深度優先算法(DFS)遍歷圖後的結果(字典輸出方式)如下: [('A', (1, 12)), ('B', (2, 11)), ('C', (3, 4)), ('D', (5, 10)), ('E', (6, 9)), ('F', (7, 8))]
Dijkstr算法
Dijkstra首先把起點到所有點的距離存下來找個最短的,然後鬆弛一次再找出最短的,所謂的鬆弛操作就是,遍歷一遍看通過剛剛找到的距離最短的點作爲中轉站會不會更近,如果更近了就更新距離,這樣把所有的點找遍之後就存下了起點到其他所有點的最短距離。Dijkstra算法只能用於邊權爲正的圖,時間複雜度爲O(n^2)。
class PriorityQueue:
    def __init__(self):
        self.heapArray = [(0,0)]
        self.currentSize = 0

    def buildHeap(self,alist):
        self.currentSize = len(alist)
        self.heapArray = [(0,0)]
        for i in alist:
            self.heapArray.append(i)
        i = len(alist) // 2
        while (i > 0):
            self.percDown(i)
            i = i - 1

    def percDown(self,i):
        while (i * 2) <= self.currentSize:
            mc = self.minChild(i)
            if self.heapArray[i][0] > self.heapArray[mc][0]:
                tmp = self.heapArray[i]
                self.heapArray[i] = self.heapArray[mc]
                self.heapArray[mc] = tmp
            i = mc

    def minChild(self,i):
        if i*2 > self.currentSize:
            return -1
        else:
            if i*2 + 1 > self.currentSize:
                return i*2
            else:
                if self.heapArray[i*2][0] < self.heapArray[i*2+1][0]:
                    return i*2
                else:
                    return i*2+1

    def percUp(self,i):
        while i // 2 > 0:
            if self.heapArray[i][0] < self.heapArray[i//2][0]:
               tmp = self.heapArray[i//2]
               self.heapArray[i//2] = self.heapArray[i]
               self.heapArray[i] = tmp
            i = i//2

    def add(self,k):
        self.heapArray.append(k)
        self.currentSize = self.currentSize + 1
        self.percUp(self.currentSize)

    def delMin(self):
        retval = self.heapArray[1][1]
        self.heapArray[1] = self.heapArray[self.currentSize]
        self.currentSize = self.currentSize - 1
        self.heapArray.pop()
        self.percDown(1)
        return retval

    def isEmpty(self):
        if self.currentSize == 0:
            return True
        else:
            return False

    def decreaseKey(self,val,amt):
        # this is a little wierd, but we need to find the heap thing to decrease by
        # looking at its value
        done = False
        i = 1
        myKey = 0
        while not done and i <= self.currentSize:
            if self.heapArray[i][1] == val:
                done = True
                myKey = i
            else:
                i = i + 1
        if myKey > 0:
            self.heapArray[myKey] = (amt,self.heapArray[myKey][1])
            self.percUp(myKey)

    def __contains__(self,vtx):
        for pair in self.heapArray:
            if pair[1] == vtx:
                return True
        return False

import sys
def dijkstra(routeGraph,start):
    for v in routeGraph:
        v.setDistance(sys.maxsize)
    pq = PriorityQueue()
    start.setDistance(0)
    pq.buildHeap([[v.getDistance(), v] for v in routeGraph])
    while not pq.isEmpty():
        currentVertex = pq.delMin()
        for nextVert in currentVertex.getConnections():
            newDist = currentVertex.getDistance() + currentVertex.getWeight(nextVert)
            if newDist < nextVert.getDistance():
                nextVert.setDistance(newDist)
                nextVert.setPred(currentVertex)
                pq.decreaseKey(nextVert, newDist)
按上圖構建Graph如下所示:
def buildRouteGrap():
    g = Graph()
    g.addEdge("u", "v", 2)
    g.addEdge("u", "x", 1)
    g.addEdge("u", "w", 5)

    g.addEdge("v", "w", 3)
    g.addEdge("v", "x", 2)

    g.addEdge("x", "w", 3)
    g.addEdge("x", "y", 1)

    g.addEdge("y", "w", 1)
    g.addEdge("y", "z", 1)
    g.addEdge("w", "z", 5)
    return g

routeGraph = buildRouteGrap()
dijkstra(routeGraph, routeGraph.getVertex("u"))
def traversRoute(targetVertex):
    if targetVertex.previous:
        print(targetVertex.previous.getId(), end="<-")
        traverse(targetVertex.previous)
print("Dijkstra後 源路由器 u 到目標路由器 w 的最佳路徑是: ", end=" ")
traverse(routeGraph.getVertex('w'))
經過dijkstra之後的Graph效果如下:
上述代碼執行結果如下:
Dijkstra後 源路由器 u 到目標路由器 w 的最佳路徑是: w <- y <- x <- u最小生成樹(minimum weight spanning tree)
生成樹:擁有圖中所有頂點和最少數量的邊,以保持連通的子圖。
圖G(V,E)的最小生成樹T,定義爲包含所有頂點V,以及邊E的無圈子集,並且邊權重之和最小。
解決最小生成樹問題的Prim算法屬於"貪心算法",即每步都沿着最小權重的邊向前搜索。
def prim(routeGraph, start):
    pq = PriorityQueue()
    for v in routeGraph:
        v.setDistance(sys.maxsize)
        v.setPred(None)
    start.setDistance(0)
    pq.buildHeap([(v.getDistance(), v) for v in routeGraph])
    while not pq.isEmpty():
        currentVertex = pq.delMin()
        for nextVertex in currentVertex.getConnections():
            newCost = currentVertex.getWeight(nextVertex)
            if nextVertex in pq and newCost < nextVertex.getDistance():
                nextVertex.setPred(currentVertex)
                nextVertex.setDistance(newCost + currentVertex.getDistance())
                pq.decreaseKey(nextVertex, newCost)
按上圖構建Graph, 如下所示:
def buildRouteGraph2():
    g = Graph()
    g.addEdge("A", "B", 2)
    g.addEdge("A", "C", 3)
    g.addEdge("B", "C", 1)

    g.addEdge("B", "D", 1)
    g.addEdge("B", "E", 4)
    g.addEdge("D", "E", 1)

    g.addEdge("E", "F", 1)
    g.addEdge("C", "F", 5)
    g.addEdge("F", "G", 1)
    return g

routeGraph2 = buildRouteGraph2()
prim(routeGraph2, routeGraph2.getVertex("A"))
print("prim後 源路由器 A 到目標路由器 G 的最佳路徑是: ", end=" ")
traverse(routeGraph2.getVertex('G'))
運行結果如下:
prim後 源路由器 A 到目標路由器 G 的最佳路徑是: G <- F <- E <- D <- B <- A關於本例中優先隊列類的測試如下:
testList = [(4, "a"), (3, "d"), (5, "c"), (2, "e"), (1, "f")]
pq = PriorityQueue()
pq.buildHeap(testList)
# for elem in testList:
#     pq.add(elem)
print("本例中優先隊列的刪除順序爲:", end=" ")
while not pq.isEmpty():
    print(pq.delMin(), end=" -> ")
輸出結果如下:
本例中優先隊列的刪除順序爲: f -> e -> d -> a -> c ->