


項目背景
隨着業務的不斷優化調整,開發的環境由傳統環境轉向Docker容器方向,各種開發過程和應用的日誌變得更加種類繁多。
因此,集中式的日誌管理與展示分析變得尤爲重要。
項目實施架構
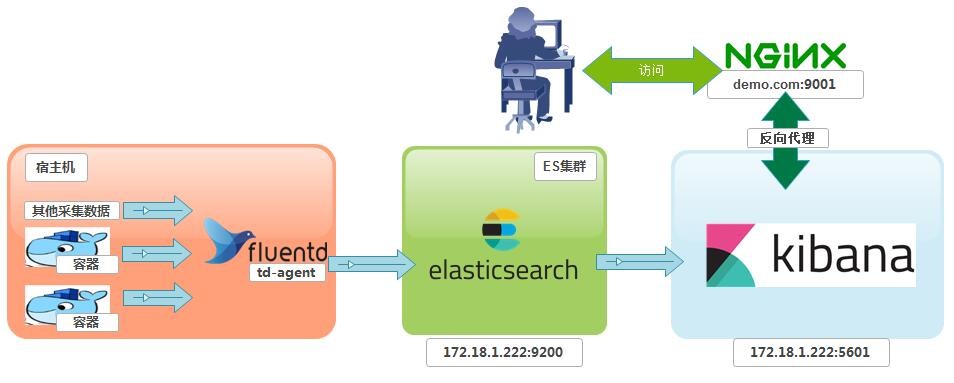
Docker環境搭建
EFK簡介
## Elasticsearch :
    官網 https://www.elastic.co
    分佈式搜索引擎。具有高可伸縮、高可靠、易管理等特點。可以用於全文檢索、結構化檢索和分析,並能將這三者結合起來。
    Elasticsearch 基於 Lucene 開發,現在使用最廣的開源搜索引擎之一,Wikipedia 、StackOverflow、Github 等都基於它來構建自己的搜索引擎。

## Fluentd (td-agent):
    https://www.fluentd.org
    是開源社區中流行的日誌採集器,提供了豐富的插件來適配不同的數據源、輸出目的地等。
    fluentd基於C和Ruby實現,並對性能表現關鍵的一些組件用C語言重新實現,整體性能不錯
    由於docker的log driver默認支持Fluentd,所以發送端默認選定Fluentd.
    td-agent是fluentd的易安裝版本,由Treasure Data公司維護。一般會默認包含一些常用插件
    fluentd適合折騰,td-agent適合安裝在大規模的生產環境。

## Kibana :
    官網 https://www.elastic.co
    可視化化平臺。它能夠搜索、展示存儲在 Elasticsearch 中索引數據。使用它可以很方便的用圖表、表格、地圖展示和分析數據。
術語約定
Elasticsearch 後續簡稱爲 ES三大日誌採集器橫向對比
網上轉發前輩的對比
日誌客戶端(Logstash,Fluentd, Logtail)橫評
阿里雲ECS配置參數
ES+Kibana 所在主機
ecs.mn4.small 共享通用型 1核 4GB

# cat /etc/centos-release
CentOS Linux release 7.6.1810 (Core)
# uname -r
4.4.162-1.el7.elrepo.x86_64

td-agent 所在主機
需要採集數據的每一臺主機。注意,並不是在docker容器內安裝。(當然,這視乎你是如何設計日誌收集方式而定)
部署EFK
下載docker鏡像
點開Download會有比較詳細的指引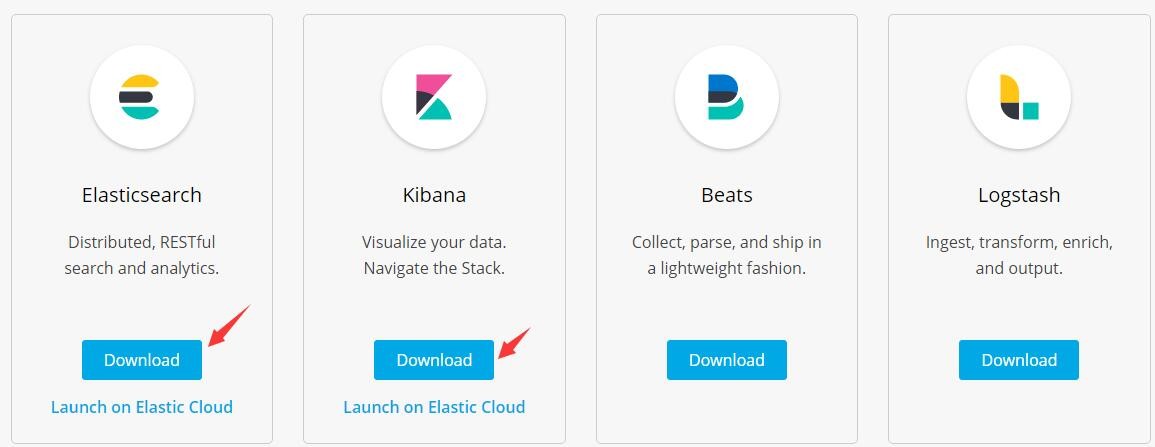
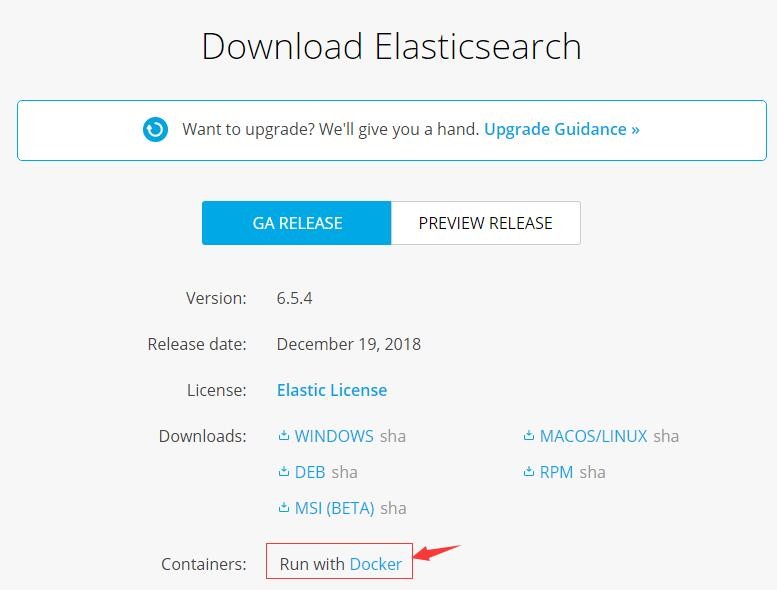
具體使用的指令如下:
docker pull docker.elastic.co/elasticsearch/elasticsearch:6.5.4
docker tag docker.elastic.co/elasticsearch/elasticsearch:6.5.4 elasticsearch:6.5.4
docker rmi docker.elastic.co/elasticsearch/elasticsearch:6.5.4

docker pull docker.elastic.co/kibana/kibana:6.5.4
docker tag docker.elastic.co/kibana/kibana:6.5.4 kibana:6.5.4
docker rmi docker.elastic.co/kibana/kibana:6.5.4

以上指令看不懂的話,請自行補docker知識
ES + Kibana 所在宿主機內核參數優化
vim /etc/sysctl.conf
vm.max_map_count=262144

立即生效
sysctl -w vm.max_map_count=262144

如果不設置,容器將會報如下錯誤
[1]: max virtual memory areas vm.max_map_count [65530] is too low, increase to at least [262144]
docker-compose 配置生成容器
用到的一些輔助配置(這些需要你去了解ES和Kibana是如何工作的)
mkdir -p /data/docker/EFK
cd /data/docker/EFK
elasticsearch 相關
主配置文件
vim elasticsearch.yml
內容如下
cluster.name: EFK                   # 這是註釋:集羣名稱
node.name: host-elk01               # 集羣中節點名稱
path.data: /var/lib/elasticsearch
path.logs: /var/log/elasticsearch

ES的JVM參數配置文件
vim jvm.options

內容如下,這些內容,可以從官方安裝包內獲取,這裏只是把內容貼出來而已。
# JVM heap size,注意,此2個值要保持一致,否則會出現啓動不了
-Xms1500m
-Xmx1500m

## 以下內容我沒有修改,建議不熟悉參數的話,使用官方提供的參數
## GC configuration
-XX:+UseConcMarkSweepGC
-XX:CMSInitiatingOccupancyFraction=75
-XX:+UseCMSInitiatingOccupancyOnly

# pre-touch memory pages used by the JVM during initialization
-XX:+AlwaysPreTouch

## basic

# explicitly set the stack size
-Xss1m

# set to headless, just in case
-Djava.awt.headless=true

# ensure UTF-8 encoding by default (e.g. filenames)
-Dfile.encoding=UTF-8

# use our provided JNA always versus the system one
-Djna.nosys=true

# turn off a JDK optimization that throws away stack traces for common
# exceptions because stack traces are important for debugging
-XX:-OmitStackTraceInFastThrow

# flags to configure Netty
-Dio.netty.noUnsafe=true
-Dio.netty.noKeySetOptimization=true
-Dio.netty.recycler.maxCapacityPerThread=0

# log4j 2
-Dlog4j.shutdownHookEnabled=false
-Dlog4j2.disable.jmx=true

-Djava.io.tmpdir=${ES_TMPDIR}

## heap dumps

# generate a heap dump when an allocation from the Java heap fails
# heap dumps are created in the working directory of the JVM
-XX:+HeapDumpOnOutOfMemoryError

# specify an alternative path for heap dumps; ensure the directory exists and
# has sufficient space
-XX:HeapDumpPath=data

# specify an alternative path for JVM fatal error logs
-XX:ErrorFile=logs/hs_err_pid%p.log

## JDK 8 GC logging

8:-XX:+PrintGCDetails
8:-XX:+PrintGCDateStamps
8:-XX:+PrintTenuringDistribution
8:-XX:+PrintGCApplicationStoppedTime
8:-Xloggc:logs/gc.log
8:-XX:+UseGCLogFileRotation
8:-XX:NumberOfGCLogFiles=32
8:-XX:GCLogFileSize=64m

# JDK 9+ GC logging
9-:-Xlog:gc*,gc+age=trace,safepoint:file=logs/gc.log:utctime,pid,tags:filecount=32,filesize=64m
# due to internationalization enhancements in JDK 9 Elasticsearch need to set the provider to COMPAT otherwise
# time/date parsing will break in an incompatible way for some date patterns and locals
9-:-Djava.locale.providers=COMPAT

# temporary workaround for C2 bug with JDK 10 on hardware with AVX-512
10-:-XX:UseAVX=2
kibana相關
vim kibana.yml

內容如下
xpack.monitoring.ui.container.elasticsearch.enabled: true   # 這是註釋,xpack是一個權限控制插件,30天試用。
server.port: 5601                               # kibana 監聽端口
server.host: "0"                                # kibana 監聽地址,0代表所有地址(0.0.0.0/0)
#server.basePath: ""
#server.rewriteBasePath: false
#server.maxPayloadBytes: 1048576
server.name: kibana                             # 服務器名稱
elasticsearch.url: http://elasticsearch:9200    # ES服務器訪問地址
#elasticsearch.preserveHost: true
#kibana.index: ".kibana"
#kibana.defaultAppId: "home"
#elasticsearch.username: "user"
#elasticsearch.password: "pass"
#server.ssl.enabled: false
#server.ssl.certificate: /path/to/your/server.crt
#server.ssl.key: /path/to/your/server.key
#elasticsearch.ssl.certificate: /path/to/your/client.crt
#elasticsearch.ssl.key: /path/to/your/client.key
#elasticsearch.ssl.certificateAuthorities: [ "/path/to/your/CA.pem" ]
#elasticsearch.ssl.verificationMode: full
#elasticsearch.pingTimeout: 1500
#elasticsearch.requestTimeout: 30000
#elasticsearch.requestHeadersWhitelist: [ authorization ]
#elasticsearch.customHeaders: {}
#elasticsearch.shardTimeout: 30000
#elasticsearch.startupTimeout: 5000
#elasticsearch.logQueries: false
#pid.file: /var/run/kibana.pid
#logging.dest: stdout
#logging.silent: false
#logging.quiet: false
#logging.verbose: false
#ops.interval: 5000
#i18n.locale: "en"
nginx 反向代理相關
因爲要用到nginx反向代理,因此,會有一個容器專門運行nginx服務器
SSL證書可以採用Let’s Encrypt頒發的,免費使用90天,到期續約便可一直免費。

提供此nginx容器的主配置文件nginx.conf供參考

user nginx;
worker_processes auto;
worker_rlimit_nofile 60000;
error_log /var/log/nginx/error.log;
pid /var/run/nginx.pid;

events {
    use epoll;
    worker_connections 10240;
}

http {
        server_tokens off;
    log_format  main  '$remote_addr - $remote_user [$time_local] "$request" '
                      '$status $body_bytes_sent "$http_referer" '
                      '"$http_user_agent" "$http_x_forwarded_for"';

#### logs
    access_log  /var/log/nginx/access.log  main;

    sendfile            on;
    tcp_nopush          on;
    tcp_nodelay         on;
    types_hash_max_size 2048;

#### include
    include /usr/share/nginx/modules/*.conf;
    include  /etc/nginx/mime.types;
    include /etc/nginx/conf.d/*.conf;
    default_type        application/octet-stream;

  # server set
    include /data/nginx_conf/vhosts/*.conf;

  # upstream set
  #  include /data/nginx_conf/upstream/*.conf;

##### Timeout
        keepalive_timeout   60;
        client_header_timeout 12;
        client_body_timeout 120;
        send_timeout 12;

##### post
        client_max_body_size 100M; # 這個自己設置了,允許上傳的大小。

##### Buffer
        client_body_buffer_size 128k;
        client_header_buffer_size 4k;
        client_body_in_single_buffer on;
        large_client_header_buffers 4 8k;
        open_file_cache max=60000 inactive=20s;
        open_file_cache_valid 30s;
        open_file_cache_min_uses 2;

#### Compression
        gzip on;
        gzip_comp_level 6;
        gzip_min_length 1k;
        gzip_buffers 16 8k;
        gzip_types text/plain text/css text/xml application/xml text/javascript application/javascript application/x-javascript application/x-httpd-php;
        gzip_vary off;
        gzip_disable "MSIE [1-6]\.";

# proxy set

        proxy_set_header Host $host;
        proxy_set_header X-Real-IP $remote_addr;
        proxy_set_header X-Forwarded-For $proxy_add_x_forwarded_for;
        proxy_set_header X-Forwarded-Proto $scheme;

        proxy_connect_timeout 300;
        proxy_read_timeout 300;
        proxy_send_timeout 300;
        proxy_intercept_errors off;
        proxy_ignore_client_abort on;

此容器的虛擬主機配置供參考
# server set
    server {
        listen       9001 default_server ssl;
        listen       [::]:9001 default_server ssl;
        server_name  demo.com;
        index        index.html index.htm

# SSL set

    ssl on;
    ssl_certificate "/你的證書鏈路徑/fullchain.cer";
    ssl_certificate_key "/你的證書私鑰路徑/demo.com.key";
    ssl_session_cache shared:SSL:10m;
    ssl_session_timeout  30m;
    ssl_ciphers HIGH:!aNULL:!MD5;
    ssl_prefer_server_ciphers on;
    add_header Strict-Transport-Security "max-age=63072000; includeSubdomains; preload";

## kibana
        location / {
                auth_basic "Authorization";                 # 用來在kibana訪問前進行賬號驗證
                auth_basic_user_file /etc/.htpasswd;        # 參考下面的工具用法
                proxy_pass http://172.18.1.222:5601;        # 反向代理到內部的kibana主機
        }
}
nginx 基本認證htpasswd工具用法參考
注意,因爲kibana默認是沒有權限管理的,暴露在公網上,必須在前面加一層nginx基本模塊認證,且配置爲https協議。
有錢的同學可以使用xpack。
nginx 的基本認證模塊auth_basic 中用到的htpasswd加密文件,根據不同的容器需要安裝以下組件
centos: httpd-tools
alpine: apache2-utils

創建使用文本文件作爲數據庫

htpasswd [ -c ] [ -m ] [ -D ] passwdfile username
htpasswd -b [ -c ] [ -m | -d | -p | -s ] [ -D ] passwdfile username password

-c:自動創建文件,僅在文件不存在時使用
-m:md5格式加密,默認方式
-s: sha格式加密
-D:刪除指定用戶
-b: 批處理時使用,可以通過命令行直接讀取密碼而不是交互。
-n: 不更新文件,僅僅屏幕輸出命令執行結果。

交互方式:
#htpasswd -c /etc/httpd/conf.d/.htpasswd hunk1
New password:
Re-type new password:
Adding password for user hunk1

非交互方式:
#htpasswd -bs /etc/httpd/conf.d/.htpasswd hunk2 1234567
Adding password for user hunk2

生成的密碼是經過加密的
#cat .htpasswd
hunk1:xLhgTub5K6Css
hunk2:{SHA}IOq+XWSw4hZ5boNPUtYf0LcDMvw=

僅僅顯示命令執行效果
#htpasswd -nbs hunk3 1234567
hunk3:{SHA}IOq+XWSw4hZ5boNPUtYf0LcDMvw=

刪除指定用戶
#htpasswd -D /etc/httpd/conf.d/.htpasswd hunk2
Deleting password for user hunk2
docker-compose.yml編排
docker創建外部自定義網絡和數據卷,注意,這是使用docker-compose編排啓動的必要條件
docker network create efk
docker volume create elasticsearch

####################
docker-compose.yml
內容如下

version: "2.4"
## 聲明網絡
networks:
  efk:
    external: true

## 聲明數據卷
volumes:
  elasticsearch:
    external: true

### 服務
services:
  elasticsearch:
    image: elasticsearch:6.5.4
    container_name: elasticsearch
    environment:
      - cluster.name=EFK
      - node.name=host-elk01
      - bootstrap.memory_lock=true
      - "discovery.zen.ping.unicast.hosts=elasticsearch"
    ulimits:
      memlock:
        soft: -1
        hard: -1
    networks:
      - efk
    ports:
      - "9200:9200"
    volumes:
      - /etc/localtime:/etc/localtime
      - "elasticsearch:/usr/share/elasticsearch/data"
      - "/data/docker/EFK/jvm.options:/usr/share/elasticsearch/config/jvm.options"
    restart: "always"

    logging:
      driver: "json-file"
      options:
         max-size: "200k"
         max-file: "1"

  kibana:
    image: kibana:6.5.4
    container_name: kibana
    networks:
      - efk
    ports:
      - "5601:5601"
    volumes:
      - /etc/localtime:/etc/localtime
      - /data/docker/EFK/kibana.yml:/usr/share/kibana/config/kibana.yml
    restart: "always"

    logging:
      driver: "json-file"
      options:
         max-size: "200k"
         max-file: "1"

### 注意,以下服務的鏡像屬於自定義的,請參考上面的給的參考文件。基於nginx-alpine製作。
  efk-proxy:
    image: efk-proxy:latest
    container_name: efk-proxy
    networks:
      - efk
    ports:
      - "9001:9001"
    volumes:
      - /etc/localtime:/etc/localtime
      - "/data/docker/EFK/ssl/demo.com:/data/ssl/demo.com:ro"
    command: ["nginx", "-g", "daemon off;"]
    restart: "always"
    depends_on:
      - kibana
    logging:
      driver: "json-file"
      options:
         max-size: "200k"
         max-file: "1"
啓動ES + Kibana + nginx
docker-compose up -d
宿主機會出現端口5601,9001和9200

簡單驗證下
# curl 172.18.1.222:9200
{
  "name" : "host-elk01",
  "cluster_name" : "EFK",
  "cluster_uuid" : "CMJ4F-E5TcypIhrReze7mQ",
  "version" : {
    "number" : "6.5.4",
    "build_flavor" : "default",
    "build_type" : "tar",
    "build_hash" : "d2ef93d",
    "build_date" : "2018-12-17T21:17:40.758843Z",
    "build_snapshot" : false,
    "lucene_version" : "7.5.0",
    "minimum_wire_compatibility_version" : "5.6.0",
    "minimum_index_compatibility_version" : "5.0.0"
  },
  "tagline" : "You Know, for Search"
}
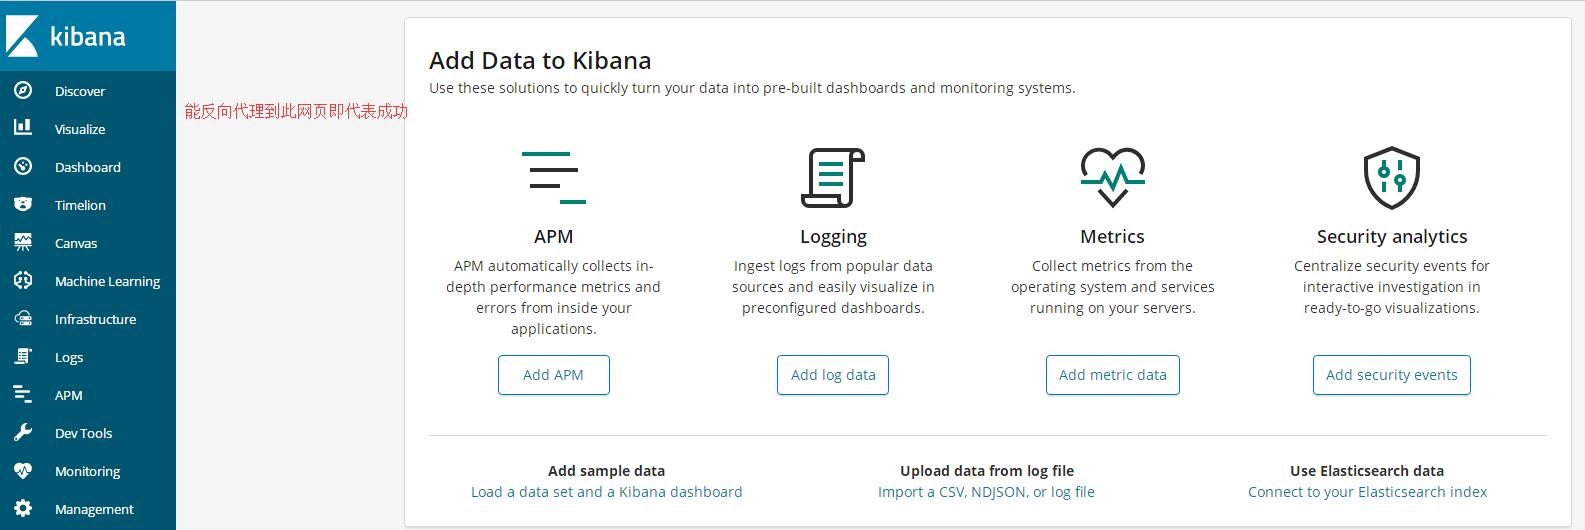
打開瀏覽器,輸入EFK對應的域名

部署 fluentd (td-agent)
在需要採集數據的機器安裝client

查看是否安裝:
rpm -qa|grep td-agent

按系統版本選擇操作
https://www.fluentd.org
Installation Guide 提供了安裝指引

查看本地安裝了哪些組件
# td-agent-gem list --local

*** LOCAL GEMS ***

addressable (2.5.2)
elasticsearch (6.1.0)
elasticsearch-api (6.1.0)
elasticsearch-transport (6.1.0)
excon (0.62.0)
faraday (0.15.3)
fluent-config-regexp-type (1.0.0)
fluent-logger (0.7.2)
fluent-plugin-elasticsearch (2.11.11)
fluent-plugin-kafka (0.7.9)
fluent-plugin-record-modifier (1.1.0)
fluent-plugin-rewrite-tag-filter (2.1.0)
fluent-plugin-s3 (1.1.6)
fluent-plugin-td (1.0.0)
fluent-plugin-td-monitoring (0.2.4)
fluentd (1.2.6)
以上由於篇幅有限,僅僅列出一部分,其中包括了後續要使用到的fluent-plugin-elasticsearch
td-agent 配置文件
不同的操作系統位置不一樣,centos系統如下
/etc/td-agent/td-agent.conf
默認會帶有一些示例配置,此處暫時不作變更,後續會單獨篇章講解。

默認配置文件路徑:/etc/td-agent/td-agent.conf
默認日誌文件路徑:/var/log/td-agent/td-agent.log
可以從這個日誌文件中查看td-agent服務運行日誌/報錯信息
td-agent相關操作指令
設置開自動啓動:                              systemctl enable td-agent.service
啓動:                                                systemctl start td-agent
重新啓動:                                         systemctl restart td-agent.service
熱加載配置文件:                              systemctl reload td-agent.service
停止服務:                                         systemctl stop td-agent.service
檢查是否設置了開機啓動:                systemctl is-enabled td-agent.service
                                                            enabled:已開啓
                                                            disabled:已關閉

啓動之後,默認會監聽tcp和udp的24224端口