一 基本環境
1 環境處理
mkdir  djanad
cd djanad/
pyenv   virtualenv 3.6.5  djanad
pyenv  local  djanad
結果如下

2 創建django和基本配置
pip install django==2.1django-admin startproject demo .
django-admin startapp app結果如下

數據庫配置如下
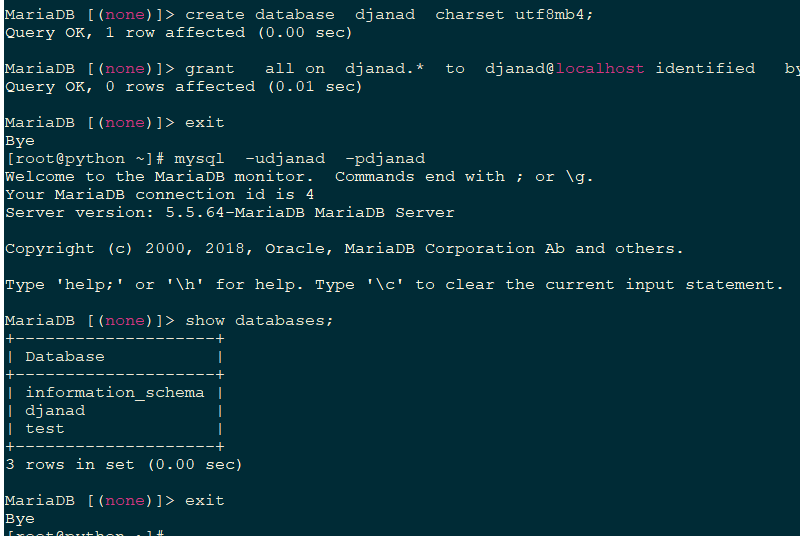
基本時區和mysql配置及相關時區配置請看django基礎
https://blog.51cto.com/11233559/2444627
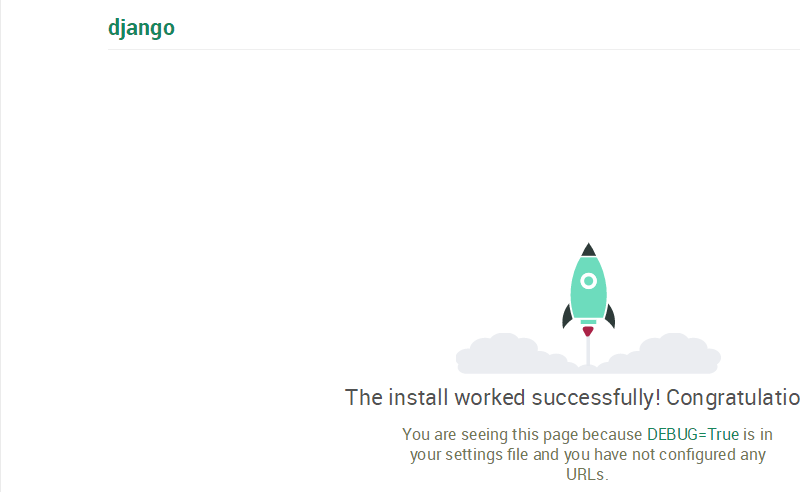
啓動結果如下
二 view基本使用
1 view中使用模板
1 概述
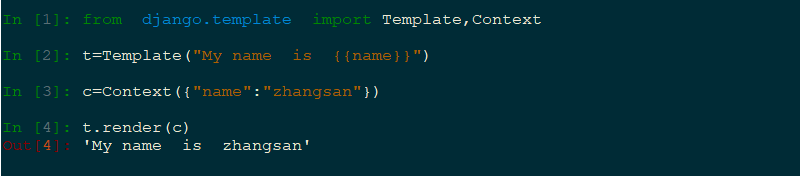
django內置了自己的模板引擎,和jinjia 很像,使用簡單
使用 Template 進行定義模板,使用Context 將數據導入到該模板中,其導入默認使用字典
2 環境準備
1 創建models
django 默認會去到app_name/templates下尋找模板,這是settings中的默認設置,默認會去app_name/static找那個尋找靜態文件(css,js,jpg,html)等
在 app/models.py 中創建數據庫表模板,具體配置如下:
from django.db import models

# Create your models here.
# 問題
class Question(models.Model):
    question_text = models.CharField(max_length=200)
    pub_date = models.DateTimeField('date published')

    def __str__(self):
        return self.question_text

# 選擇
# 配置選擇爲問題的外鍵,並配置選擇的內容和選擇的起始值
class Choice(models.Model):
    question = models.ForeignKey(Question, on_delete=Question)
    choice_text = models.CharField(max_length=200)
    votes = models.IntegerField(default=0)

    def __str__(self):
        return self.choice_text
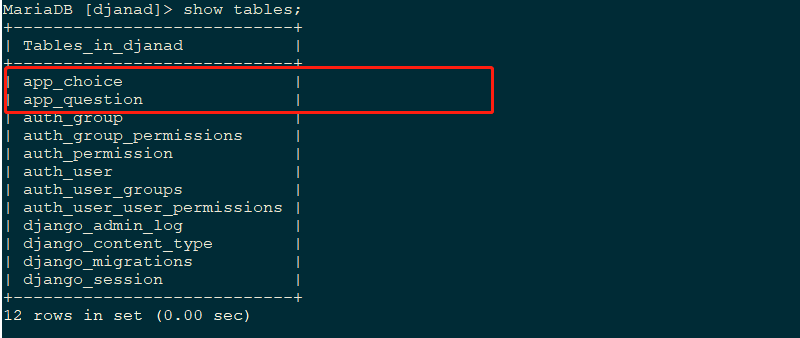
2 執行生成遷移文件和遷移並查看
 python manage.py   makemigrations

 python manage.py   migrate
結果如下
3 添加數據進入表中
創建後臺登陸用戶,設置用戶名爲admin,密碼爲admin@123

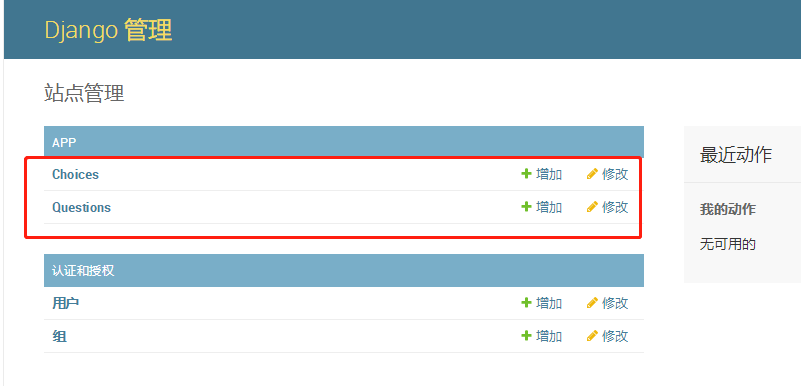
4 將model中的模型添加進入django admin 後臺管理界面
app/admin.py中添加
# Register your models here.
from django.contrib import admin
from .models import Question, Choice

# Register your models here.
class ChoiceInline(admin.TabularInline):
    model = Choice
    extra = 3

class QuestionAdmin(admin.ModelAdmin):
    fieldsets = [
        (None, {'fields': ['question_text']}),
        ('Date information', {'fields': ['pub_date'], 'classes': ['collapse']}),
    ]
    inlines = [ChoiceInline]
    list_display = ('question_text', 'pub_date')

admin.site.register(Choice)
admin.site.register(Question, QuestionAdmin)
url : localhost:port/admin/
5 登陸後臺並添加數據如下

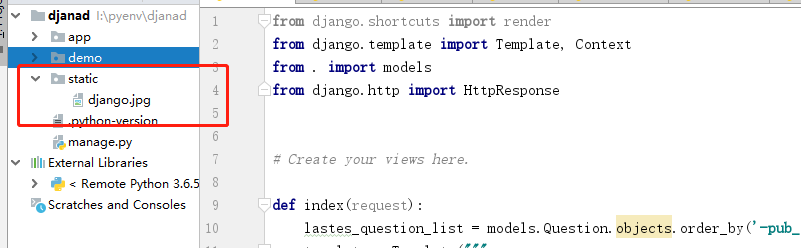
6 配置靜態文件
demo/setting.py 中配置添加
STATICFILES_DIRS = [
os.path.join(BASE_DIR, 'static')
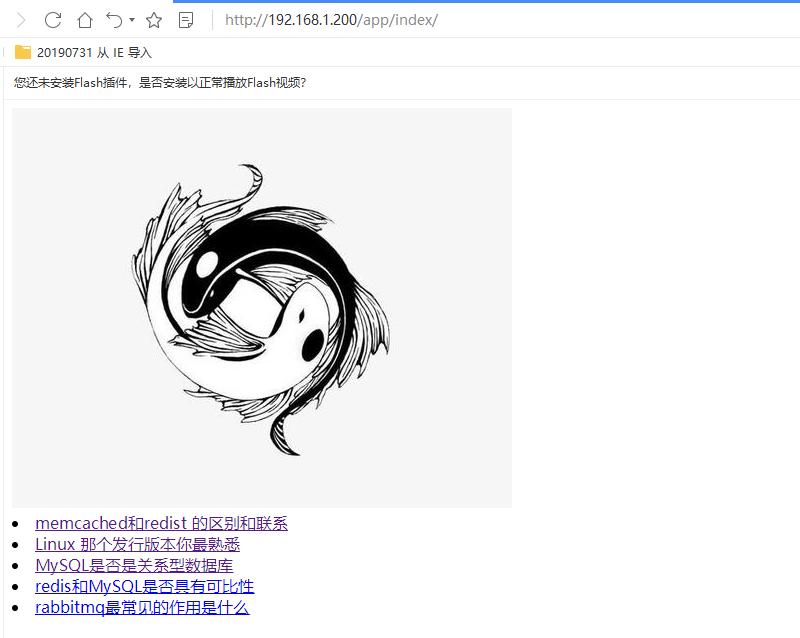
]項目中創建static 並上傳圖片django.jpg
7 配置 url
demo/urls.py中配置如下
from django.conf.urls import url, include
from django.contrib import admin

urlpatterns = [
    url(r'^admin/', admin.site.urls),
    url(r'^app/', include("app.urls",namespace="app")),  #此處配置名稱空間,用於處理後面的翻轉
]
8 app中創建 urls.py 文件,內容如下
from django.conf.urls import url, include
from . import views

urlpatterns = [
    url(r'^index/$', views.index, name="index"), # name 指定名稱,
]

3 view 使用
1 在view中直接嵌入模板,結果如下
from django.shortcuts import render
from django.template import Template, Context
from . import models
from django.http import HttpResponse

# Create your views here.

def index(request):
    lastes_question_list = models.Question.objects.order_by('-pub_date')[:5]
    template = Template("""
    <img  src="/static/django.jpg">
    {%  if lastes_question_list %}
    <ul>
    {% for question  in  lastes_question_list %}
    <li>  <a  href="/app/ {{question.id}}/"> {{ question.question_text }} </a> </li>
    {% endfor %}
    </ul>
    {% endif %}
    """)
    context = Context({"lastes_question_list": lastes_question_list})
    return HttpResponse(template.render(context))
訪問配置,結果如下
2 使用html 模板如下
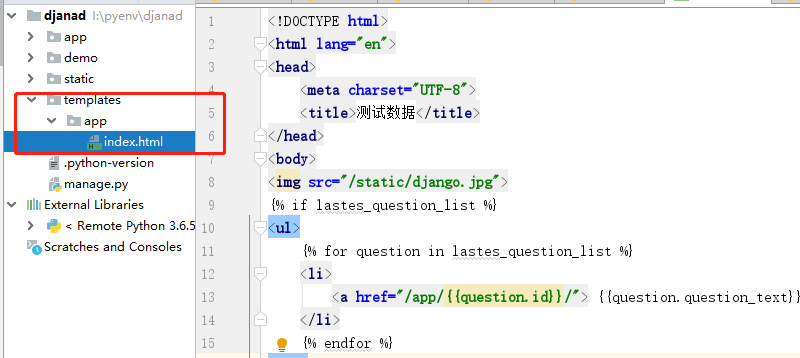
index 代碼如下
<!DOCTYPE html>
<html lang="en">
<head>
    <meta charset="UTF-8">
    <title>測試數據</title>
</head>
<body>
<img src="/static/django.jpg">
{% if lastes_question_list %}
<ul>
    {% for question in lastes_question_list %}
    <li>
        <a href="/app/{{question.id}}/"> {{question.question_text}} </a>
    </li>
    {% endfor %}
</ul>

{% endif%}
</body>
</html>
app/view.py 中代碼如下
from . import models
from django.http import HttpResponse
from django.template import loader

# Create your views here.
def index(request):
    lastes_question_list = models.Question.objects.order_by('-pub_date')[:5]
    template = loader.get_template("app/index.html")
    context = {"lastes_question_list": lastes_question_list}
    return HttpResponse(template.render(context))
3 index.html不變,app/view 修改
from . import models
from django.shortcuts import render

# Create your views here.
def index(request):
    lastes_question_list = models.Question.objects.order_by('-pub_date')[:5]
    context = {"lastes_question_list": lastes_question_list}
    return render(request, template_name="app/index.html", context=context)
4 去掉static 和 url中的硬編碼及反向解析
根據根路由中註冊的namespace和子路由中註冊的name來動態獲取路徑。在模板中使用"{% url namespace:name %}"
如果攜帶位置參數
“{% url namespace:name args %}"
如果攜帶關鍵字參數
“{% url namespace:name k1=v1 k2=v2 %}"
配置 詳情頁面添加數據
app/view.py 中添加數據如下
from . import models
from django.shortcuts import render

# Create your views here.
def index(request):
    lastes_question_list = models.Question.objects.order_by('-pub_date')[:5]
    context = {"lastes_question_list": lastes_question_list}
    return render(request, template_name="app/index.html", context=context)

def detal(request, question_id):
    detal = models.Question.objects.get(pk=question_id)
    context = {"detal": detal}
    return render(request, template_name="app/detal.html", context=context)
app/urls.py中如下
from django.conf.urls import url, include
from . import views

urlpatterns = [
    url(r'^index/$', views.index, name="index"),
    url(r'^(?P<question_id>[0-9]+)/$', views.detal, name="detal"),# name 指定名稱,用於後面的反向解析
]

]
詳情頁html 配置如下
<!DOCTYPE html>
<html lang="en">
<head>
    <meta charset="UTF-8">
    <title>測試數據</title>
</head>
<body>
{% if detal %}
<h1>{{ detal.question_text }}</h1>
{% for question in detal.choice_set.all %}
<li>
    {{ question.votes }}
    {{ question.choice_text }}
</li>
{% endfor %}
{% endif %}

</body>
</html>
index.html 修改如下
<!DOCTYPE html>
<html lang="en">
<head>
    {% load static %}
    <meta charset="UTF-8">
    <title>測試數據</title>
</head>
<body>
<img src="{% static  'django.jpg'%}">
{% if lastes_question_list %}
<ul>
    {% for question in lastes_question_list %}
    <li>
        <a href="{% url 'detal' question.id  %}"> {{question.question_text}} </a>
    </li>
    {% endfor %}
</ul>

{% endif%}
</body>
</html>
2 針對上述項目實現投票機制
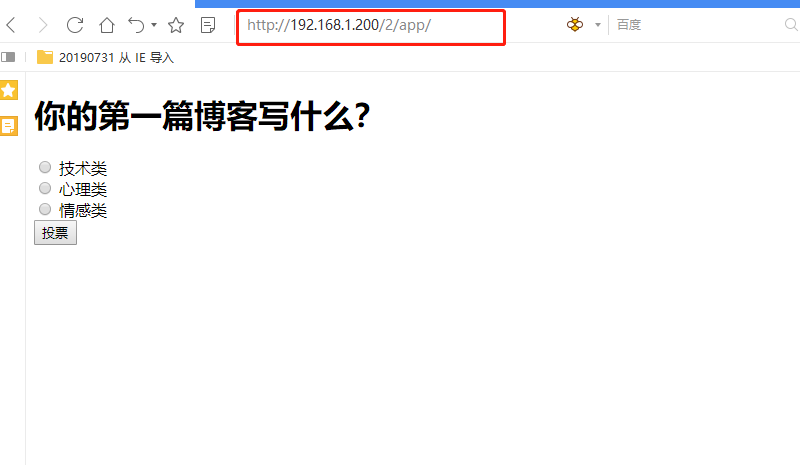
1 修改detal 結果如下
此處的app:vote 是對應的namespace 和 name ,及名稱空間和名稱
<!DOCTYPEhtml>
<html lang="en">
<head>
    <meta charset="UTF-8">
    <title>測試數據</title>
</head>
<body>
<h1>{{ detal.question_text }}</h1>
<p>
    <strong>{{error_message}}</strong>
</p>
<form action="{% url 'app:vote' detal.id %}" method="post">
    {% for choice in detal.choice_set.all %}
    <input type="radio" name="choice" id="choice {{ forloop.counter }}" value="{{ choice.id }}"/>
    <label for="choice {{ forloop.counter }}"> {{ choice.choice_text }} </label>
    <br/>
    {% endfor %}
    <input type="submit" value="投票"/>
</form>

</body>
</html>
2 app/views.py
from . import models
from django.http import HttpResponseRedirect
from django.shortcuts import render, get_object_or_404, reverse

# Create your views here.
def index(request):
    lastes_question_list = models.Question.objects.order_by('-pub_date')[:5]
    context = {"lastes_question_list": lastes_question_list}
    return render(request, template_name="app/index.html", context=context)

# 詳情頁面
def detal(request, question_id):
    detal = models.Question.objects.get(pk=question_id)
    context = {"detal": detal}
    return render(request, template_name="app/detal.html", context=context)

# 投票結果顯示
def vote(request, question_id):
    question = get_object_or_404(models.Question, pk=question_id)
    if request.method == "POST":
        choice_id = request.POST.get('choice', 0)
        try:
            selected_choice = question.choice_set.get(pk=choice_id)
        except  models.Choice.DoesNotExist:
            return render(request, 'app/detal.html', {
                'qestion': question,
                "error_message": "You didn't select  a  choice",
            })
        else:
            selected_choice.votes += 1
            selected_choice.save()
            return HttpResponseRedirect(reverse('app:results', args=(question.id,)))

# 投票結果顯示
def results(request, question_id):
    question = get_object_or_404(models.Question, pk=question_id)
    print(question, type(question))
    return render(request, 'app/results.html', {"question": question})
3 templates/app/results.html
<!DOCTYPE html>
<html lang="en">
<head>
    <meta charset="UTF-8">
    <title></title>
</head>
<body>
<h1> {{ question.question_text }} </h1>
<h1> 測試 </h1>

<ul>
    {% for choice in question.choice_set.all %}

    <li>
        {{ choice.choice_text }} -- {{ choice.votes }} vote {{ choice.votes |pluralize }}
    </li>
    {% endfor %}
</ul>

</body>
</html>
4 投票程序結果如下:
3 錯誤頁面處理
1 基本頁面處理
def test(request):
    # return HttpResponse('Not Found', status=404)
    return HttpResponseNotFound('Not Found')

urlpatterns = [
    url(r'^admin/', admin.site.urls),
    url(r'^app/', include("app.urls"), {"question_id": 1}),  # 此處配置直接捕獲question_id 進行處理
    url(r'^test/$', test)
]
上述兩種返回錯誤方式結果相同
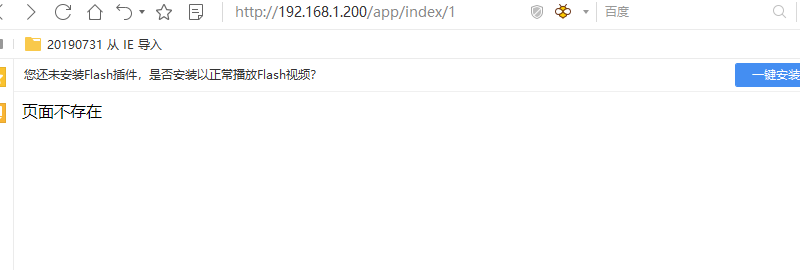
2 自定義錯誤視圖
在url中導入,在其他頁面使用即可
在 demo/urls.py中導入
from django.conf.urls import url, include
from django.contrib import admin
from django.http import HttpResponse, HttpResponseNotFound

def test(request):
    return HttpResponse('Not Found', status=404)

handler404 = 'demo.views.my_custom_page_not_found_view'
handler500 = 'demo.views.my_custom_error_found_view'
handler403 = 'demo.views.my_custom_permission_denied_view'
handler400 = 'demo.views.my_custom_bad_request_request_view'

urlpatterns = [
    url(r'^admin/', admin.site.urls),
    url(r'^app/', include("app.urls")),  # 此處配置直接捕獲question_id 進行處理
    url(r'^test/$', test)
]
demo/views.py中配置如下
from django.http import HttpResponse
def my_custom_page_not_found_view(request):
return HttpResponse("頁面不存在", status=404)
def my_custom_error_found_view(request):
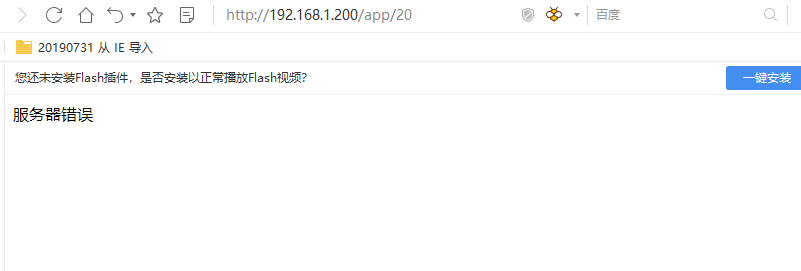
return HttpResponse("服務器錯誤", status=500)
def my_custom_permission_denied_view(request):
return HttpResponse("拒絕訪問", status=403)
def my_custom_bad_request_request_view(request):
return HttpResponse("請求錯誤", status=400)
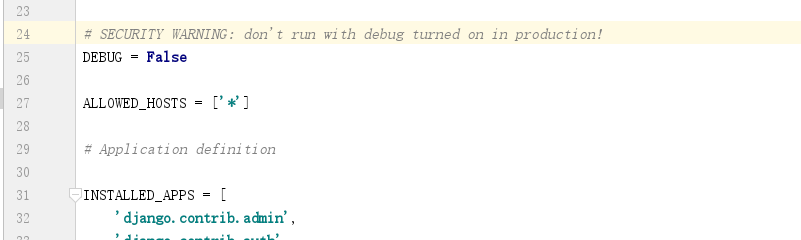
此處需要將demo/setting.py 中的DEBUG修改爲False,纔會出現此處定義的情況
結果如下
4 相關函數
1 render函數
用於渲染模板和傳遞參數
def render(request, template_name, context=None, content_type=None, status=None, using=None):
    """
    Returns a HttpResponse whose content is filled with the result of calling
    django.template.loader.render_to_string() with the passed arguments.
    """
    content = loader.render_to_string(template_name, context, request, using=using)
    return HttpResponse(content, content_type, status)
選項:
request : 請求參數
template_name:對應的html模板名稱
context:渲染模板的context字典,默認是空 {}
content_type : Response MIME type,默認使用DEFAULT_CONTENT_TYPE 設置
2 redirect 函數
用於頁面跳轉
def redirect(to, *args, **kwargs):
    pass
選項
to :
此選項可以是
1 模塊
2 視圖名稱
3 absolute或者回調 urlperments 是否永久重定向
爲 True 表示永久重定向,否則表示臨時重定向
3 get_object_or_404 函數
當對象不存在時返回特定頁面404
def get_object_or_404(class, *args, **kwargs):
    pass
第一個參數: 可爲Model中對應的數據庫表類,後面可爲對應的過濾方法
question = get_object_or_404(models.Question, pk=question_id)當對象執行成功時,返回對應的值,否則返回404 錯誤
4 get_list_or_404 函數
當對象不存在時返回特定頁面404
question = get_list_or_404(models.Question, pk=question_id)5 裝飾器
require_http_methods(request_method_list)
用於限制請求類型,在此中以列表的形式顯示
require_GET()
用於限制請求類型爲GET請求
require_POST()
用於限制請求類型爲POST 請求
require_safe()
用於限制安全的請求,如get和head
gzip_page()
用於啓用gzip壓縮功能
cache_control(**kwargs)
緩存相關函數
never_cache()
用於配置永久不緩存
login_required()
用於處理登錄後的用戶才能訪問對應的屬性
三 urlconf
1 django 路由匹配概述
1 項目啓動後根據 setting ROOT_URLCONF 決定跟URLconf,默認是object中的urls.py
2 它是django.conf.urls.url()實例的一個python 列表
3 django 依次匹配每個URL模式,在於請求的URL匹配的第一個模式停下來。
4 一旦其中的一個正則表達式匹配上,django將導入並調用給出的視圖,它是一個簡單的python函數(或者一個基於類的視圖)。視圖將獲得如下參數:
一個HttpRequest 實例。
如果匹配的正則表達式返回來了沒有命名的組,那麼正則表達式匹配的內容將作爲位置參數提供給視圖。
關鍵字參數由正則表達式匹配的命名組成,但是可以被django.conf.urls.url()的可選參數kwargs 覆蓋。
5 如果沒有匹配到正則表達式,或者如果過程中拋出一個異常,django將調用一個適當的錯誤處理試圖。
2 用戶請求數據處理過程
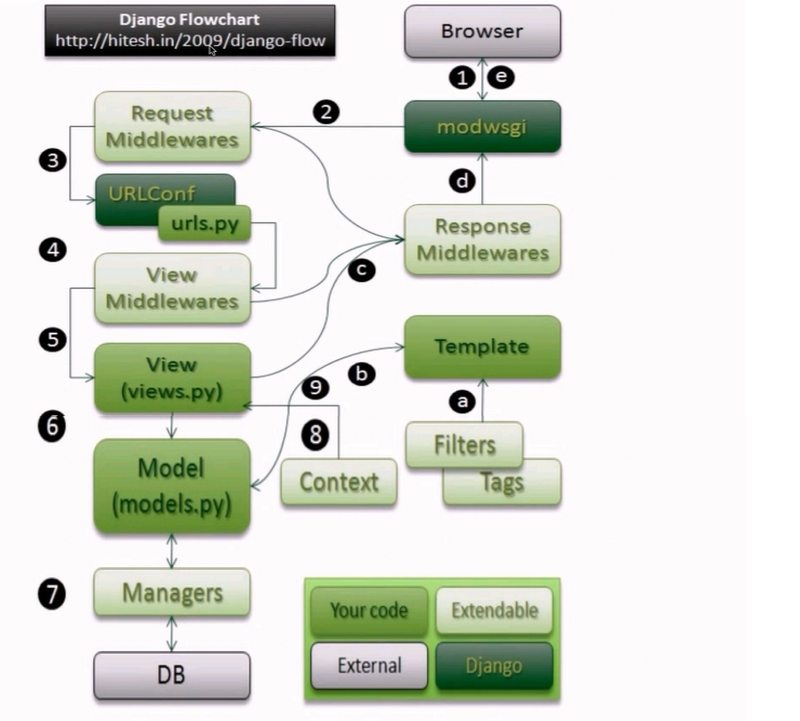
Middlewares: 過濾函數,俗稱過濾器,在執行之前和執行之後進行某些操作
3 URL 命名空間
1 兩種命名空間
app namespace
instance namespace
2 app namespace
app/urls.py
app_name='app' # 此中方式和在demo/urls.py中的
url(r'^app/', include("app.urls",namespace="app")), 作用相同命名空間的作用主要用作隔離
上述表示使用了此配置後,此配置文件中的所有數據都在此名稱空間下,在使用url時,需要在其上面加上名稱空間的名稱

3 instance namespace
instance 級別,名稱不可以重複
在demo/urls.py中的
url(r'^app/', include("app.urls",namespace="app")), 用於在項目的urls.py中的include()中指定,作用和上面的相同,均可用於反向解析
說明:
app namespace 使用場景: 通常使用此方式 ,除非有多個include則使用instance namespace
3 url 反向解析
1 解析概述
如果在你的代碼中,需要使用一些類似url模板標籤,Django提供了下列功能:
正解析: url ->view
反解析: view name -> url
2 reverse
此函數用於通過url中指定的name來返回對應的url
格式如下
reverse(viewname,urlconf=None,args=None,Kwargs=None,current_app=None)
viewname 可以是一個url模式名稱或一個可調用的視圖對象

3 reverse_lazy
懶加載下的 reverse
格式如下:
reverse_lazy(viewname, urlconf=None, args=None, kwargs=None, current_app=None)
作用:
提供反向URL作爲url基於類的通用視圖的屬性。
向裝飾器提供反向URL(例如裝飾器的login_url參數django.contrib.auth.decorators.permission_required() )。
提供反向URL作爲函數簽名中參數的默認值。
1 在模板中: 使用url 模板標籤
2 在python 代碼中,使用django.core.urlresolvers.reverse() 函數
3 在更高層的與處理django模型實例相關的代碼中,使用get_absolute_url() 方法
4 多種URL
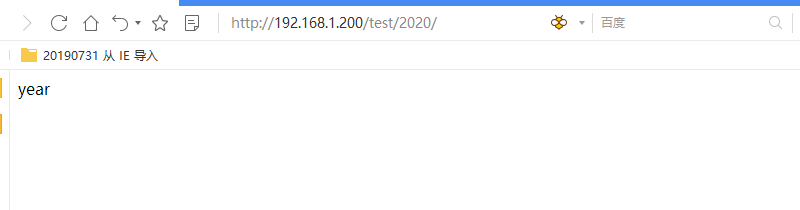
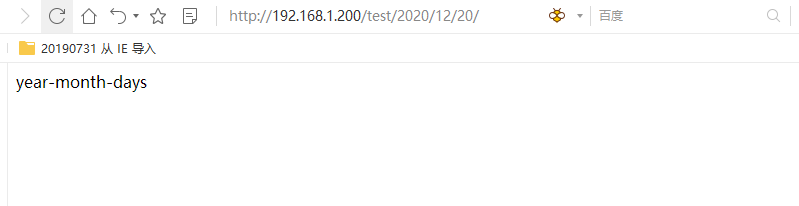
demo.urls.py 中配置如下
from django.conf.urls import url, include
from django.contrib import admin
from django.http import HttpResponse

def year(request):
    return HttpResponse("year")

def month(request):
    return HttpResponse("month")

def ymd(request):
    return HttpResponse("year-month-days")

urlpatterns = [
    url(r'^admin/', admin.site.urls),
    url(r'^app/', include("app.urls")),
    url(r'^[0-9]{4}/$', year),
    url(r'^[0-9]{2}/$', month),
    url(r'^[0-9]{4}/[0-9]{2}/[0-9]{2}/$', ymd),
]
說明:
1 若要從URL中捕獲一個值,只需要在它周圍放置一對圓括號
2 不需要添加一個前導的反斜槓,因爲每個URL都有,
3 每個正則表達式前面的'r' 是可選的,建議加上,它告訴python這個字符串是原始的字符串,字符串中的任何意義都不應該被轉義。
4 默認捕捉到的都是字符串
5 上述的匹配方式因爲加上了$,因此其是絕對匹配
5 URL 無法匹配的錯誤處理
當django找不到一個匹配請求的URL的正則表達式時,或者當拋出一個異常時,django會將調用有個錯誤處理視圖
默認的錯誤處理視圖
-handler404
-handler500
-handler403
-handler400
6 url 多種組合寫法
1 引入配置
demo/urls.py 中如下
from django.conf.urls import url, include
from django.contrib import admin
from django.http import HttpResponse

def year(request):
    return HttpResponse("year")

def month(request):
    return HttpResponse("month")

def ymd(request):
    return HttpResponse("year-month-days")

extra_patters = [
    url(r'^[0-9]{4}/$', year),
    url(r'^[0-9]{2}/$', month),
    url(r'^[0-9]{4}/[0-9]{2}/[0-9]{2}/$', ymd),

]

urlpatterns = [
    url(r'^admin/', admin.site.urls),
    url(r'^app/', include("app.urls"), name="app"),
    url(r'test/', include(extra_patters)),  # 引入上述配置的匹配規則
]
2 多層級配置
from django.conf.urls import url, include
from django.contrib import admin
from django.http import HttpResponse

def year(request):
    return HttpResponse("year")

def month(request):
    return HttpResponse("month")

def ymd(request):
    return HttpResponse("year-month-days")

urlpatterns = [
    url(r'^admin/', admin.site.urls),
    url(r'^app/', include("app.urls"), name="app"),
    url(r'test/', include([

        url(r'^[0-9]{4}/$', year),
        url(r'^[0-9]{2}/$', month),
        url(r'^[0-9]{4}/[0-9]{2}/[0-9]{2}/$', ymd),

    ])),  # 引入上述配置的匹配規則
]
3 追加配置
from django.conf.urls import url, include
from django.contrib import admin
from django.http import HttpResponse
def year(request):
return HttpResponse("year")
def month(request):
return HttpResponse("month")
def ymd(request):
return HttpResponse("year-month-days")
urlpatterns = [
url(r'^admin/', admin.site.urls),
url(r'^app/', include("app.urls"), name="app"),
url(r'test/', include([
url(r'^[0-9]{4}/$', year),
url(r'^[0-9]{2}/$', month),
url(r'^[0-9]{4}/[0-9]{2}/[0-9]{2}/$', ymd),
])), # 引入上述配置的匹配規則
]
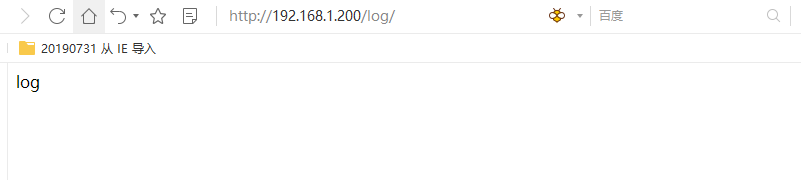
def log(request):
return HttpResponse("log")
urlpatterns += [
url(r'log/', log)
]
結果如下
6 URL 參數的捕獲和繼承
demo/urls.py
from django.conf.urls import url, include
from django.contrib import admin
urlpatterns = [
    url(r'^admin/', admin.site.urls),
    url(r'^(?P<question_id>[0-9]+)/app/', include("app.urls"), name="app"),  # 此處配置直接捕獲question_id 進行處理
]
app/urls.py 中配置如下
from django.conf.urls import url, include
from . import views

app_name = "app"
urlpatterns = [
    url(r'^index/$', views.index, name="index"),
    url(r'^$', views.detal, name="detal"),
    url(r'^result$', views.result, name="result"),
    url(r'^vote$', views.vote, name="vote"),
]
去除了之前的(?P<question_id>[0-9]+)
app/view.py
修改 index接受參數,需要添加接受此參數,否則其無法訪問
def index(request, question_id):
    lastes_question_list = models.Question.objects.order_by('-pub_date')[:5]
    context = {"lastes_question_list": lastes_question_list}
    return render(request, template_name="app/index.html", context=context)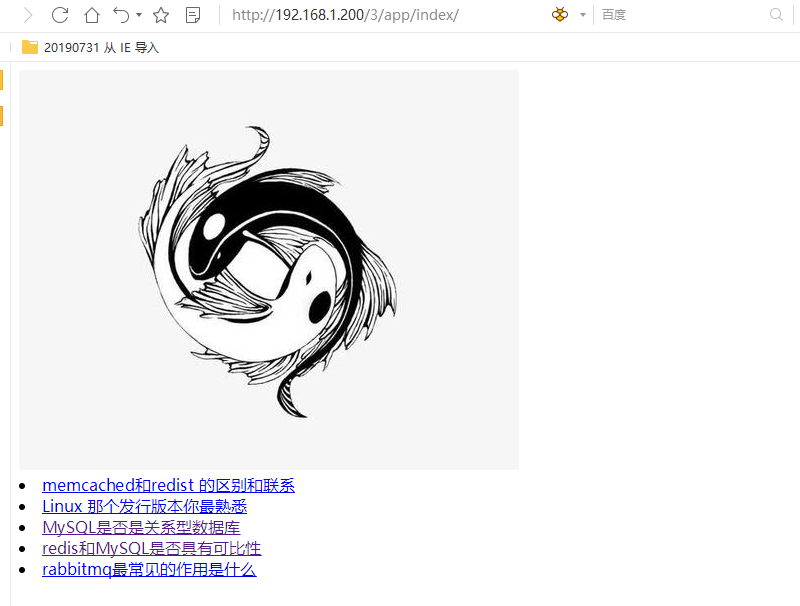
傳遞額外參數
urlpatterns = [
    url(r'^admin/', admin.site.urls),
    url(r'^(?P<question_id>[0-9]+)/app/', include("app.urls"), {"question_id": 1}),  # 此處配置直接捕獲question_id 進行處理
]
說明: 此處配置的必須是正則表達式中匹配的值,此處會覆蓋正則表達式中匹配的值,此處的question_id,爲1

五 view 高級部分
1 發送郵件
1 setting.py 中配置如下
需要在項目project.setting.py 中配置相關參數
本項目是在 demo/setting.py 中配置
# 郵件發送相關配置
EMAIL_HOST = "smtp.163.com"  # 服務地址
EMAIL_PORT = 25  # 發送使用的端口
EMAIL_HOST_USER = ""  # 發送郵件使用的賬號
EMAIL_HOST_PASSWORD = ""  # 發送授權密碼
# EMAIL_USE_TLS=True  # 是否啓用TLS
# EMAIL_USE_SSL=True  # 是否啓用SSL
2 send_mail 格式含義如下
def send_mail(subject, message, from_email, recipient_list,
              fail_silently=False, auth_user=None, auth_password=None,
              connection=None, html_message=None):
            pass
其中:
subject 表示郵件的標題
message 表示郵件內容
from_email 表示發件人
recipient_list 表示收件人列表
3 app/views.py 中代碼如下
from django.core.mail import send_mail

def sendemail(request):
    if request.method == "POST":
        subject = request.POST.get('subject', '')
        message = request.POST.get('message', '')
        recipient_list = request.POST.get('recipient_list', '')
        print(recipient_list)
        if subject and message and recipient_list:
            try:
                send_mail(subject, message=message, from_email='[email protected]',
                          recipient_list=['[email protected]'])
            except  Exception as e:
                return HttpResponse("Invalid header found.")
            return HttpResponseRedirect('/app/index')
        else:
            return HttpResponse("Make  sure all  fields  are entered  and valid.")
    return render(request, 'app/sendemail.html')
4 app/urls.py 中修改如下
from django.conf.urls import url, include
from . import views

app_name = "app"
urlpatterns = [
    url(r'^index/$', views.index, name="index"),
    url(r'^(?P<question_id>[0-9]+)$', views.detal, name="detal"),
    url(r'^(?P<question_id>[0-9]+)/result$', views.result, name="result"),
    url(r'^(?P<question_id>[0-9]+)/vote$', views.result, name="vote"),
    url(r'^sendemail/$', views.sendemail, name="sendemail"),
5 templates/app/sendemail.html中修改如下
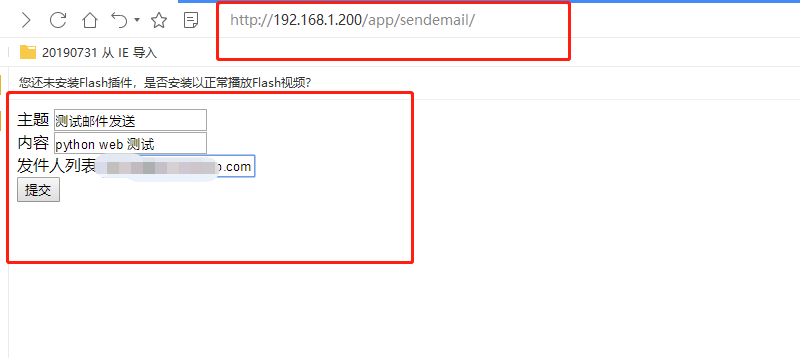
<!DOCTYPE html>
<html lang="en">
<head>
    <meta charset="UTF-8">
    <title>郵件發送</title>
</head>
<body>
<form action="" method="post">
    <label> 主題 </label>
    <input type="text" name="subject">
    <br/>
    <label> 內容 </label>
    <input type="text" name="message">
    <br/>
    <label> 發件人列表</label>
    <input type="email" name="recipient_list">
    <br/>
    <input type="submit" value="提交">
</form>
</body>
</html>
6 結果如下
7 跳轉到如下頁面
2 導出CSV 文件
1 app/views.py中配置如下
import csv
import datetime
def get_csv(request):
if request.method == "POST":
response = HttpResponse(content_type="text/csv")
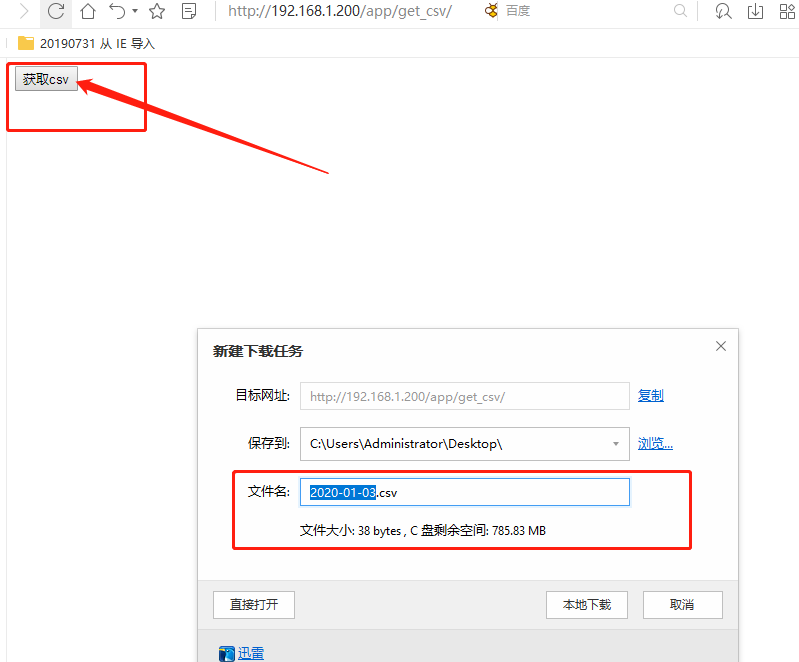
response['Content-Disposition'] = 'attachment;filename={}.csv'.format(
datetime.datetime.now().strftime("%Y-%m-%d"))
writer = csv.writer(response)
writer.writerow(["第一行", 1, 2, 3, 4])
writer.writerow(["第二行", 'A', 'B', 'C', 'D'])
return response
return render(request, 'app/get_csv.html')2 app/urls.py 中配置如下
from django.conf.urls import url, include
from . import views

app_name = "app"
urlpatterns = [
    url(r'^index/$', views.index, name="index"),
    url(r'^(?P<question_id>[0-9]+)$', views.detal, name="detal"),
    url(r'^(?P<question_id>[0-9]+)/result$', views.result, name="result"),
    url(r'^(?P<question_id>[0-9]+)/vote$', views.result, name="vote"),
    url(r'^sendemail/$', views.sendemail, name="sendemail"),
    url(r'^get_csv/$', views.get_csv, name="getcsv"),

]
3 templates/app/get_csv.html中配置如下
<!DOCTYPE html>
<html lang="en">
<head>
    <meta charset="UTF-8">
    <title>觸發獲取get_csv</title>
</head>
<body>
<form action="" method="post">
    <input type="submit" value="獲取csv">
</form>
</body>
</html>
4 結果如下
3 上傳文件
1 app/views.py 中配置如下
def upload_file(request):
if request.method == "POST":
print(request.FILES)
upload_file = request.FILES.get('file', None)
if upload_file is None:
return HttpResponse("Not file get")
else:
with open('/tmp/{}'.format(upload_file.name), 'wb') as f:
f.write(upload_file.read())
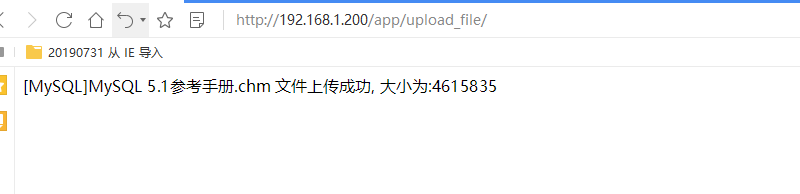
return HttpResponse("{} 文件上傳成功,大小爲:{}".format(upload_file.name, upload_file.size))
else:
return render(request, 'app/upload_file.html')2 app/urls.py 中配置如下
from django.conf.urls import url, include
from . import views

app_name = "app"
urlpatterns = [
    url(r'^index/$', views.index, name="index"),
    url(r'^(?P<question_id>[0-9]+)$', views.detal, name="detal"),
    url(r'^(?P<question_id>[0-9]+)/result$', views.result, name="result"),
    url(r'^(?P<question_id>[0-9]+)/vote$', views.result, name="vote"),
    url(r'^sendemail/$', views.sendemail, name="sendemail"),
    url(r'^get_csv/$', views.get_csv, name="getcsv"),
    url(r'^upload_file/$', views.upload_file, name="upload_file"),

]
3 templates/app/upload_file.html中配置如下
<!DOCTYPE html>
<html lang="en">
<head>
    <meta charset="UTF-8">
    <title>上傳文件</title>
</head>
<body>
<form action="" method="post" ENCTYPE="multipart/form-data">
    <input type="file" name="file">
    <br/>
    <input type="submit" value="上傳文件">
</form>
</body>
</html>
4 結果如下
5 說明
-request.FILES
- enctype 默認是 "application/x-www-form-urlencoded",上傳文件時需要修改爲"multipart/form-data"
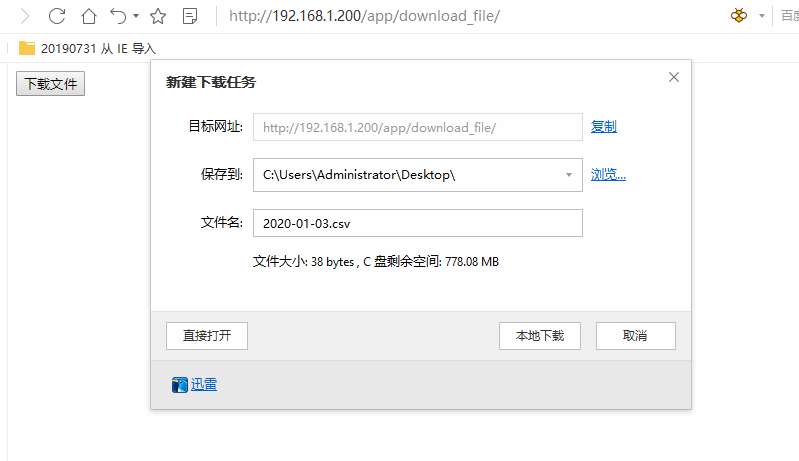
4 下載文件
1 app.views.py 中配置如下
def download_file(request):
    if request.method == "POST":
        f = open('/tmp/2020-01-03.csv', 'rb')
        response = HttpResponse(f, content_type="application/csv")
        response['Content-Disposition'] = 'attachment;filename={}.csv'.format(
            datetime.datetime.now().strftime("%Y-%m-%d"))
        f.close()
        return response
    else:
        return render(request, 'app/download_file.html')
2 app/urls.py中配置
from django.conf.urls import url, include
from . import views

app_name = "app"
urlpatterns = [
    url(r'^index/$', views.index, name="index"),
    url(r'^(?P<question_id>[0-9]+)$', views.detal, name="detal"),
    url(r'^(?P<question_id>[0-9]+)/result$', views.result, name="result"),
    url(r'^(?P<question_id>[0-9]+)/vote$', views.result, name="vote"),
    url(r'^sendemail/$', views.sendemail, name="sendemail"),
    url(r'^get_csv/$', views.get_csv, name="getcsv"),
    url(r'^upload_file/$', views.upload_file, name="upload_file"),
    url(r'^download_file/$', views.download_file, name="download_file"),

]
3 templates/app/download_file.html中配置如下
<!DOCTYPE html>
<html lang="en">
<head>
    <meta charset="UTF-8">
    <title>下載數據</title>
</head>
<body>
<form action="" method="post">
    <input type="submit" value="下載文件">
</form>
</body>
</html>